How to build a website for free
We provide a step-by-step guide on how to build a website for free, and publish it online, all without spending a pound

Previously, building a website used to be an expensive and arduous task, requiring the hiring of web developers, designers, back-end coders, and database experts. Additionally, businesses or individuals seeking a site would also have needed to pay for website hosting, email servers, and domain registration.
However, now you can build a website for free with the best website builders, and publish it yourself online without spending any money. The best builders enable you to design and edit an entire site without touching a line of code, and in this walkthrough, we'll take you through how to build a website for free, step-by-step.
Step 1: Understand your options
Even if you’re haven't got the budget to spend on a new website, you still have a few options. You could write every line of code yourself in a tool like Notepad++ or an IDE (Integrated Development Environment), like CoffeeCup HTML Editor. Then, you would upload your site to a free web hosting platform.
Some of the best free web hosting providers, including InfinityFree, ByetHost, and FreeHostingNoAds, won’t display any advertising on your site, but they do have other restrictions such as limited disk space. Consult our list of the best web hosting services too, to see if there are any cheaper but more secure options available.
If you don’t feel like writing every line of code, you can use an open-source content management system (CMS) like WordPress or Drupal. Install a free CMS on your free hosting, and you can upload your content without editing code.
A third option is a website builder. Sites like Wix, Constant Contact, GoDaddy, and Webnode all have modern editors to create websites, and only charge for domain names and advanced features.
Step 2: Choose your free website builder
If you take the free website builder route, you have many choices. Webnode has an advanced interface, but places a small ad on your site. Wix frequently tops website builder lists because of its unique features and great templates, but it also requires a small ad on free sites. Jimdo is easy to use, but limited in features.
Get the ITPro. daily newsletter
Receive our latest news, industry updates, featured resources and more. Sign up today to receive our FREE report on AI cyber crime & security - newly updated for 2024.
For this guide, we’ll use Weebly, another top website builder with a free tier. Weebly’s free plan requires no credit card details to sign up, and comes with 500MB of free storage and a free SSL certificate. However, you will be required to use a .weebly.com domain and display certain advertisements. If you do ultimately decide to upgrade to a paid plan, Weebly is one of the cheapest, starting at £4 a month.
Step 3: Sign up for your chosen website builder

First, sign up with your website builder. In our case, this entails heading to weebly.com, clicking on "Sign Up", and entering your full name, email address, and country. You also need to set a password for your account.
Step 4: Choose a template for your site

Weebly has a four-part website startup wizard. First, choose whether you want a standard website or an online store. You’ll be presented with a gallery of 55 themes to use as a template for your website. Choose a design that speaks to you, as you can always change the images and text later.
You’ll be shown a preview of your site. If you’re happy with the theme, hit "Start Editing".
Step 5: Set up a subdomain
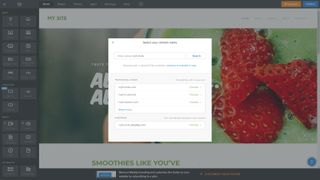
Weebly will ask you to connect a domain name. If you have your own domain name, you can transfer it to Weebly, or you can purchase one now. But as we’re creating a free website, we’ll use a Weebly subdomain instead.
Enter a name for your website and click "Search". Select the Weebly subdomain at the bottom of the list. In our example, we call the website myfruitsite, so it will be available to visitors at myfruitsite.weebly.com.
Step 6: Set your site’s colours and fonts
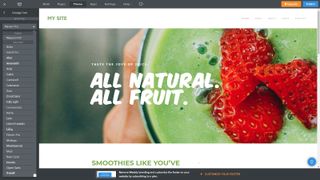
Click on "Theme" on Weebly’s top menu. Here, you can choose a different colour scheme for your website and edit the fonts. If you decide that you want a different theme completely, click "Change Theme" and choose a new option.
Step 7: Change images and text
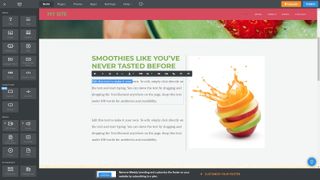
You can change any of the text and images on your website, simply by clicking on it. Text can be dragged and dropped anywhere on the page, and you can edit or replace images. Images can be cropped and adjusted, and there are several filters that you can apply.
Step 8: Change page elements
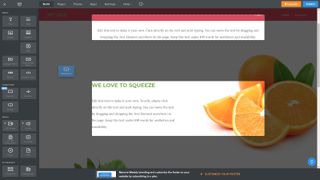
Besides editing the text and images, you can drag-and-drop rich elements onto your pages. Choose "Build" from the top menu. On the left-hand-side menu, there are over 30 elements that you can drag and drop onto pages. From YouTube videos and surveys to social icons and maps, you can use these to mould your site to your vision.
If you can’t find the exact feature that you need, you can add a custom HTML code element with the desired functionality.
Step 9: Add or remove pages
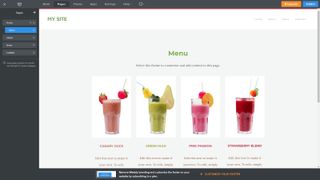
By clicking on "Pages" at the top of the screen, you can add, remove, and re-order the pages across your website. Whenever you make changes to your site’s pages, these are automatically reflected in the navigation menu.
If you drag a page label to the right, it becomes a sub-page. Sub-pages don’t appear in your site’s main navigation. Instead, they are linked from your main pages.
Step 10: Publish your website
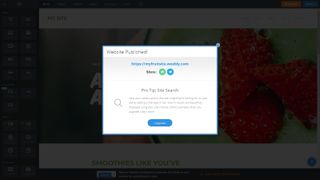
When you’re happy with your site, hit the blue "Publish" button at the top right. Your site will now be available for all to see. You can add a professional domain name later, but right now, your website will be available at the subdomain that you chose earlier.
How to build a website for free: Summary
You can easily build a website for free, but as your business grows, you’ll probably want to upgrade to a paid plan in order to gain access to more advanced features. Free web hosting usually has severe bandwidth limitations, as well as maximum file size and storage space restrictions.
In our opinion, one of the best ways to build a website for free is to use the free tier offered by website builders such as Wix, GoDaddy, or Weebly. This feature has shown you the steps to take to make a site for free on Weebly, but the process is roughly the same for all builders. Once the traffic begins to flow, you can upgrade to a paid plan to better meet the needs of your customers.
Further reading on website builders
Make sure to read our comparison feature pitting Wix vs Squarespace vs Weebly: and if you're just starting out with website building, follow our step-by-step guide on how to build a website from scratch. Read our interview with Wix's Head Product Manager Michal Bignitz; learn how to build a website on Wix and how to build a website with Shopify, and take a look at how to build an ecommerce website. It's also worth looking at the best web hosting services, in case you have more advanced web experience and want a more customizable site creation process.
Richard brings more than 20 years of computer science, full-stack development and business operations experience to ITPro. A graduate in Computer Science and former IT support manager at Samsung, Richard has taught courses in Java, PHP and Perl, and developed software for both private businesses and state organisations. A prolific author in B2B and B2C tech, Richard has written material for Samsung, TechRadar Pro, and now ITPro.


