Windows 10 starts up so much more quickly than older versions of Windows that tapping F8 is no longer a reliable way to access Safe Mode. You can still launch Safe Mode in a number of other ways, but they're clunky and, more importantly, are performed once Windows has already loaded, which isn't helpful if your PC won't start.
In this tutorial, we show you how to configure your boot menu so that options for Safe Mode (or indeed 'Safe Mode with Networking' or 'Safe Mode with Command Prompt') are available whenever you start your PC. You add each boot entry using a simple command line in Command Prompt, then configure it using System Configuration. By default, your PC gives you 30 seconds to choose a boot option, but you can make it shorter to avoid slowing your PC's boot time.
If you have only one operating system installed, adding a Safe Mode option also lets you access advanced tools such as Windows 10's troubleshooting menu when you start your PC.
Step 1

Click the Start button and type cmd. Right-click Command Prompt and select 'Run as administrator' and Yes. In the console, type , where "Windows 10 Safe Mode" is the name of your new boot entry. Then press Enter.

Step 2
To add entries for 'Safe Mode with Networking' or 'Safe Mode with Command Prompt', repeat Step 1, changing only the title to describe these functions so, for example: bcdedit /copy {current} /d "Windows 10 Safe Mode with Networking"

Step 3
To alter your new boot entries so they perform the appropriate function (instead of the standard boot procedure), click Start, type msconfig and open System Configuration. From the Boot tab, select the entry for 'Windows 10 Safe Mode' and tick the box for 'Safe boot'.

Step 4
Leave the Minimal option selected for this entry and tick the box for 'Make all boot settings permanent' before clicking Apply and Yes. Windows will warn you that the changes are permanent, but don't worry about this, because we show you how to undo them in Step 8.

Step 5
To set 'Safe Mode with Networking', follow the same steps, choosing Network instead of Minimal. To configure 'Safe Mode with Command Prompt', select its entry, tick the box to 'Make all boot settings permanent' and then select 'Safe boot' and 'Alternate shell' before clicking Apply.

Step 6
By default, you're given 30 seconds to choose one of your boot entries on startup. You can change this to a time of your choice by changing the Timeout figure and then clicking Apply. Setting Timeout to 1 keeps all the options on screen until you pick one.

Step 7
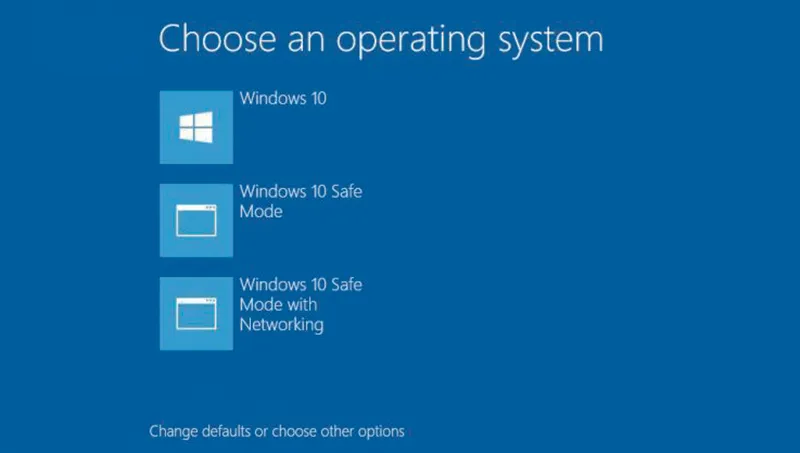
Once you've completed your configuration, click OK and you'll be asked if you're happy to Restart your PC. Select Restart and your new boot menu will appear on screen. Use your mouse or the Tab key to select the option you want, then press Enter to proceed.

Step 8
From the same menu, you can choose 'Change defaults or choose other options'. Selecting this lets you change the timeout length and default boot entry. Clicking the Choose other options' button lets you access Windows 10's troubleshooting tools or boot from a USB device or DVD.

Step 9
If you decide you want to delete your boot entries, type msconfig into the Start menu and run System Configuration again. From the boot menu, select the boot entry you want to remove and click Delete. When you click Apply and OK, Windows invites you to restart your PC again.
Step 10
If you delete all your custom boot entries, your computer will boot straight to Windows 10, as before. Make sure you never delete the option marked 'Current OS' because that would render your PC unable to boot into Windows.

Expert Tip
If you run more than one operating system on your PC, you can access Safe Mode by reinstating the Windows 'legacy boot menu' (and tapping F8 when it loads). To do this, run the following command line in an elevated command prompt: . To undo the change, enter: bcdedit /set {default} bootmenupolicy legacy. To undo the change, enter: bcdedit /set {default} bootmenupolicy standard