How to start page numbering from a specific page in Microsoft Word
Learn how to start page numbering from a specific page in Microsoft Word and give your documents a professional edge


Effectively managing page numbers in Microsoft Word is essential for creating polished, well-organized documents. This is particularly important for academic papers, business reports, dissertations, and other formal documents that often include preliminary sections such as cover pages, abstracts, or tables of contents. In these cases, standard formatting guidelines frequently require that page numbering begins only after these introductory sections, ensuring that the main content is distinguished and easy to navigate.
By default, Microsoft Word assigns page numbers to every page in a document, starting from the very first page. While this approach works for simple documents, it can be problematic when you need to exclude certain sections, such as title pages, acknowledgments, or executive summaries, from the page count. Failing to adjust the numbering can result in confusion, disrupt the flow of information, and violate formatting standards set by academic institutions or professional organizations.
Customizing where page numbers begin not only enhances the readability and logical flow of your document but also demonstrates attention to detail and adherence to formatting conventions. This adjustment helps readers quickly locate key sections, reinforces the document’s structure, and projects a higher level of professionalism.
In the following guide, you’ll find step-by-step instructions for setting up section breaks and customizing page numbering in Microsoft Word. These preparatory steps will help you achieve a clean and organized appearance, ensuring your document meets the expectations of your intended audience.
How to start page numbering from a specific page in Microsoft Word
Step 1: Prepare your document

To start page numbering from a specific page in Microsoft Word, you’ll first need to separate your document into distinct sections. Section breaks give you precise control over where page numbering begins, making it easy to leave preliminary pages, such as the title page or table of contents, without numbers.
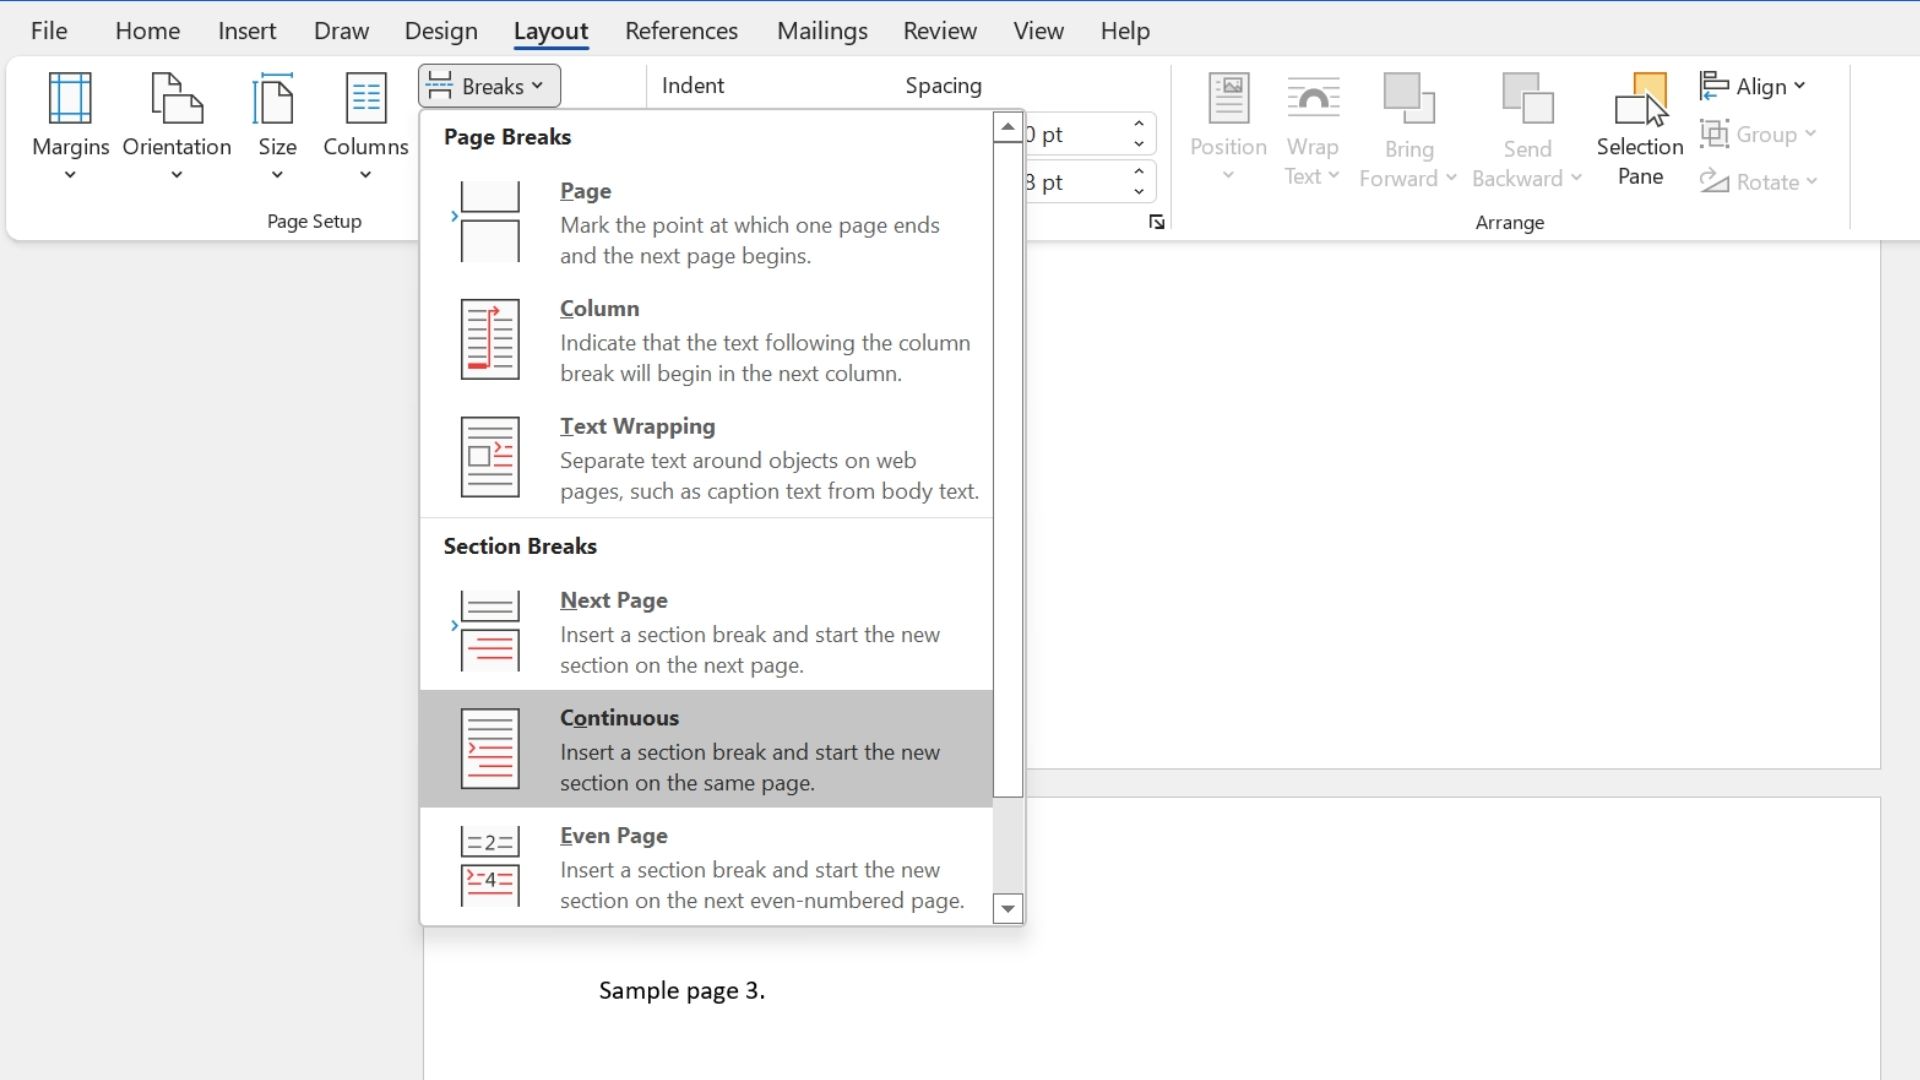
Begin by scrolling to the page where you want the numbering to start. Go to the Layout tab in the ribbon at the top of your screen to access formatting tools.
Click on the Breaks dropdown menu. Here, you’ll see several options for section breaks. In most situations, Next Page is the ideal choice, as it creates a new section that begins on the following page. If you want to keep the content flowing on the same page but still create a new section, select Continuous instead.
After you insert a section break, your document will be split into two parts:
Sign up today and you will receive a free copy of our Future Focus 2025 report - the leading guidance on AI, cybersecurity and other IT challenges as per 700+ senior executives
This step is essential because it clearly separates the unnumbered introductory pages from the main content, allowing you to customize your document’s layout to meet professional or academic standards.
Step 2: Insert page numbers
The next step is to add page numbers to your document. Navigate to the Insert tab on the ribbon at the top of the screen, then locate the Header & Footer group. Click on the Page Number dropdown menu to see your options.
You can choose where to position the page numbers, whether at the top of the page, the bottom, or within the margins. Once you select your preferred location, you’ll also have the option to choose a style, including alignment, bold formatting, brackets, and other design features.
At this point, the page numbers will be inserted throughout the entire document. However, you will customize which sections display the numbering in the upcoming steps.
Step 3: Deselect the Link to Previous option

The next step is to disconnect page numbering between the sections you’ve created. To do this, double-click in the header, footer, or margin area on any page within the section where you want page numbering to begin; this depends on where you previously placed your page numbers. This action will open the Header & Footer Tools tab in the ribbon, providing additional options.
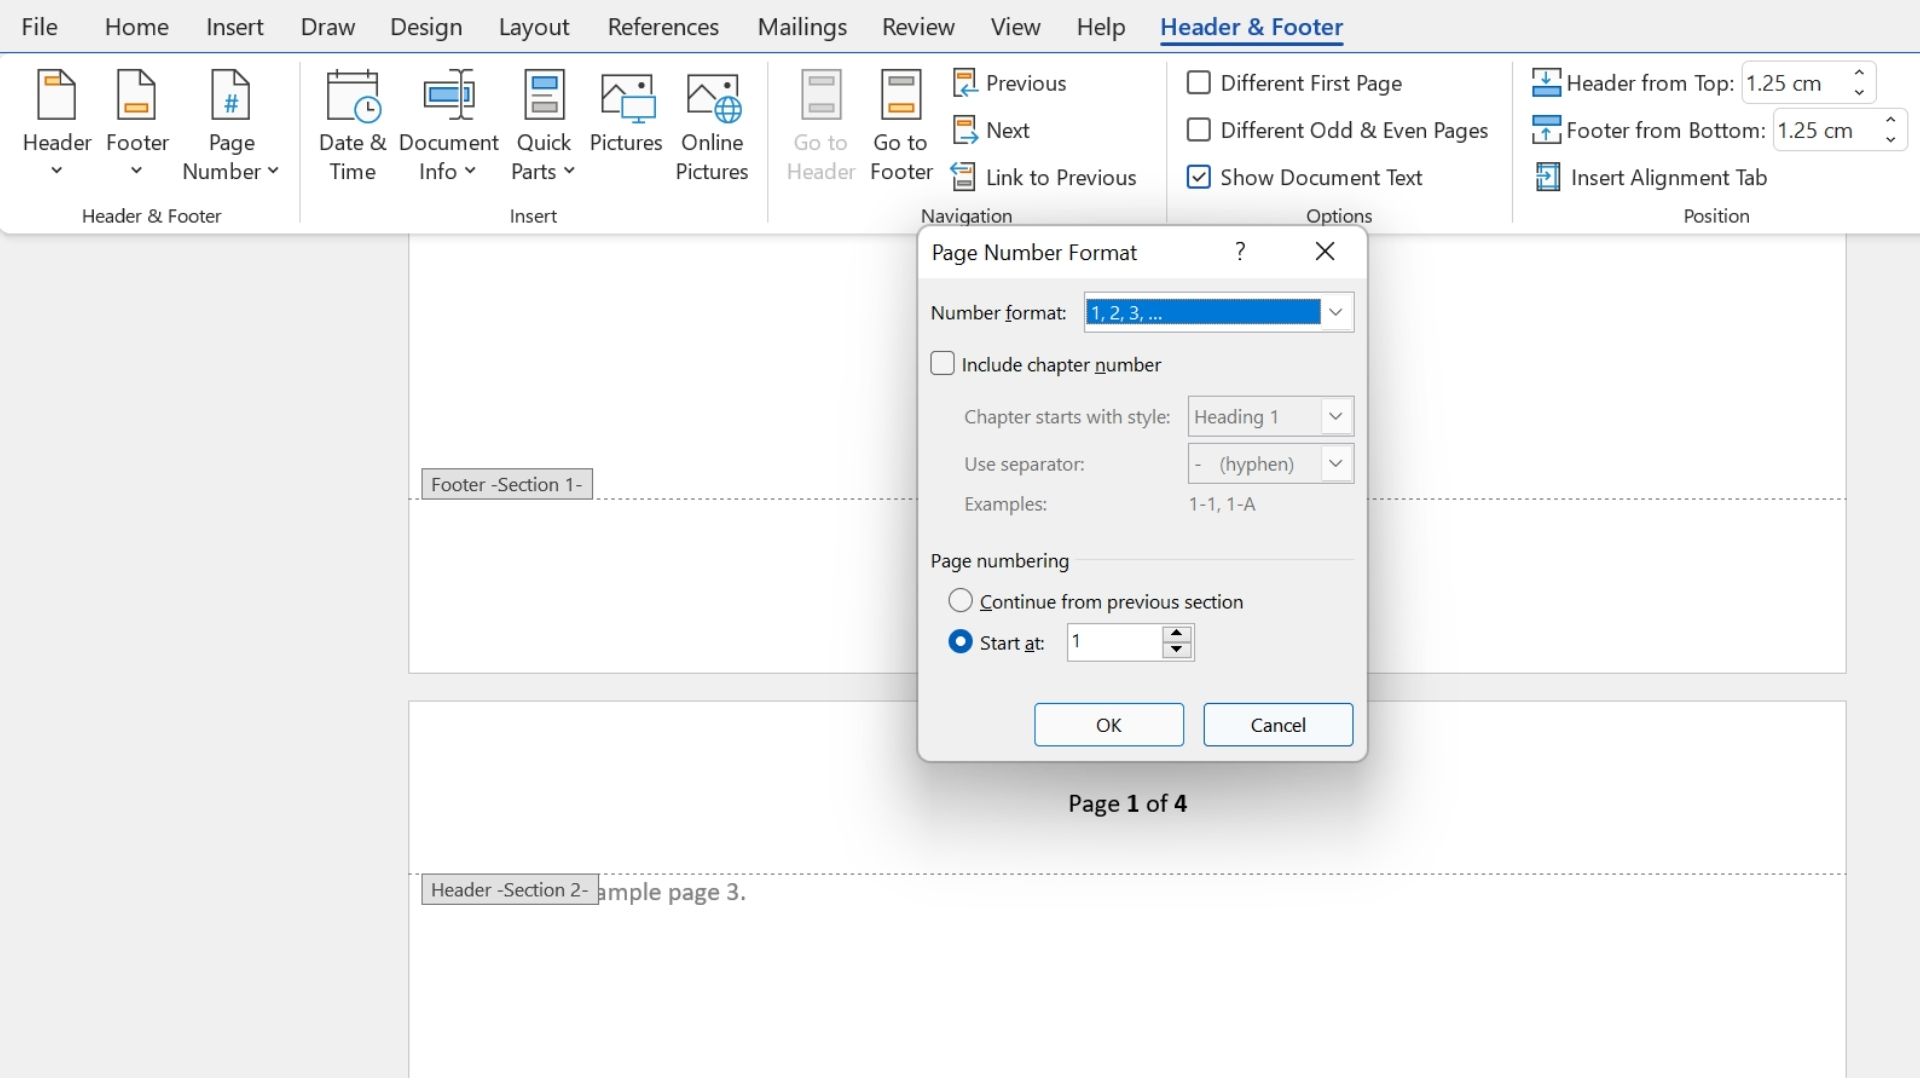
Within the Navigation group of this tab, locate the Link to Previous button. By default, this option is enabled, which means your new section is connected to the previous one and shares the same header, footer, and page numbering format. Click Link to Previous to turn it off. When disabled, this breaks the connection between the current section and the preceding one, allowing you to independently control page numbering in each section.
This step is crucial: it ensures that any changes to page numbers in your new section, such as starting from a specific number, will not affect the earlier, unnumbered pages.
Step 4: Choose a number to start page numbering

With the sections now unlinked, you can control exactly where page numbering begins in your document. While Word typically numbers all pages consecutively, formal documents like academic papers or reports often require numbering to start at 1 on a later page, rather than continuing from the total page count.
To do this, place your cursor anywhere in the section where you want numbering to begin. Open the Insert tab and navigate to the Header & Footer section, or double-click in the header, footer, or margin area to activate the Header & Footer ribbon.
Next, click the Page Number dropdown and select Format Page Numbers. In the dialog box, find the Start at field and enter your desired starting number, usually 1. Click OK to apply your changes.
This will start page numbering from your chosen section, leaving previous pages unnumbered and ensuring your document meets formal formatting requirements.
Step 5: Remove page numbering from the first section
The final step is to remove page numbers from sections that should remain unnumbered, such as the cover page or table of contents.
To do this, click anywhere within the section you want to keep free of page numbers — usually the first few pages of your document. Then, open the Header & Footer tab and click the Page Number dropdown
Because you previously unlinked the sections, this change will only apply to the selected section, leaving it without page numbers while preserving numbering in the rest of your document starting from the page you specified.
Step 6 (optional): Change the page number format
If you need to use a different page number format, such as Roman numerals for introductory sections or letters for appendices, you can easily adjust this in Microsoft Word.
To change the format, navigate to the Insert tab and open the Header & Footer section. Click on the Page Number dropdown menu and select Format Page Numbers. In the Format Page Numbers dialog box, you’ll find a Number format dropdown at the top. This allows you to choose from several options, including Roman numerals (I, II, III) or letters (A, B, C).
If you’re working on a formal document, such as a dissertation or a report, you might want to apply Roman numerals for the front matter (e.g., i, ii, iii for the introduction and table of contents) and switch to standard Arabic numbers (1, 2, 3) for the main content. You can achieve this by inserting section breaks, unlinking sections, and setting the format separately for each section.
Once you've selected the desired format, click OK to apply the changes. The updated numbering will now reflect the chosen style.
Troubleshooting Common Page Numbering Issues
Even with a careful approach, Word’s section-based formatting can sometimes produce unexpected results. If your page numbers aren't behaving, here are the fixes for the most common problems.
The Essential Diagnostic Tool: Show/Hide 
Before you begin, go to the Home tab and click the Show/Hide (¶) button. This reveals all hidden formatting marks, including page breaks and, most importantly, Section Breaks. Seeing where your breaks are is the first step to fixing any issue.
Problem: I deleted the page number on my title page, and it disappeared from the entire document.
Problem: My numbering starts over at "1" in the middle of my document.
Problem: I followed the steps, but the page number on the very first page (page 1) won't go away.
Problem: I can't get the numbering to start on a new page; it just continues on the same page.
Customizing your page number appearance
Once you've set up page numbering, you can further refine its appearance to match the overall style and formatting of your document. Microsoft Word provides various customization options to help create a polished, professional look. Whether you need to adjust the font, size, alignment, or apply formatting effects, these tweaks can enhance readability and ensure consistency with the rest of your content.
Changing font and size
To modify the font or size of your page numbers, double-click on the header, footer, or margin where they appear.
This will activate the Header & Footer Tools. Highlight the page number, then go to the Home tab, where you can choose a different font, resize the text, or apply formatting options such as bold, italics, or underlining to match the rest of your document.
Applying text effects
For additional styling, Word allows you to apply effects like shadows, outlines, or reflections to your page numbers.
With the page number selected, open the Format tab under Drawing Tools (which appears when a text box is selected). Click on Text Effects to explore different visual enhancements, which can add a professional touch to reports, creative projects, or business documents.
Adjusting alignment
To change the placement of your page numbers, such as centering them at the bottom of the page or aligning them to the right, select the page number and navigate to the Paragraph section in the Home tab.
From there, choose the appropriate alignment option to ensure consistency across your document and improve readability.
By taking the time to customize the appearance of your page numbers, you can enhance the overall visual appeal of your document, ensuring it meets both your aesthetic preferences and professional standards.
Starting page numbering from a specific page can greatly enhance the readability of your document, especially when dealing with academic or professional papers. This approach ensures that only relevant sections are numbered, improving clarity and organization.
Although it typically takes just a few minutes, adjusting section and page number settings can become complex. Therefore, we recommend dividing your document into sections before you start. This preparation simplifies the process and prevents potential issues.
Once the sections are created, you can easily set the starting point and format for page numbering in the desired section. This approach allows you to manage your document more efficiently by ensuring that unnecessary numbering is omitted from the initial section.
You can further advance your Microsoft Office knowledge by reading our guides on:
- How to use the Microsoft Office Ribbon
- How to insert a tick or a cross symbol in Microsoft Word and Excel
- How to insert and edit footnotes in Microsoft Word
Rene Millman is a freelance writer and broadcaster who covers cybersecurity, AI, IoT, and the cloud. He also works as a contributing analyst at GigaOm and has previously worked as an analyst for Gartner covering the infrastructure market. He has made numerous television appearances to give his views and expertise on technology trends and companies that affect and shape our lives. You can follow Rene Millman on Twitter.
