How to migrate your SMB network to the cloud
Make your migration as painless as possible with our handy guide

Andrew Webb
Sign up today and you will receive a free copy of our Future Focus 2025 report - the leading guidance on AI, cybersecurity and other IT challenges as per 700+ senior executives
You are now subscribed
Your newsletter sign-up was successful
So, the time has finally come. You migrated the office email to the cloud and the Exchange servers now sit forlorn in the corner of the IT room, collecting dust and half-finished cups of coffee. Then you moved the files to the cloud, and listened to the whine of the file server’s disk array fade away for the last time.
But the domain controller is still there in the rack, the last beacon of hum amongst the windowless desolation of loose carpet tiles and unidentifiable cables that is the server room. All that shiny new cloud infrastructure depends on this last server, home to your Active Directory and the photos of the 2008 office party. It’s time to migrate this vestige to the cloud as well and let silence fall in the server room.
Starting point
In this tutorial, we’ll be looking at a small business setup, comprising a single server running ESXi, hosting a single Windows Server 2012r2 virtual machine which is acting as domain controller and file server, and a firewall/router capable of maintaining an IPSec VPN link to the cloud. The ESXi box needs enough spare disk space to install the Azure Site Recovery (ASR) appliance image to handle the migration. We will be using a PFSense firewall, but any decent business firewall/router should be OK, such as Cisco ASA, Checkpoint, Sonicwall and so on.
We'll be using Microsoft Azure for this tutorial: the specifics of the migration process vary between various cloud providers, so you'll also need to use Azure. We assume for the purposes of this tutorial that you've already created an Azure account, chosen a region and set up a resource group. Whilst this can be done in almost all Azure regions, you need to set everything up in the same region for this to work.
Our starting network is laid out as follows:
| Subnet - 10.10.12.0/24Server - 10.10.12.50Firewall - 10.10.12.10DHCP range - 10.10.12.100-200ESXi server 10.10.12.5Domain - smeoffice.local |
Step 1: Virtual network setup
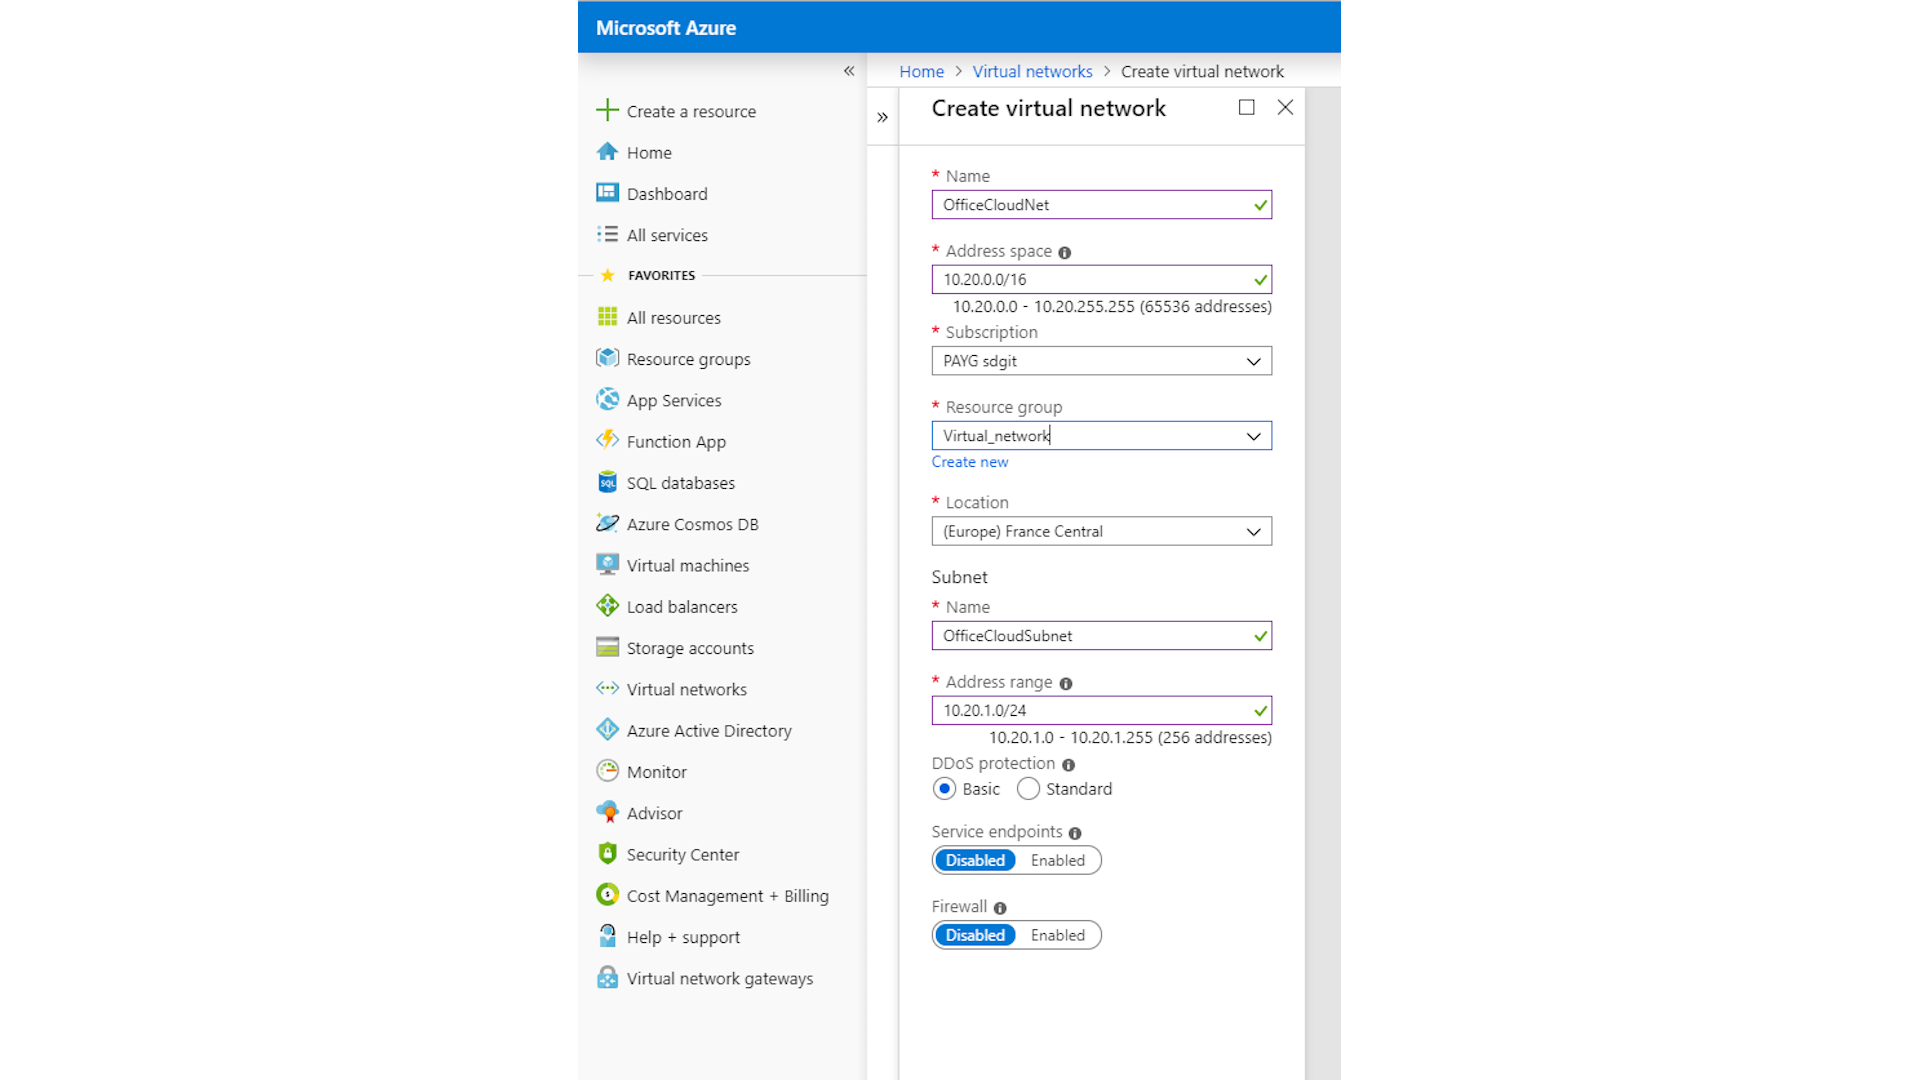
The first thing to do is to set up a virtual network for the cloud server to connect to. In the Azure portal, click on “Create a resource” at the top of the left hand menu bar, and then select the Networking category and choose Virtual network from the top of the right hand menu. Choose an address space, and a subnet within it, and select the appropriate resource group from the pull-down menu. We used 10.20.0.0/16 for the address space, and 10.20.1.0/24 for the subnet.
Step 2: Set up a Virtual Network Gateway for the cloud network
Next, we need to set up a Virtual Network Gateway for the cloud subnet. This will act as the cloud end of a VPN tunnel from the office to the cloud subnet. Go back to the Azure portal home screen using the menu on the left, and click on “Create a resource” again. Type “Virtual network gateway” into the search box and select it from the drop-down menu.
Sign up today and you will receive a free copy of our Future Focus 2025 report - the leading guidance on AI, cybersecurity and other IT challenges as per 700+ senior executives
Click on Create, then give the gateway a name. There are several types of VPN gateway available, with different pricing models. We’ll be using the basic, cheapest option. Select this from the drop-down SKU menu, then select the virtual network we just created from the Virtual network dropdown menu. Enter a name for the public IP address and leave everything else on the defaults.
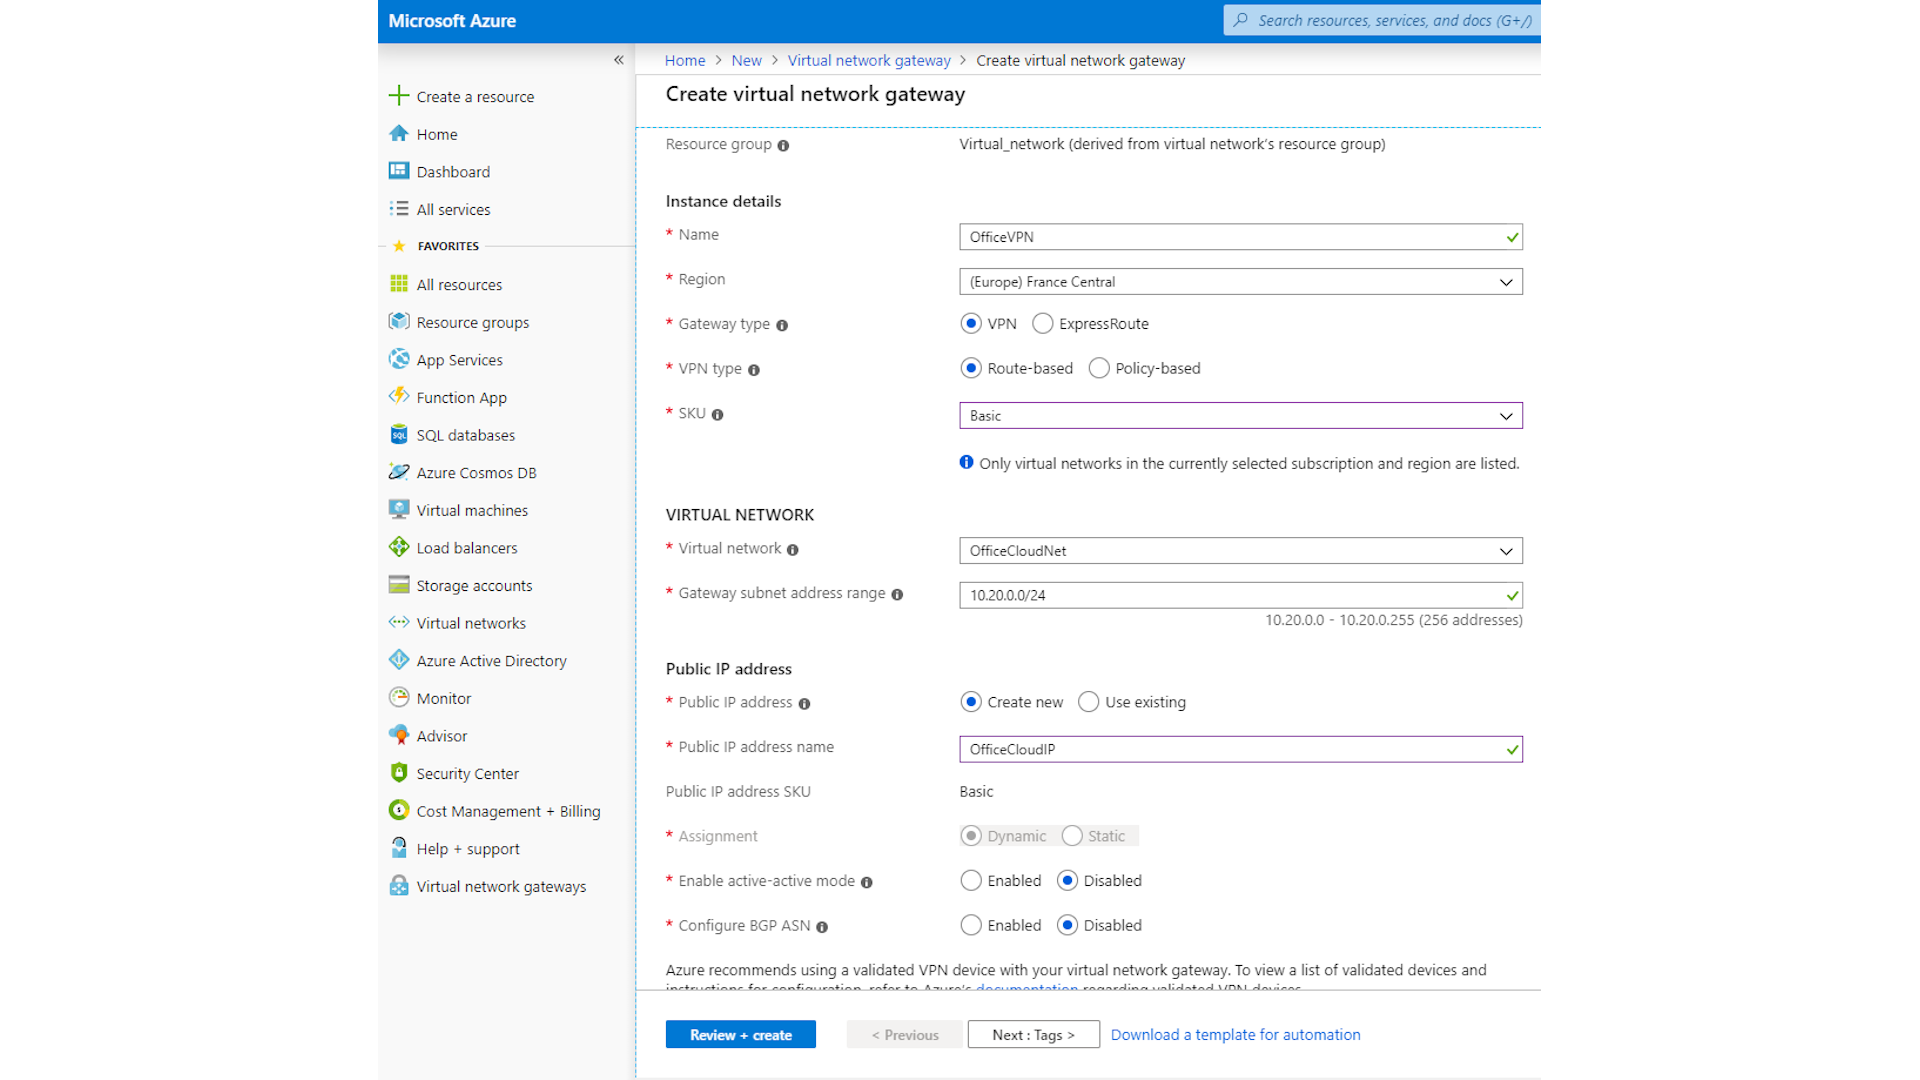
Now click on Review + create at the bottom of the page. If everything looks OK on the next page, hit the Create button at the bottom of the page. This deployment may take a while, so now is a good time to make a cup of coffee or write a novel.
Step 3: Create a local network gateway
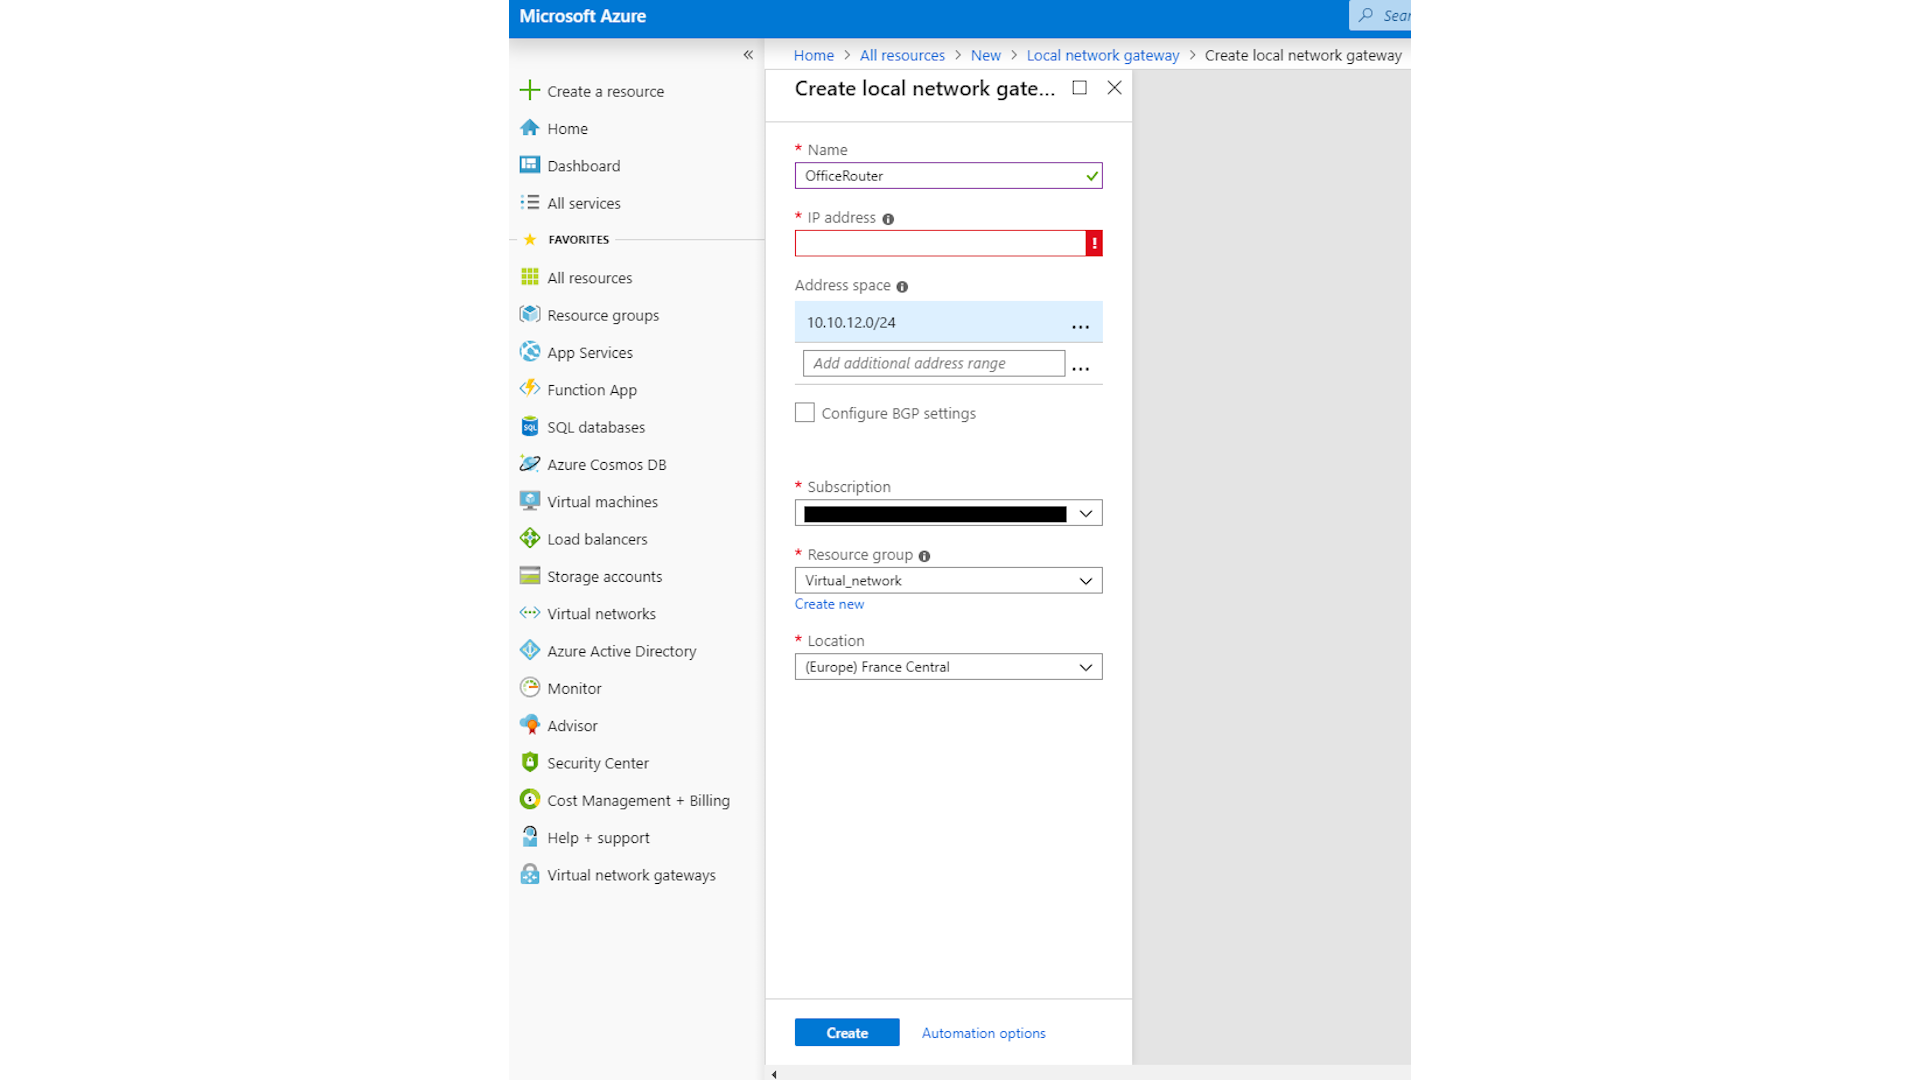
Now we need to create a local network gateway in Azure to represent your office firewall or router. Click on Create a resource, type “local network gateway" into the search bar and select it from the menu as before.
Click on Create, then give it a name and fill in the office subnet details and the public IP address of the firewall. Select the appropriate subscription and resource group, then click on create.
Step 4: Create a site-to-site VPN from the office to the cloud subnet
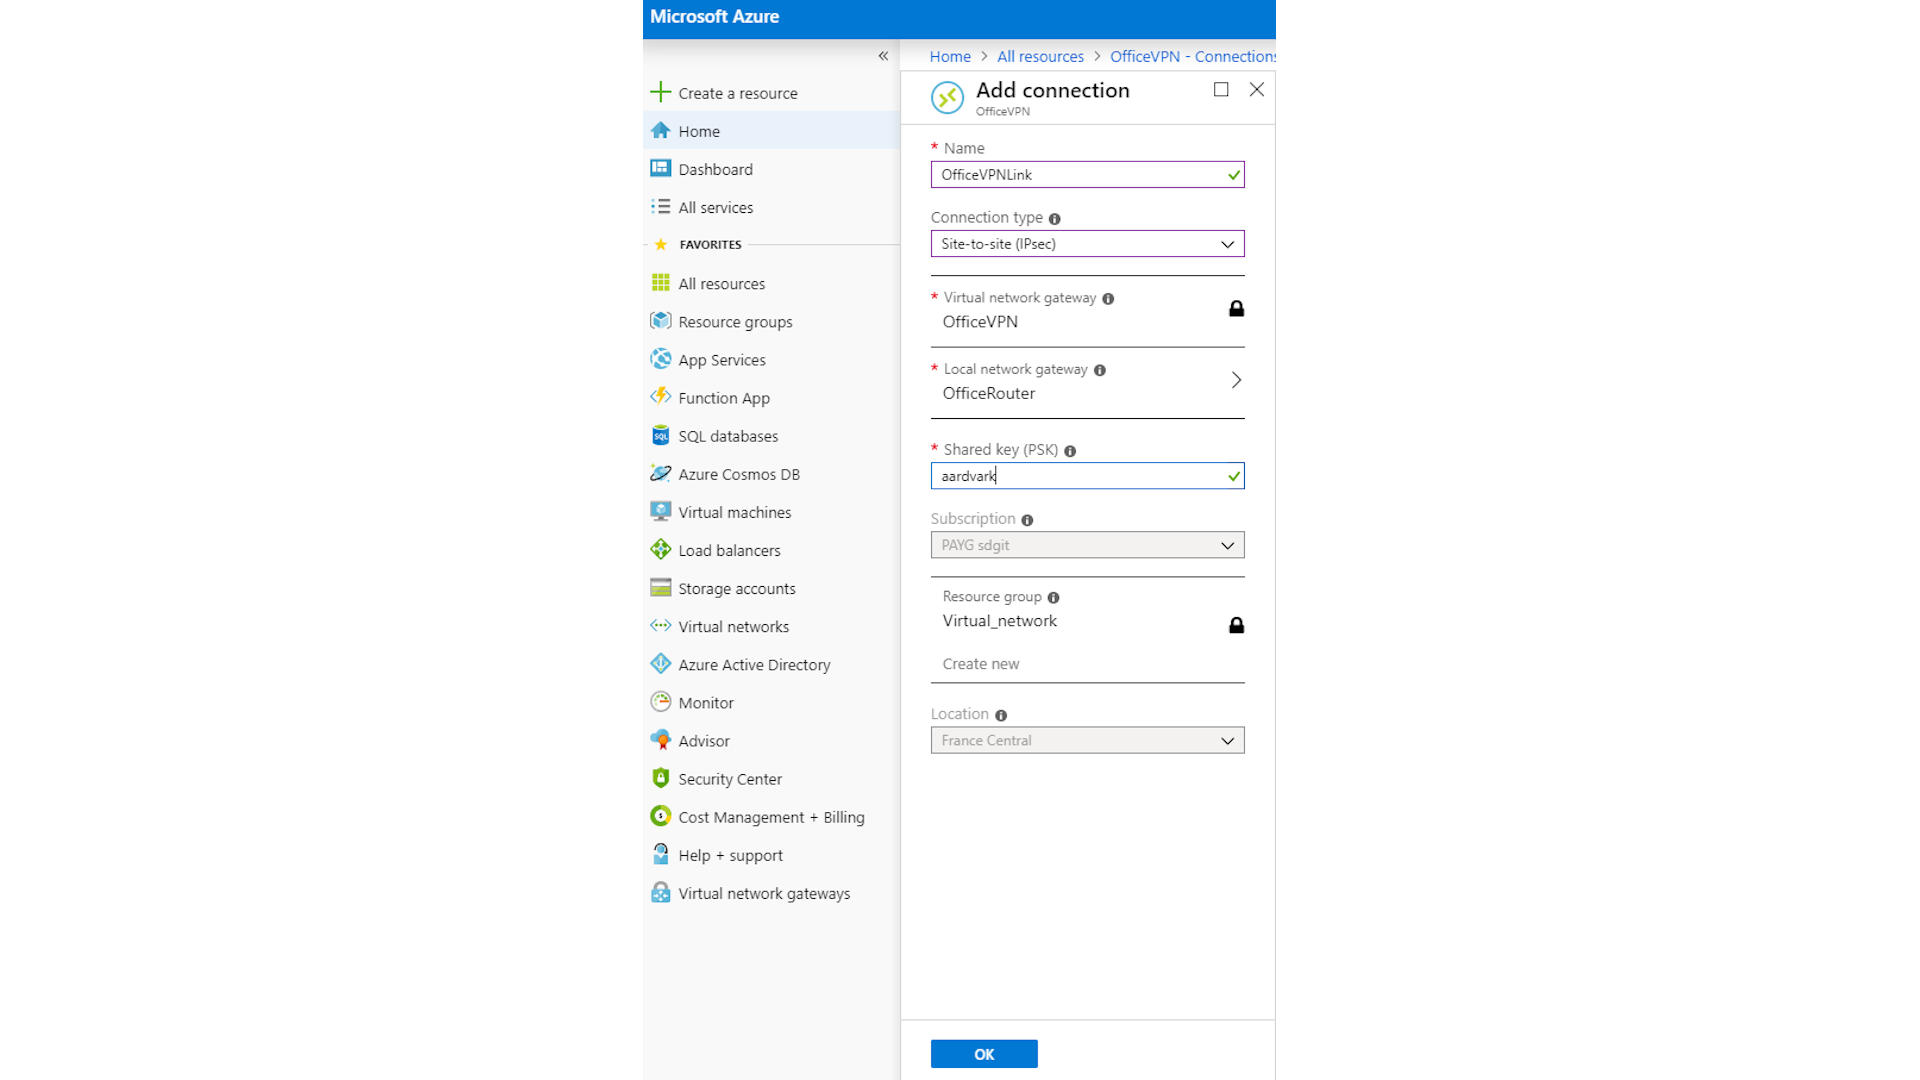
We can now create the VPN link between the new cloud subnet and the existing office subnet. Select all resources from the left hand menu, then locate your virtual network gateway on the list and select it. Click on connections, then on the add button.
Name your connection, and select site-to-site from the drop-down connection type menu. Select your local gateway from the list, and provide a shared key for the VPN. Now click OK.
Now we just need to configure the office end of this VPN on your office firewall or router. Don’t forget to add appropriate firewall rules to allow traffic across the link between your office and the cloud subnet.
Step 5: Set up a recovery services vault
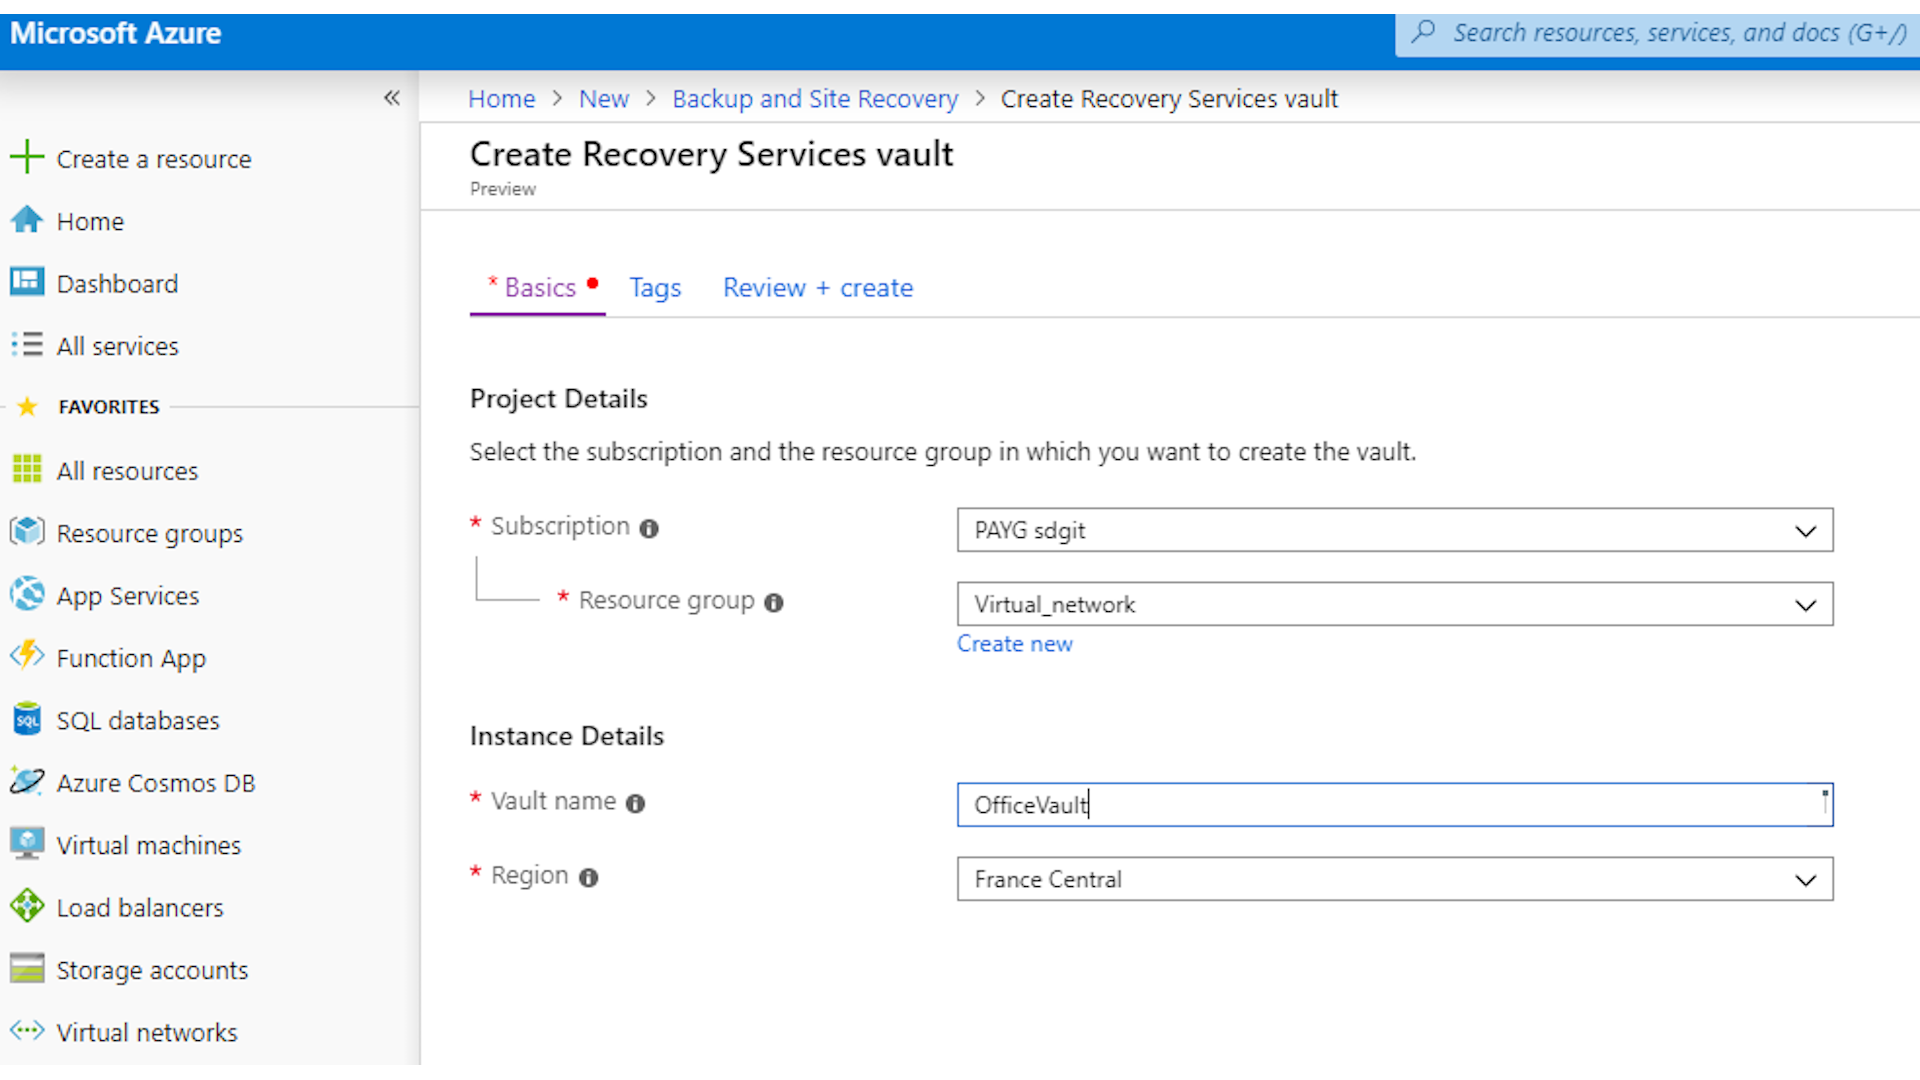
In the Azure portal, click on create a resource again, then type "recovery" into the search box. Select backup and site recovery from the list, then click on create. Name your recovery services vault and select the appropriate resource group and region, then click on review + create. Check the details and click on create.
Step 6: Configure the vault and deploy the site recovery server image
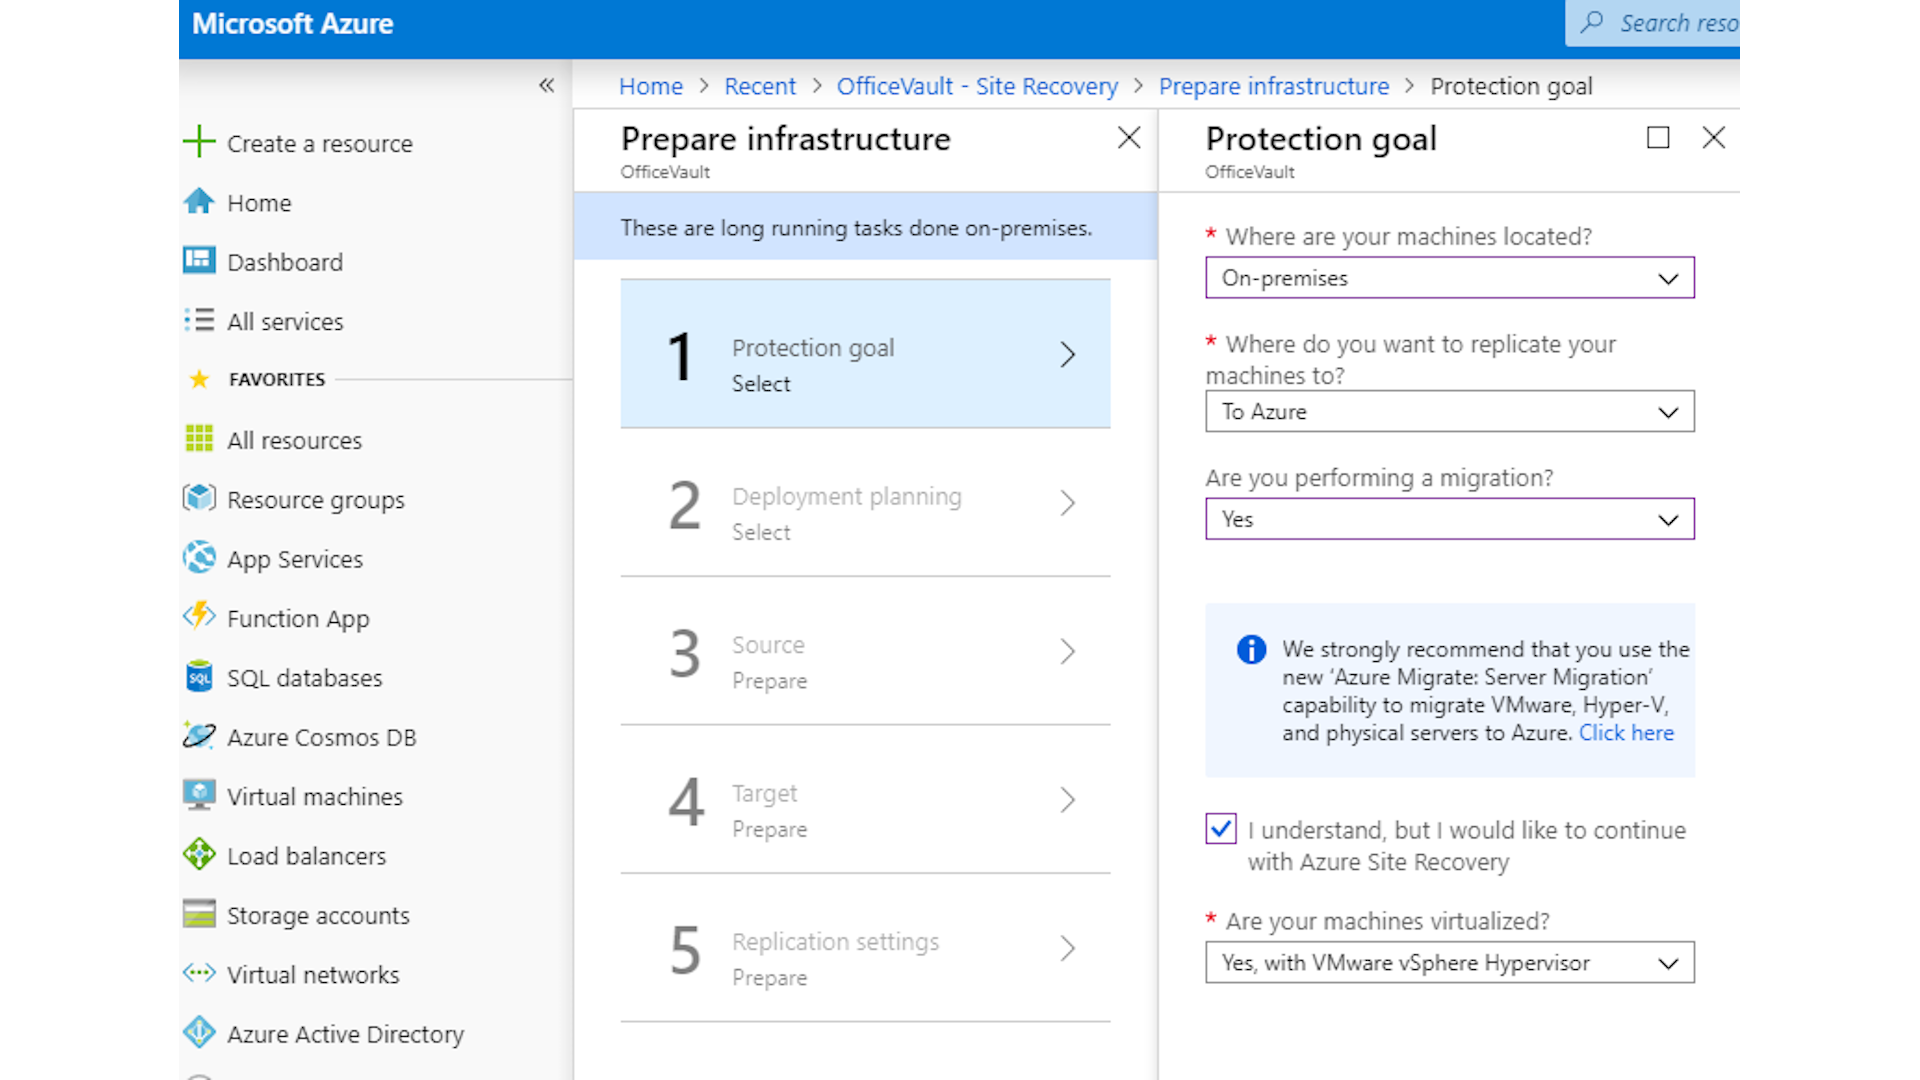
From the list of resources, select the vault we just created. Click on getting started in the site recovery column on the overview screen. Now click on prepare infrastructure. Answer the protection goal questions. You’ll be prompted to use Azure Migrate instead.
Right now, we still recommend using Azure Site Recovery (ASR) for this process, as Azure Migrate v2, released in July 2019, is still relatively new and a wider range of support and information resources are available for ASR if you encounter any snags or have any unusual use cases. Tick the box to bypass Migrate, answer the last question and click on OK.
Next is the deployment planner. Whilst Microsoft recommends running this tool, it's largely designed to calculate the required bandwidth for regular replication of your on-site systems to Azure. As we'll be using this for a one-off migration, you can safely skip this step. Select “I will do it later” from the menu and click OK to move on to the next stage.
Click on the add configuration server button, make sure that the server type is for VMware, then download the virtual machine template and import it into your ESXi server. It’s quite large so the download will take a while. The virtual machine image requires about 50GB of disk space on the ESX server to install.
Once the import is complete and the virtual machine has booted, connect to its console and accept the license terms, then on the next screen set a password for the local administrator account. You can allocate a static IP to this server at this point if you wish, but as it will only be required for a short time, it isn’t really necessary.
Log in to the console of the ASR server using the password you just set. The ASR setup wizard will start, but before proceeding with that, open server manager and disable IE ESC, as it will cause irritation later in the process.
Step 7: ASR server configuration
Now you can move on to the ASR setup wizard. First, you need to set a name for this server to identify it in your Azure portal, then provide your Azure portal login so that the ASR server can register itself with Azure.
If you have a multi-tenancy Azure setup, then you should provide an account associated with the target tenant, but if you have only the default tenant set up then you can use your root account login. Once the wizard has completed, the server will register itself with Azure, then reboot.
Log in again and wait for the browser to open and display the ASR management page. Select the network interfaces for communication with the on-premises systems, and with Azure. As there is only one subnet in our office network, there is only one interface to choose. You can safely ignore the warning about using a dynamic IP, as this server is not going to be around for very long.
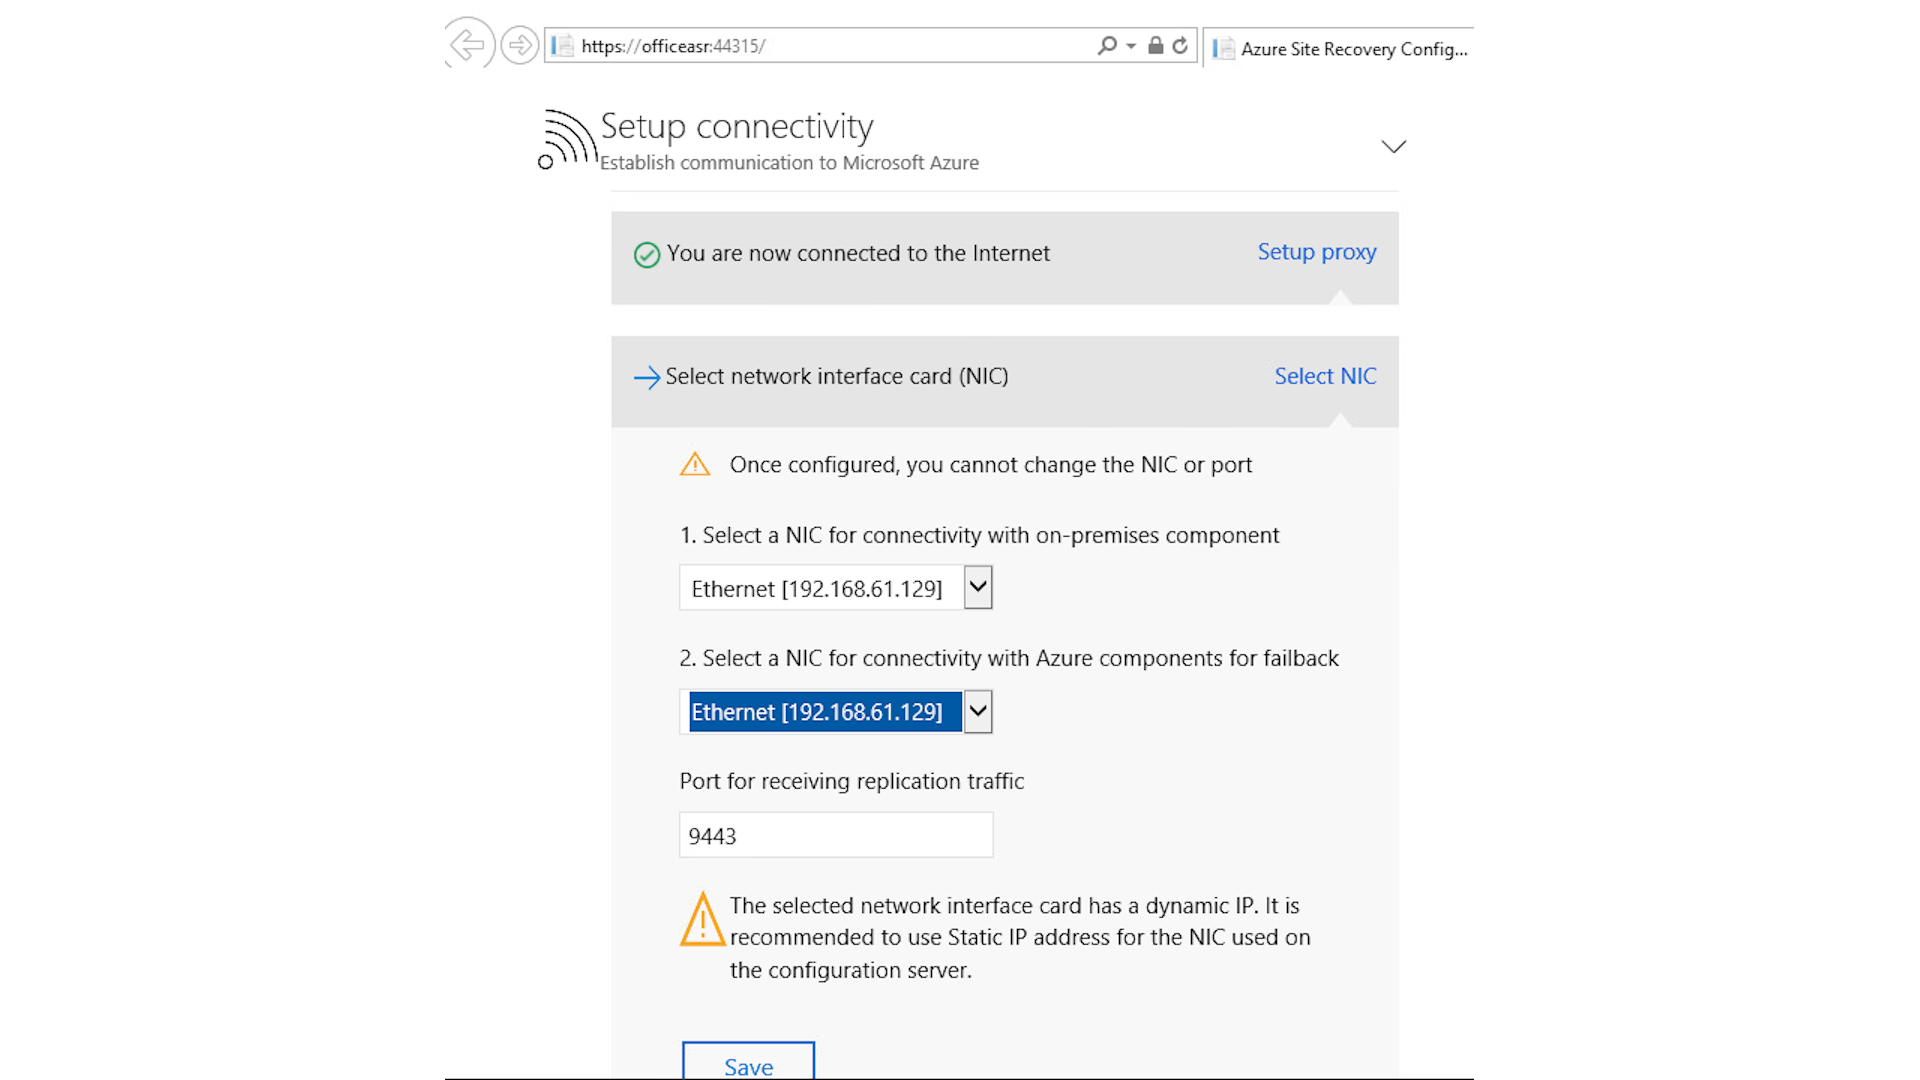
Save these settings, then click on continue to move on to the next page. Here, click on the sign-in link for Azure and tick the box to grant it the required permissions, then select the appropriate subscription and resource group, and the recovery services vault we created in step 5. Click continue to move on to the next stage.
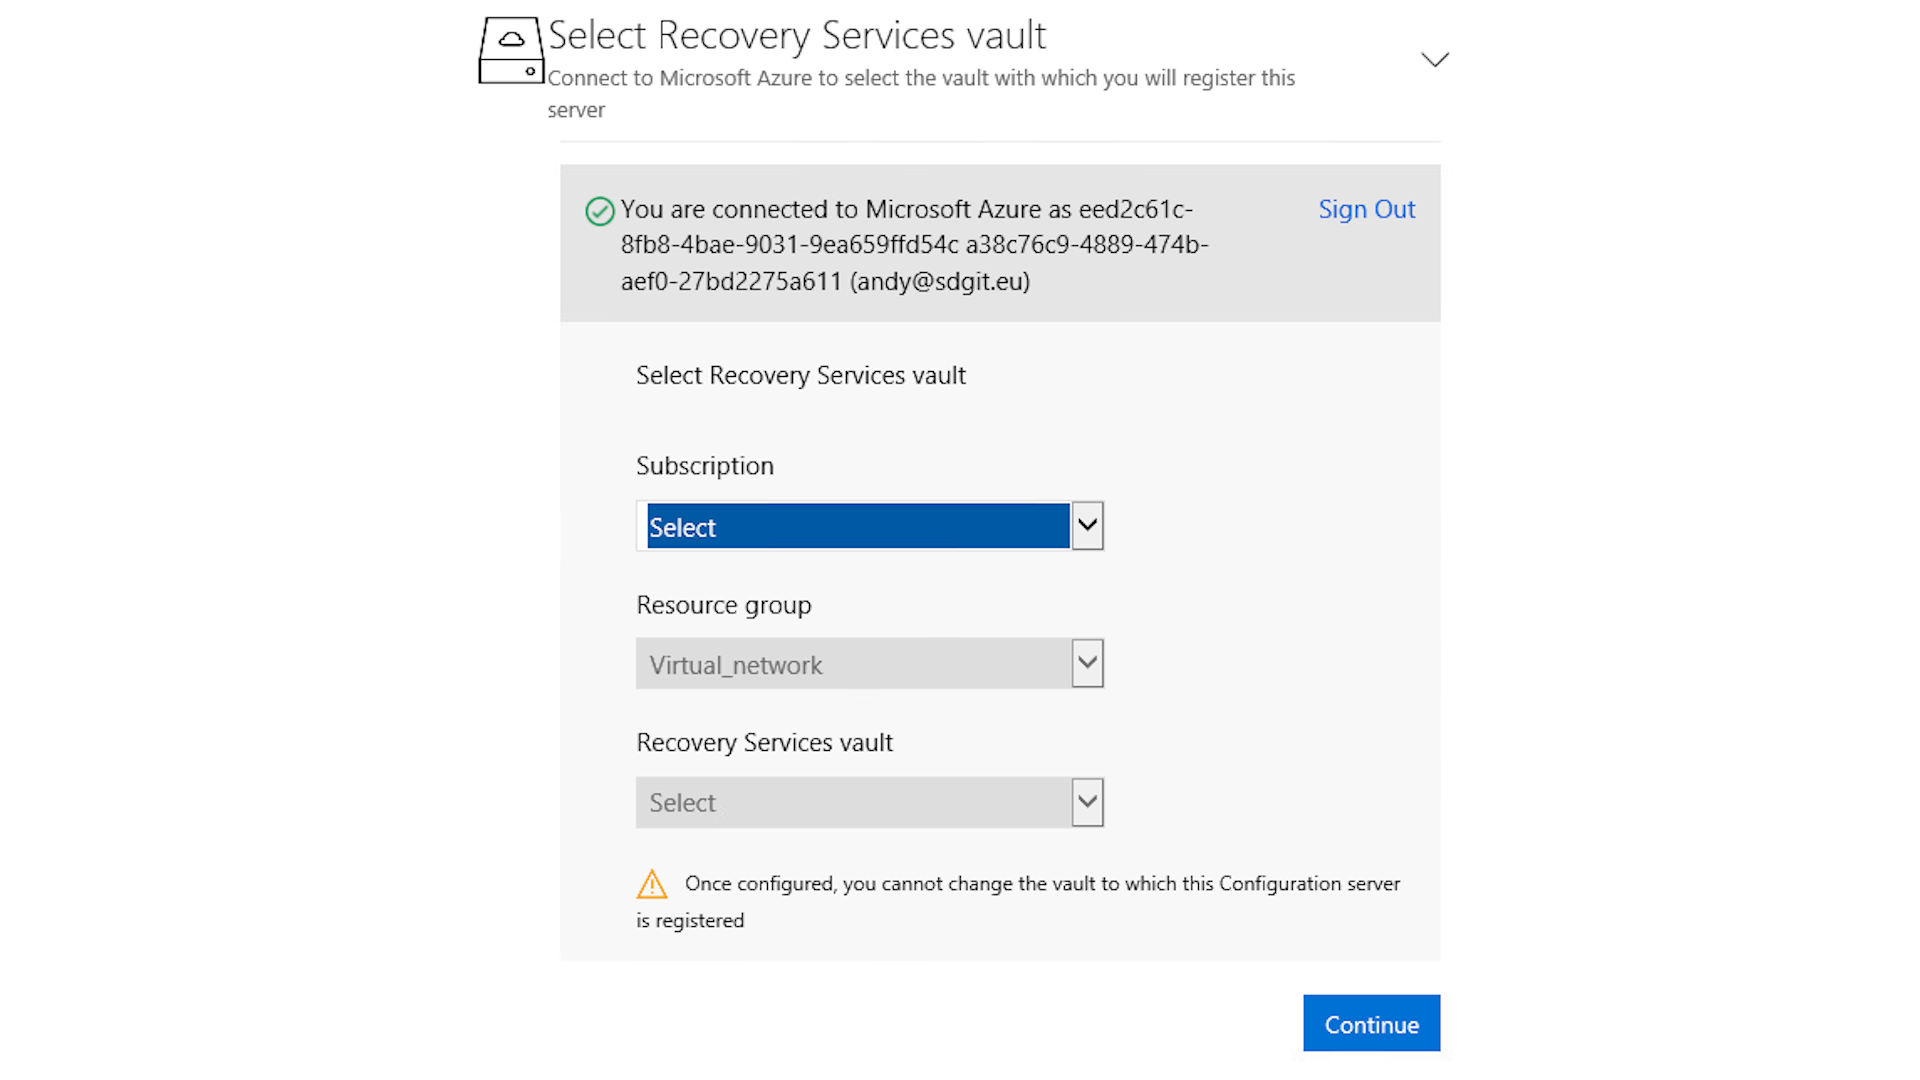
Next, we install MySQL. Tick the box to accept the license, then click on the link to download and install MySQL. Once installation is complete, click continue to move on to configuration validation. Once this has completed, click continue. Once again you may safely ignore the warning about providing a static IP address and continue.
Step 8: Set up VMware and office server access
Now we need to provide the ASR server with the address and credentials for our VMware ESXi server, as well as an account with administrator-level access to the servers we wish to migrate to Azure. Click on the button to add the ESXi server and fill in your server details in the pop-up window.
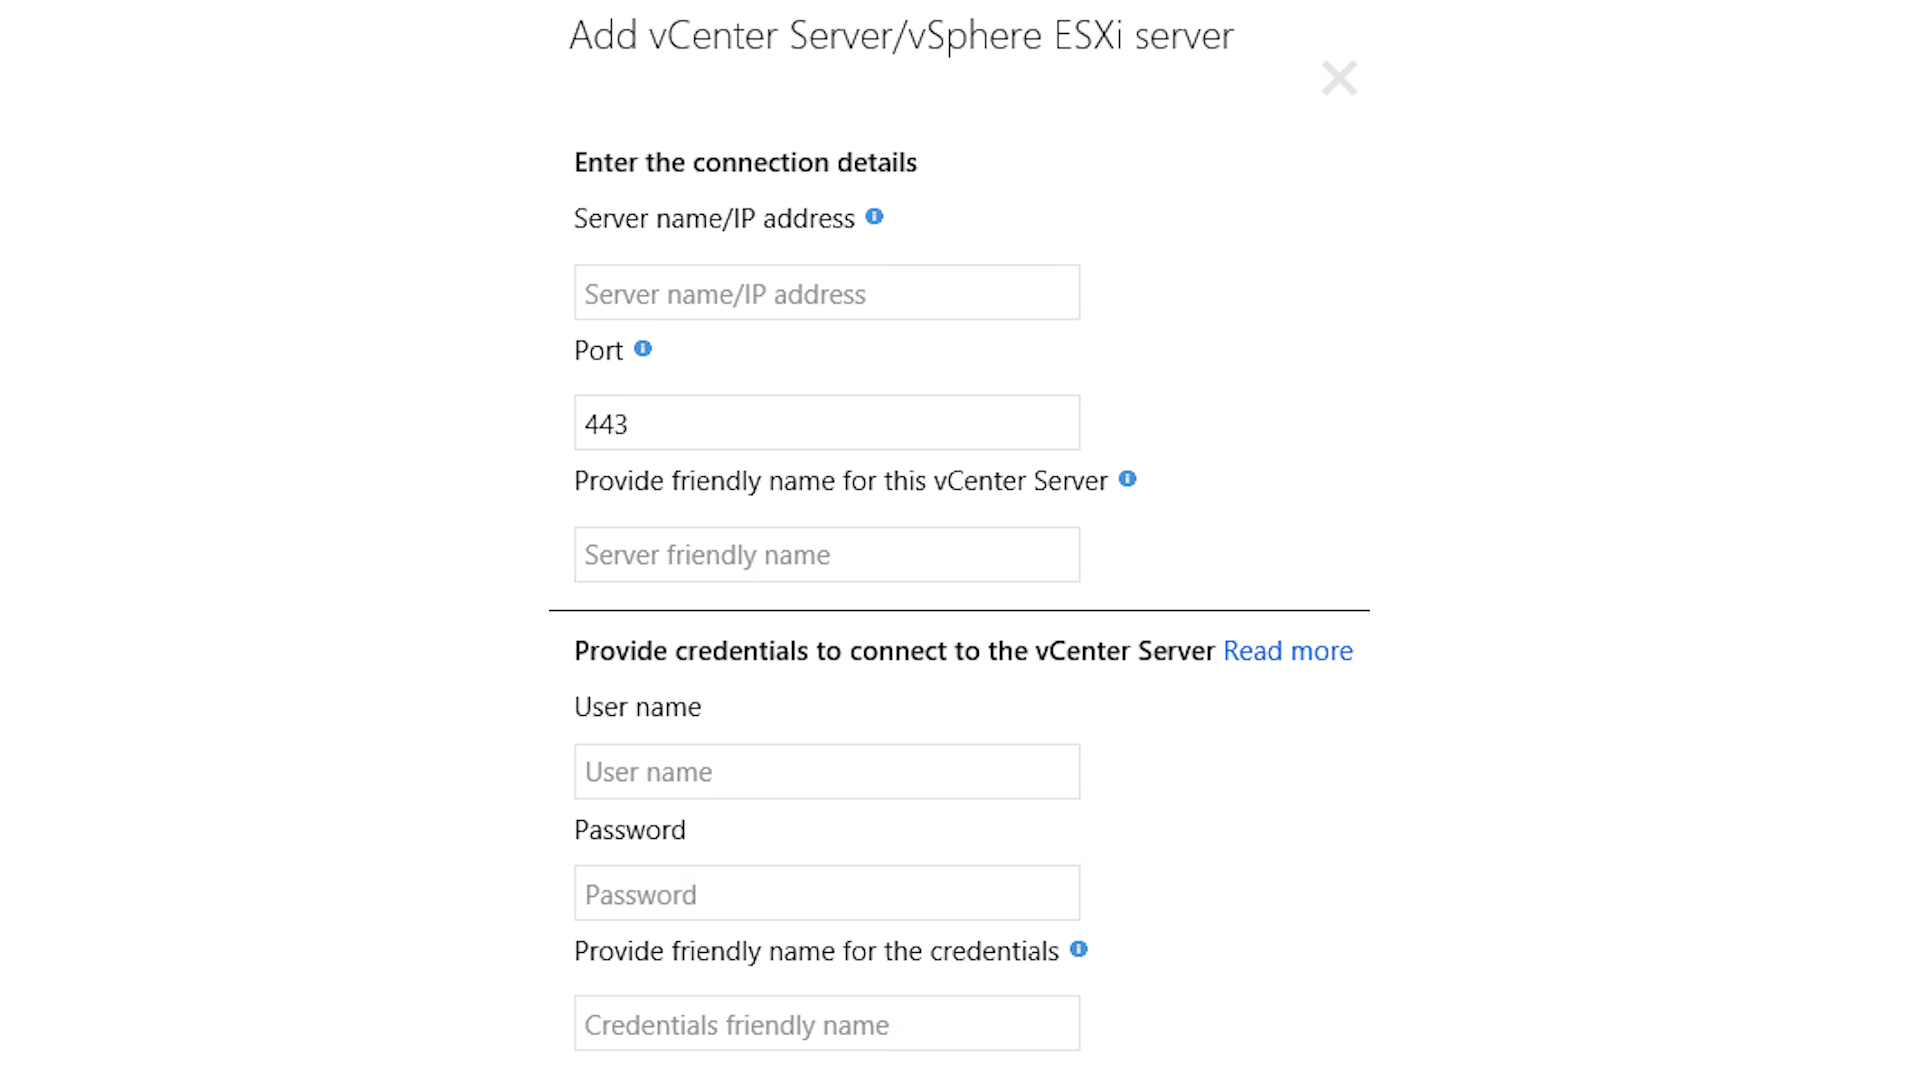
Once you’ve filled those in, click on add, wait for them to be validated, then click on continue.
Click on the link to add VM credentials, then provide an administrator-level account for the domain controller. Click add and wait for validation, then click on continue followed by the last button to finalize the configuration. This will take a few minutes. Once it has completed successfully, you can log out of the ASR server console.
Step 9: Prepare the domain controller for migration
Now we need to prepare the domain controller for migration. Login to the domain controller and check for updates. Apply any outstanding updates, and reboot as necessary to ensure that there are no updates pending at the next boot.
Make sure remote connections to this server via RDP are enabled, and that they're allowed through the firewall in all three profiles, otherwise you won't be able to access the server remotely after the migration.
Step 10: Set up your replication source and destination
Go back to the Azure management portal, and select the vault we configured earlier. Click on getting started from the site recovery menu, then select prepare infrastructure. Check that the answers you provided in step 6 are still selected, then click OK. Skip the deployment planning as before, and move on to configure the source.
Select the configuration server and vSphere host that we set up from the available options. If you only have one configuration server set up and linked only to one vSphere or vCenter server, they will already have been selected. Then click on OK. On the next page select your Azure subscription, choose which deployment model you want, and click OK. We used the default resource manager model.
Lastly, we need to create a replication policy and associate it with the configuration server. Click on create and associate, enter a name for the policy and click on OK. The other options can be left on the defaults as we will be using this primarily for migration, not for regular snapshots or disaster recovery planning.
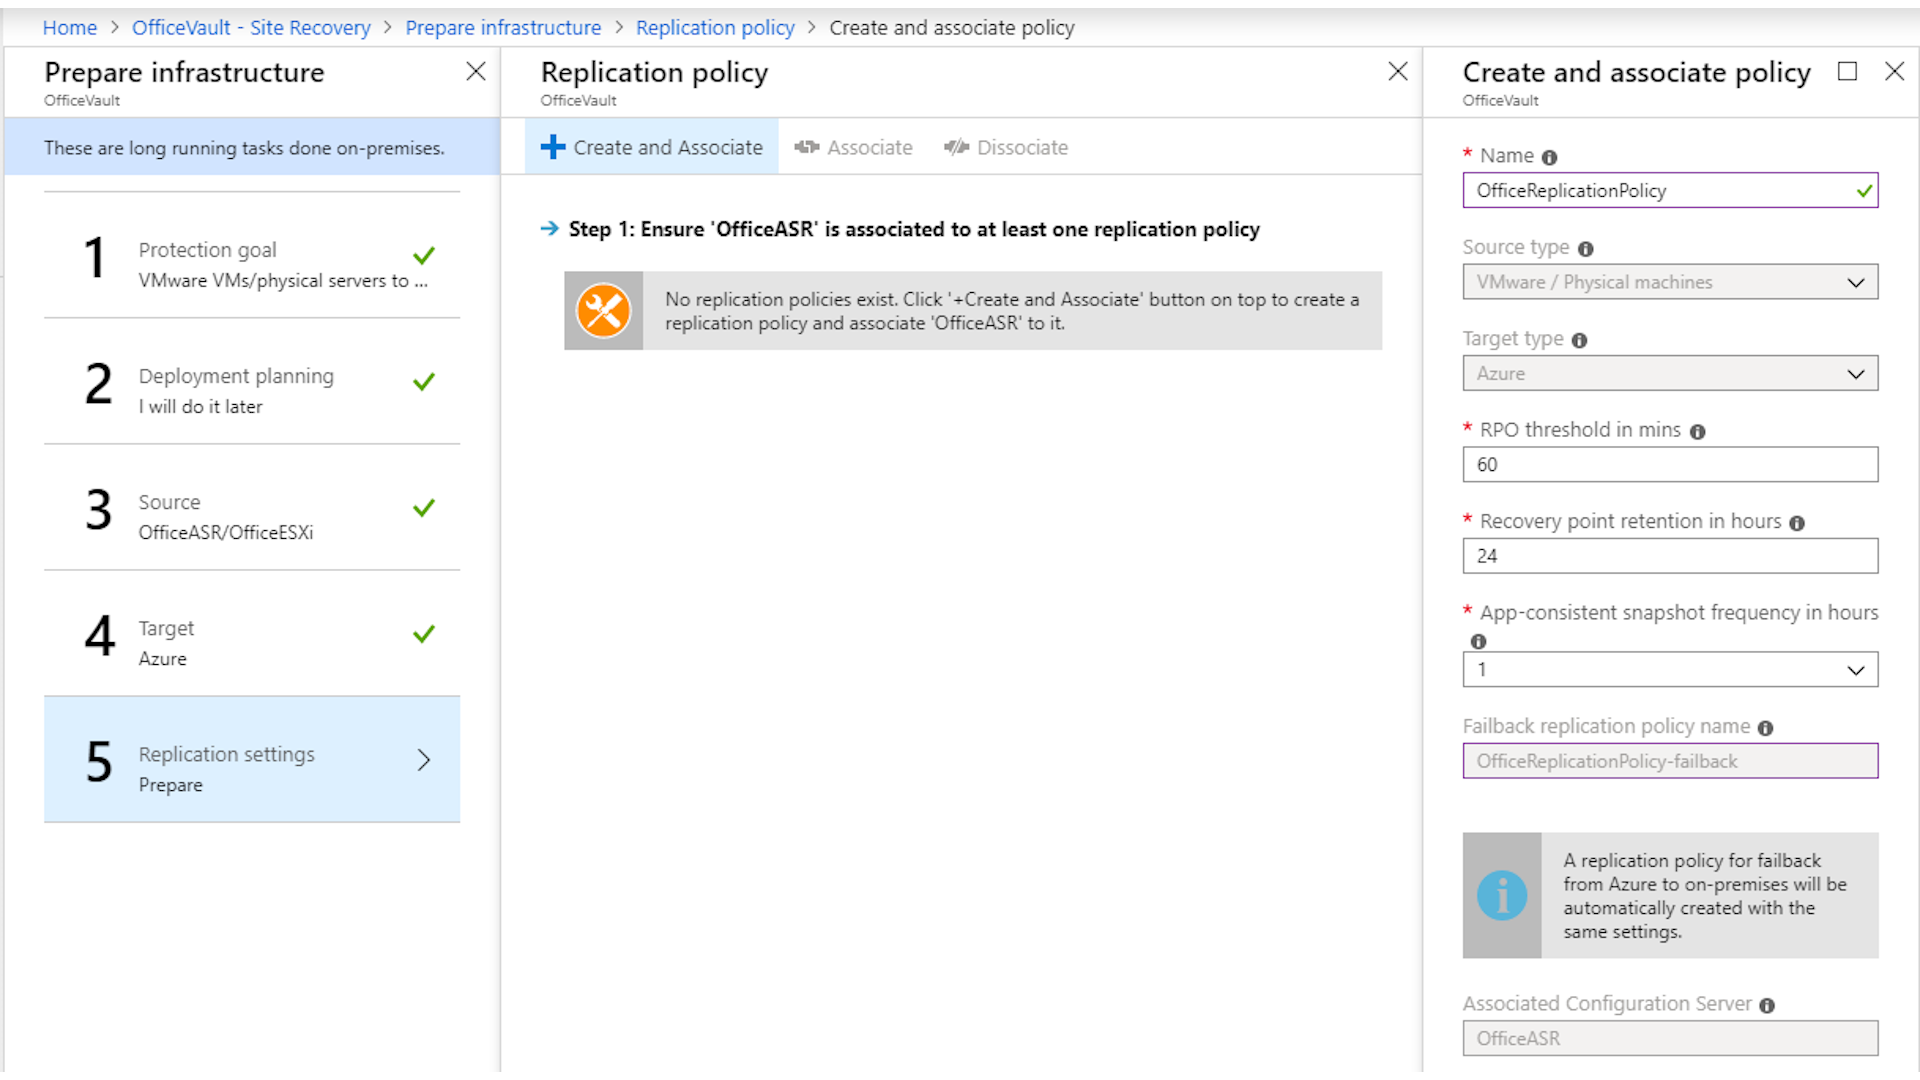
Wait for the creation processes to complete, then verify that the policy we just created is shown in the selection box, and click OK to close the policy creation window. Then click OK again to close the prepare infrastructure window and return to the vault administration page.
Step 11: Starting replication
Once started, the replication process will use a lot of internet bandwidth to perform the initial replication. You might want to perform this step outside office hours to avoid slowing down internet access for the users during working time.
To begin replication of the virtual machine to Azure, click on replicate application to open the enable replication setup. On the first page, check that the pre-filled values are correct, and select the configuration server we set up in step 7 as the process server. Click OK to move on to page two.
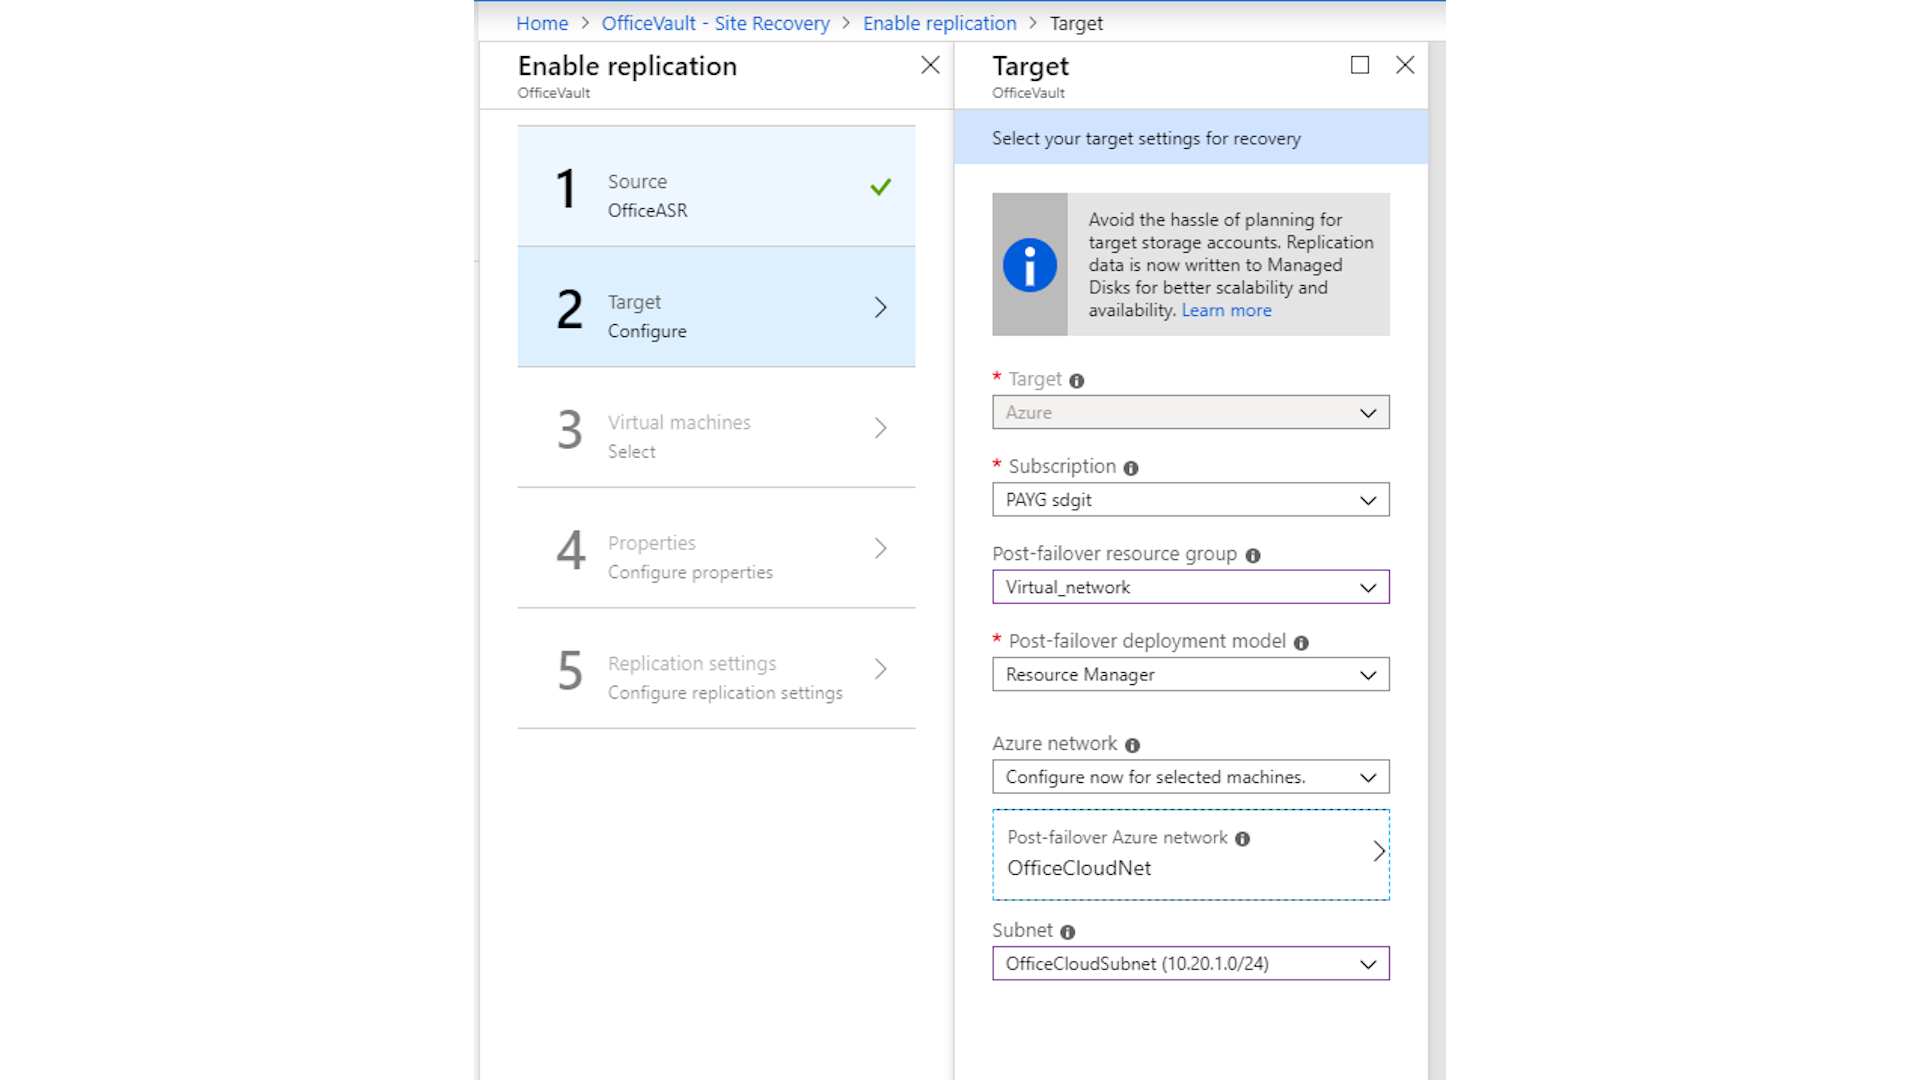
Once again, check the pre-filled answers are correct, then select your resource group, and choose the network and subnet we created in step 1 for the post-failover Azure network. Click OK to continue.
Select the VM to be migrated from the list of virtual machines on the next page. If you are migrating more than one VM, select them all here before clicking OK to continue. Set the type of disk you want for your VMs and choose the domain admin account we associated with the configuration server from the user account drop-down menu.
What type of disk you choose will depend on your usage patterns and on the costs associated with the disks. As everyone’s usage patterns are different, you will need to work this out for yourself – Microsoft provides tools to help estimate potential costs. Once you’ve made your choice, click on create target resources to continue.
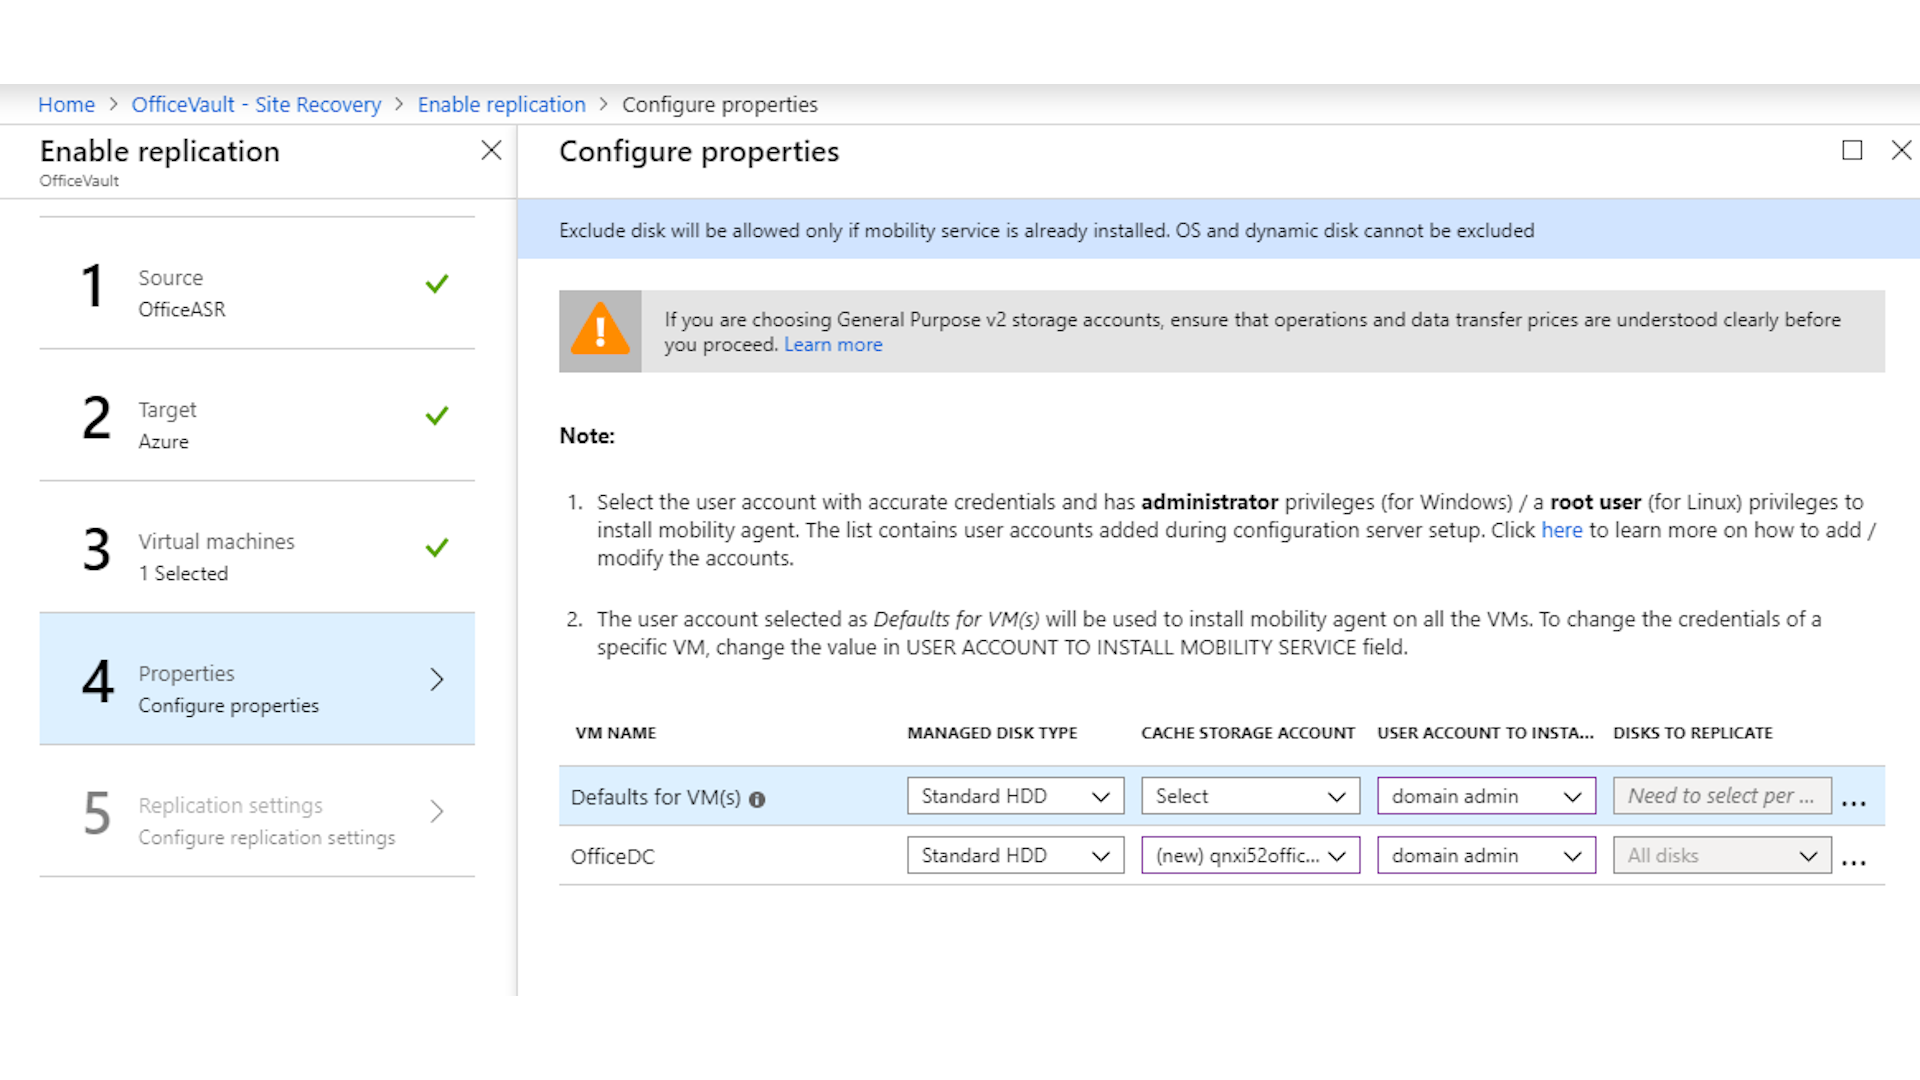
Once the resource creation tasks have finished, check that the replication policy we created in the previous step is selected, and click on OK. We don’t need multi-VM consistency for this migration, but if you are migrating two or more servers that depend on each other, such as mirrored database servers, you may want to enable this. Now click on the enable replication button, and wait for the notification that replication has been enabled. This will take some time, as it needs to install the mobility agent on the target virtual machine and then prepare it for replication. For us it took about 12 minutes. Once this is complete, the initial replication will start.
How long this takes will depend on the amount of data to be moved and the speed of your office internet connection. To keep an eye on the progress, go back to the vault configuration page, select replicated items from the protected items section of the menu and click on the name of the VM in question.
Don’t worry if you get a warning that the initial replication has been flow controlled, as it is replicating a large amount of data this first time and unless you have an extremely fast upload speed, your host's disks will be faster so will have to be throttled to prevent the configuration server running out of cache space.
Step 12: Failover test
Before running the migration for real, it’s important to do a failover test to make sure that everything behaves as you expect it to. Once the initial replication has completed, select the vault, then click on replicated items in the menu. Select the virtual machine from the list on the right, then verify that its replication health is OK and that there are no warnings or issues that need to be resolved.
Select test failover from the menu bar, check to make sure that the time on the pre-selected recovery point is within the last hour and select the virtual network we created in step 1 from the drop-down menu. Now click OK to start the test failover running. This will take a few minutes.
Once the test failover has completed, go back to the home page of the Azure portal and select virtual machines from the menu bar across the top. Select the failover test VM from the list. It’ll have the same name as your on-premises VM with “-test” appended to it. Verify that there are no errors showing and note down the private IP address assigned to it.
Now connect to that IP using your preferred RDP client and log in with your domain admin credentials. If you are unable to connect to the Azure VM, check that the VPN you set up in step 4 is connected.
Check that the server is running as you expected, and that all the services are OK. Once you are satisfied that all is well, disconnect from the server and go back to the Azure portal. Return to the vault page and the replicated items list, and select the server again. Click on cleanup test failover, tick the box to complete testing and click OK. This will remove the test VM and tidy everything up. Don’t leave the test VM running as it will incur costs.
Step 13: Migration time
In this step, we will shut down the on-site virtual machine and start up the Azure replica. As this will cause some downtime for your users, it should probably be done out of hours. This has the added benefit of minimising the likelihood of any changes to files or system state since the last replication point.
Go back to the vault screen and the list of replicated items. Select the virtual machine from the list, and verify that the replication is healthy and the current recovery point objective (RPO) is recent. If everything looks OK, click on failover from the top menu bar. Check the recovery point and tick the box to shut down the VM before beginning the failover, then click OK to start the failover task running.
Click on the notification bell towards the top right of the Azure portal and select the failover task. Monitor it to ensure that all the stages are completing successfully. Under some circumstances (generally relating to VMware licensing or version) it may fail to shut down the on-site VM, so you'll need to do that manually once the replication has completed. This will not affect the failover process, however.
Once the failover process has completed, cleanly shut down the on-site virtual machine if it is still running, then go to the virtual machines section in the Azure portal and select the new VM created by the failover. Make a note of the private IP address that has been assigned to it.
Now we need to set up the DHCP service on the office firewall to take over from the server. Configure it to allocate the same pool of IP addresses as the server used, but set the DNS server option for DHCP clients to the private IP address of the new cloud VM. Remember to also re-create any static DHCP assignments that were present on the server.
Refresh the DHCP leases on the office PCs (rebooting them is probably the quickest way), then test connectivity to the cloud VM by pinging it from one of the PCs, first by IP address then by name. Check that any mapped drives are working as expected, but be aware they will be slower than they were when the server was local, unless you have an extremely fast internet connection.
If everything looks fine from the client machines, connect to the server via RDP and check that everything is working as it should at that end. Pay special attention to the DNS zones on the server and make sure that the server's old IP address has been updated to its new private IP in the forward lookup zones. Correct any remaining instances of the old IP address that you find.
Step 14: Final steps and tidying up
Return to the Azure portal, and to the list of replicated items in the recovery services vault. Select the virtual machine from the list. Ignore the replication errors, as those were caused when we shut down the VMware virtual machine in the office. Select complete migration from the menu bar and click OK to continue. This will disable the replication of the office virtual machine and tidy up the Azure site recovery setup. It'll take a few minutes to complete.
Once that's finished, return to the vault page and verify that the office VM is no longer listed on the replicated items page. If you have no further use for Azure Site Recovery at this time, you can delete the config and resources associated with it.
From the vault page, select site recovery infrastructure, then on the next page select replication policies. Select the replication policy that we created in step 10, then click on the dots at the end of the line for the associated configuration server and select dissociate. Repeat this for the failback policy as well.
With that done, you should have fully and completely migrated your entire office infrastructure to the cloud. Welcome to the future.
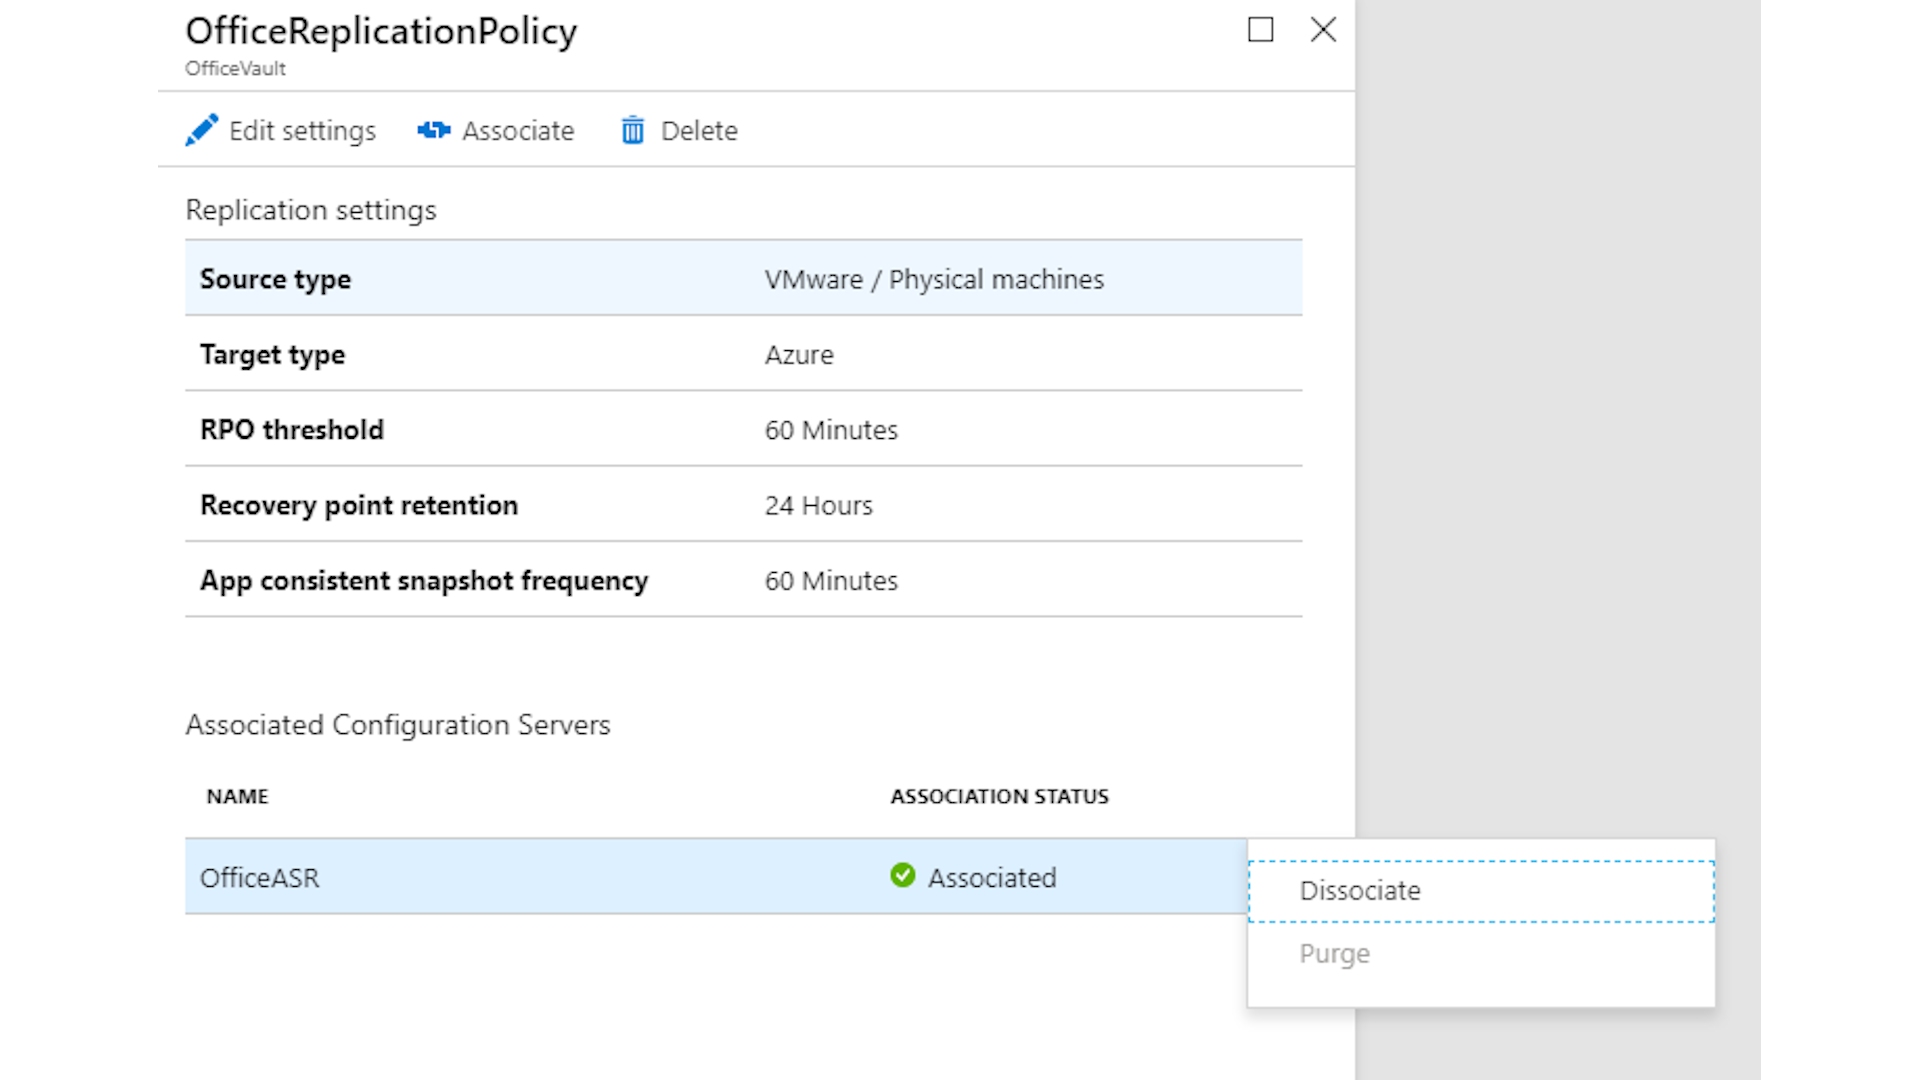
Return to the list of replication policies, click on the dots at the end of the line for each of the policies we just dissociated, and select delete. Next select configuration servers from the vault menu, and select the config server from the list. Right click on the office ESX server and hit delete, then hit yes to confirm. Once that task has completed, click on delete on the upper menu bar to remove the ASR server and hit OK to confirm. Lastly, go back to the vault screen and select delete from the top menu bar, then hit yes on the next page to delete the recovery services vault.
Don’t forget to update the configuration for any devices in the office that do not obtain their IP addresses via DHCP to use the new IP address for DNS, and for any other services configured using the server’s IP address rather than its name.
K.G. is a journalist, technical writer, developer and software preservationist. Alongside the accumulated experience of over 20 years spent working with Linux and other free/libre/open source software, their areas of special interest include IT security, anti-malware and antivirus, VPNs, identity and password management, SaaS infrastructure and its alternatives.
You can get in touch with K.G. via email at reviews@kgorphanides.com.
