Quantum DXi5500
Enterprise ready storage is a big issue today. Even small businesses are buying storage in the terabyte-plus range and larger enterprises are purchasing more storage than they would have ever expected.
This is an easy to install, easy to configure device ideally suited to the pressures of a busy data centre. VTL is fast becoming a must have for a lot of data centres and the build quality and ease of use makes this attractive.
Enterprise ready storage is a big issue today. Even small businesses are buying storage in the terabyte-plus range and larger enterprises are purchasing more storage than they would have ever expected.
All of this storage is creating a problem - back-up. The more data you have, the longer it takes to back it up and it's not getting any easier. The amount of data to be backed-up causes other problems. The first is that the back-up window, the time when the server is not being used, is shrinking. With more data to copy, this means that back-ups are in danger of affecting the working day.
The second problem is data duplication. As users begin to move stuff from local machines to servers, the amount of space used for redundant data increases. With collaboration, files and data are emailed between users creating large numbers of copies of the same data. This means that an increasing amount of backup space is being wasted.
These problems have led to the rise of the disk-to-disk backup market where data is moved to a secondary disk array, de-duplicated and then backed-up. This is where the Quantum DXi5500 sits.

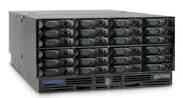
The DXi5500 arrives as a standard large box full of little packages. In one box is the main system unit housing the 5U chassis, communication boards and power supplies. A separate box contains the hard disks pre-mounted in the chassis and numbered to fit into the array.
There is a third box that contains the cables (4 power, 2 iSCSI, 2 Fibre Channel), mounting rails, documentation (quick start guide) and a CD.
At the back of the DXi5500 are keyboard, monitor, mouse and COM ports. There is a pair of Gigabit Ethernet ports and two plug-in cards that have fibre channel ports on them. There are four power supplies in the chassis and these are all designed to be hot swap.
At the front is a small panel with the power and reset switch and a range of LEDs. Unlike many storage devices, there are no communication or controller cards. This is, after all, a server with lots of storage.
The DXi5500 we received was only half populated and this is a standard configuration. You can buy fully or half populated. Quantum initialises and configures the drives for you to save time and ships all the drives labelled as to where they fit in the chassis. Unused slots are filled with blanking plates to ensure that airflow and cooling is not compromised.
The first thing to do is take the CD, put it in a machine and watch some of the videos, especially those covering installation and configuration. This will save a lot of time later when you come to configuration.
The chassis itself is heavy but luckily, the power supplies are designed to be hot swap and can be easily removed to lighten the weight of the unit. As with all storage systems, make sure you have someone to help you install into the rack.
Once the chassis is in the rack and the power supplies reinserted, the hard disks can be added. These went in easily without any problems. As Quantum configure and initialise the array for you, all you need to do is slide in the drives. They are all numbered and marked up so you know where each drive belongs.
Drives belonging to Array controller 1 fit at the bottom of the chassis and drives for Array controller 2 at the top. The drives are populated from the bottom of each set working left to right so that drive 0 is bottom left and drive 11 is top right. What would have been helpful would be some indication on the chassis of the sequence or a quick reference card printed on the outside of the chassis. Although the sequence is noted in the Quick Start guide it is not the intuitive way of installing the drives.
Once the drives are in, the last step is to attach the power and network cables and turn the DXi5500 on. The power button is on the front, in the centre on the front and easy to miss. We had to resort to the documentation to locate it. If you do not attach all four power supplies to a working supply, then the DXi5500 sounds an alarm and there is no way to silence it without fixing the power problem. If you only have half the drive bays filled, you might think you only need two power supplies - wrong! The DXi5500 demands all four supplies are connected to the mains.
The first time you turn the machine on you will need to do some configuration. This can be done either using a laptop connected directly to one of the network ports and configured for the same default subnet or using a terminal emulator such as HyperTerminal connected to the serial port.
Each of the Ethernet ports is on a different subnet allowing you to cross connect into your switches for resilience. A useful feature is that the DXi5500 ships with two built in accounts - Monitor and Administrator. The Monitor account only allows you to view the system management pages while the Administrator account can change them. This works well when you want operators to see what is happening but not make changes.
You work with the DXi5500 through a web interface and although the menu system is comprehensive and contains a lot of data, Quantum has been careful to try and limit the amount of information on each screen. We used Firefox and Internet Explorer to view the page and both worked well.
The screen is split into four areas. On the left is the menu and quick status fields. In the middle is the current system details telling you how much data you have moved to the DXi5500, how much space is actually being used and how effective it has been in reducing the data both by de-duplication and hardware compression.
The right side is split into two boxes. The top box telling you about the Virtual Tape Library (VTL) Data Services and the bottom box dealing with the NAS Data Services. Each has information about the status of de-duplication and replication.
The configuration menu deals with six different tasks. These range from the basic levels such as setting the data and time and configuring the network to the more complex such as configuring storage, the VTL and the security options.
The start point should be data and time and then the network. The DXi5500 supports Network Time Protocol (NTP) so if you are using your own NTP server to synchronise all of your servers, you can set the address of it or use any of the known master time servers.
By default, the DXi5500 comes with DHCP turned off and there is no reason to turn it on. However, you will want to configure the IP address for each port along with the subnet mask and DNS address. Unless there is a problem with the cables, leave the link speed and duplex at Auto.
Next you should configure the security settings. Already mentioned are the two built in Monitor and Administrator accounts. The passwords should be changes immediately. What you cannot do is add a network group to the DXi5500 security page for administration. This is strange as the DXi5500 is nothing more than a server with lots of storage.
Quantum has thought through the issue of secure access and the DXi5500 ships with its own SSL Security file and you can add or purchase your own certificate if you want.
Once you have secured the device and configured the network, you can begin to configure the storage itself. The first steps have already been done by Quantum. The array has been configured and initialised and this means that you can be up and running very quickly.
The first decision that you need to take is how much of the available storage will be given over to the VTL and how much to NAS. Creating a tape cartridge is very easy. Decide how many you want to create, how large they will be and then give them a barcode designation. Once this is done, you can configure your normal backup software to treat each of the virtual cartridges as if they were a real backup cartridge.
Configuring the NAS is just as easy. If you are going to use this as part of a Microsoft Windows domain, before you begin to create the NAS you need to configure the domain information. This allows you to then manage the NAS area using your domain accounts. It also allows you to control share level access through Windows.
Once you have added the DXi5500 to your domain you can then configure the shares. These can use either CIFS or NFS depending on the operating system that will be accessing them. There is an option to enable the de-duplication of the share but be careful. This can only be set when you are creating the share. You cannot turn this on later without deleting and re-adding the share.
Once you have finished configuring the storage you can then configure the VTL. You will already have determined how many virtual tapes you want, their size and the barcodes assigned to them. The VTL configuration now allows you to create partitions and make them accessible to your backup software. This is done by creating virtual tape drives and libraries and assigning them identifiers that will make them appear as a physical drive to the backup software. The virtual tapes you created earlier are now assigned to the virtual tape drives that you are now creating.
Unlike shares in the NAS configuration, de-duplication is turned on automatically with when you create a VTL partition.
If you have data that you want permanently protected, you can configure Write Protection. Once it has been written to the virtual tape it cannot be overwritten or deleted. This makes it very easy to capture critical logs and data for compliance and security needs.
The DXi5500 is now ready to capture and store your data.
It would have been all too easy to spend a lot of time over configuring the DXi5500 however it is easy to under configure it and cause yourself problems later on. Once you have split the available storage into VTL and NAS, there didn't seem to be any way of dynamically reallocating space without deleting both and starting again. If you have protected tapes in the VTL area, this is a none starter.
Before starting to configure this device you really do need to have made some serious decisions about how you want to make this work. Although you can buy the DXi5500 half populated and then have the rest of the drives delivered later, this didn't seem to make a lot of sense. The easiest option is to assign half the space for VTL and the other for NAS. If you fully populate the DXi5500 that means using one array controller for VTL and one for NAS and just work with what you have.
However, this becomes an expensive option for NAS storage and there are much faster and more focussed devices out there for doing NAS at a lower cost. Unless you have to use the device for multiple purposes, I would recommend buy this just as your VTL and even considering using one half of the drives for non erasable storage and the other for day to day backup.
We would have liked to spend more time with the DXi5500 and test the data replication feature. Unfortunately we only had a single device so that wasn't possible.
One thing that Quantum should be commended on is their video tutorials on the documentation CD. This really did speed up and clarify what was in the user manual and make it easy to get things right.
This is an easy to install, easy to configure device ideally suited to the pressures of a busy data centre. VTL is fast becoming a must have for a lot of data centres and the build quality and ease of use makes this attractive.
The lack of a dynamic partitioning solution so that you can increase the size of the space for VTL at the expense of the NAS area would help.
Verdict
This is an easy to install, easy to configure device ideally suited to the pressures of a busy data centre. VTL is fast becoming a must have for a lot of data centres and the build quality and ease of use makes this attractive.
INTERFACES NAS Backup Target: NFS or CIFS Virtual Library: Fibre Channel or iSCSI connectivity Different partitions in same appliance can present different interfaces simultaneously PERFORMANCE up to 800GB/hourPHYSICAL SPECIFICATIONS HOST TO APPLIANCE H/W INTERFACE 10/100/1000 BaseT Ethernet, 2 Gb Fibre Channel PHYSICAL SPECIFICATIONS Width (in/cm) 19 / 48.3 Height (in/cm) 8.75 / 22.2 5U Length (in/cm) 25.4 / 64.5 Weight (lbs/kg) 122 / 55.34
-
 ITPro is 20!
We take a look back on the past two decades since ITPro launched...
-
 Cyber experts issue alert after two ransomware groups team up on ‘unprecedented’ threat campaign
News The tie-up includes a new model of industrialized ransomware deployment that significantly lowers the barrier to entry for cyber crime
-
 Agentic AI 'breaks the traditional SaaS seat licensing model' – now it’s up to vendors to ditch 'legacy dashboards' and build with agents in mind
News Incumbent software vendors will need to work harder than ever to compete with agile, AI-focused disruptors


