How to boot into Windows 11 Safe Mode
Long-time Windows users will already be familiar with Windows 11 Safe Mode, but what exactly is it for and how do you boot your system into it?


Sign up today and you will receive a free copy of our Future Focus 2025 report - the leading guidance on AI, cybersecurity and other IT challenges as per 700+ senior executives
You are now subscribed
Your newsletter sign-up was successful
Windows 11 Safe Mode is a vital diagnostic utility that enables users to troubleshoot complex system issues by booting the operating system in a minimal state. By loading only the most essential drivers and services, Safe Mode effectively isolates the root causes of problems, whether they are software glitches, driver conflicts, or performance bottlenecks.
This stripped-back environment is particularly useful for tackling persistent crashes, system instability, or malware infections. Disabling non-essential components allows IT professionals and users to identify and resolve underlying issues without interference from third-party applications or background processes.
Windows 11 provides three distinct Safe Mode environments to suit different troubleshooting needs: Standard Safe Mode, Safe Mode with Networking, and Safe Mode with Command Prompt.
Understanding how to use these configurations effectively is crucial for diagnosing and resolving system issues without compromising security or functionality.
Why boot into Windows 11 Safe Mode?
Booting into Windows 11 Safe Mode is a crucial step when addressing significant system issues, such as frequent crashes, system instability, or failure to boot correctly. By initiating the operating system with only essential drivers and services, Safe Mode creates a controlled environment that simplifies the process of isolating and resolving underlying problems.
One prevalent issue that Safe Mode can help mitigate is the Blue Screen of Death (BSOD), often resulting from faulty or outdated drivers. If you've recently installed new hardware or software leading to system instability, booting into Safe Mode allows you to uninstall the problematic components or revert to a stable configuration.
Additionally, running the Check Disk (CHKDSK) utility in Safe Mode is advisable for diagnosing and repairing hard drive errors. This tool scans the file system and metadata of a volume for logical and physical errors, ensuring the integrity of your data.
Sign up today and you will receive a free copy of our Future Focus 2025 report - the leading guidance on AI, cybersecurity and other IT challenges as per 700+ senior executives
Executing CHKDSK in Safe Mode minimizes the chance of interference from third-party processes, leading to a more effective repair process. ITPro’s guide on running the Chkdsk tool is a great resource for addressing potential hard drive errors while in Safe Mode.
Important warning: Check for BitLocker
Before attempting to boot into Safe Mode, ensure you have your BitLocker Recovery Key handy. If your device is encrypted (which is standard on most modern Windows 11 laptops), the system may interpret the change in boot mode as a security risk and lock the drive.
You can find your 48-digit recovery key by logging into your Microsoft account on another device (account.microsoft.com/devices/recoverykey). Without this key, you may find yourself locked out of the system once the recovery menu loads.
How do I know if Windows 11 is in Safe Mode?

When your system boots into Windows 11 Safe Mode, several indicators confirm this status. The desktop will appear with a basic black background, devoid of personalized elements such as custom wallpapers or themes.
Additionally, the text "Safe Mode" will be displayed in the corners of the screen, including just above the clock in the bottom-right corner.
How to boot into Safe Mode in Windows 11
Accessing Safe Mode in Windows 11 is similar to previous versions, offering multiple methods to accommodate different scenarios. Whether you're logged into your system or unable to boot into Windows, you can initiate Safe Mode through various approaches.
Here’s a breakdown of the four most common methods:
- Method One - The Start Menu method
- Method Two - The Advanced Start method
- Method Three - The Function Key method
- Method Four - The ‘When all else fails’ method
Read on to see detailed instructions for each step.
Method One - The Start Menu method
The first, and easiest way is using the Start Menu inside Windows 11's desktop.
1. Click the Start Menu.
2. Select the Power button.
3. Hold down the Shift key and click Restart.
4. Wait for the system to reboot and display the Recovery Menu.
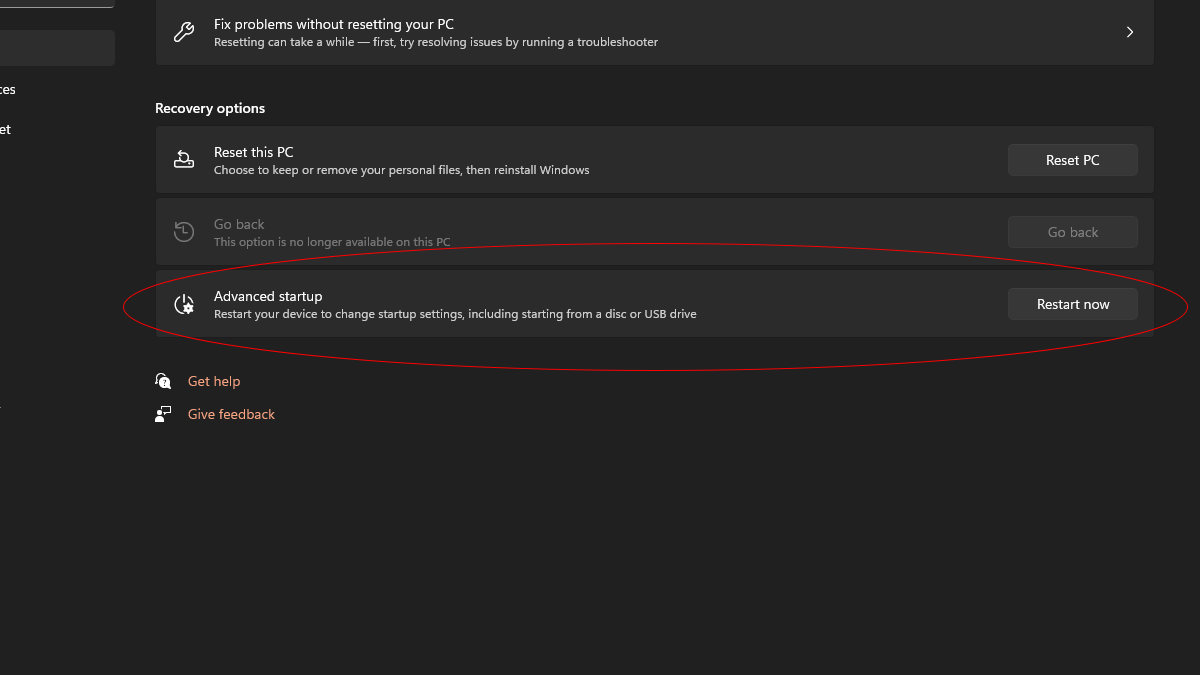
Method Two - The Advanced Start Method

1. Press the Windows key + i to open Settings.
2. Navigate to the System menu.
3. Select Recovery from the options on the right.
4. Under Advanced Startup, click Restart Now.

Method Three - The Function Key method
This method is useful if you cannot boot into Windows 11 at all. However, note that on modern PCs with fast SSDs, the window to press these keys is extremely short, and the traditional "F8" key is disabled by default in Windows 11.
- Completely shut down your computer.
- Turn the computer on and immediately start tapping the appropriate recovery key repeatedly.
- The key varies by manufacturer: try F11 (HP, Lenovo), F12 (Dell), F9 (Asus), or Esc.
- If successful, you will see the "Choose an option" or "Recovery" screen.
Note: On most modern Windows 11 PCs, the traditional F8 menu is disabled by default to speed up boot times. If F11 or Esc does not work, you will likely need to use Method Four (interrupting the boot process) instead.
Method Four - The ‘When all else fails’ method
If you’ve tried everything else and still can’t trigger safe mode, there’s a workaround.
- Turn on the computer, then hold down the power button to interrupt the boot.
- Repeat this process two more times.
- On the third reboot, you’ll see the Startup Repair option.
- Choose Advanced Options from here to enter Safe Mode.
Navigating the recovery menu

After following the steps outlined in any of the methods listed above, your PC will reboot into a recovery menu. At this stage, you will need to complete these steps:
- Click on ‘Troubleshoot’
- Click on ‘Advanced Options’
- Click on ‘Start Up Settings’
- Click on ‘Restart’

After clicking Restart, your PC will reboot and display a numbered list of startup options. You cannot use your mouse on this screen; you must use the physical keyboard.
Press the number or Function key corresponding to your desired mode:
- Press 4 (or F4) for Standard Safe Mode.
- Press 5 (or F5) for Safe Mode with Networking (drivers for Wi-Fi/Ethernet).
- Press 6 (or F6) for Safe Mode with Command Prompt.
Whichever option you choose, your machine will immediately load into the Safe Mode environment.
Leaving Safe Mode
A straightforward restart is typically sufficient to exit Safe Mode in Windows 11. You can do this by clicking the Start button, selecting the Power icon, and then choosing Restart. This action should reboot your system into its standard operating mode, restoring all personalized settings and functionalities.
However, there are instances where the system may persist in Safe Mode despite a restart. In such cases, manual intervention is required to reset the boot configuration:
1. Open the Run dialog box by pressing the Windows key + R.
2. Type msconfig and press Enter to launch the System Configuration utility.
3. Navigate to the 'Boot' tab.
4. Uncheck the 'Safe boot' option under Boot options.
5. Click 'Apply', then 'OK'.
6. Restart your computer.
This process modifies the boot settings to ensure that Windows 11 starts in its normal mode.
Safe Mode for System Restore in Windows 11
Integrating System Restore with Windows 11's Safe Mode offers a method for addressing system issues, such as crashes or irregular behaviour following software installations.
Using Safe Mode, which runs with minimal drivers and services, allows you to perform a System Restore without interference from third-party applications or problematic drivers, facilitating a smoother recovery process.
Benefits of Using System Restore in Safe Mode
Using System Restore in Safe Mode is useful for resolving issues caused by recent updates or drivers. It allows you to revert to a stable state with minimal risk, as only essential system files and services operate during restoration.
Steps to Perform System Restore in Safe Mode
Performing a System Restore in Safe Mode is a reliable method to resolve software-induced problems, potentially saving time that might otherwise be spent on manual troubleshooting.
After clicking Restart, your PC will reboot and display a numbered list of startup options. You cannot use your mouse on this screen; you must use the physical keyboard.
Press the number or Function key corresponding to your desired mode:
- Press 4 (or F4) for Standard Safe Mode.
- Press 5 (or F5) for Safe Mode with Networking (drivers for Wi-Fi/Ethernet).
- Press 6 (or F6) for Safe Mode with Command Prompt.
Whichever option you choose, your machine will immediately load into the Safe Mode environment.
Considerations
System Restore is a useful tool, but it is important to understand its limitations. It may not resolve issues caused by hardware malfunctions or severe malware infections.
While System Restore does not affect personal files, it can remove recently installed applications and drivers. Therefore, it is wise to regularly back up important data and ensure that System Restore is properly enabled and configured on your system.
Rene Millman is a freelance writer and broadcaster who covers cybersecurity, AI, IoT, and the cloud. He also works as a contributing analyst at GigaOm and has previously worked as an analyst for Gartner covering the infrastructure market. He has made numerous television appearances to give his views and expertise on technology trends and companies that affect and shape our lives. You can follow Rene Millman on Twitter.
