How to recover deleted photos from iPhone
Use this handy step-by-step guide to recover photos from your iPhone that were accidentally deleted or lost


Sign up today and you will receive a free copy of our Future Focus 2025 report - the leading guidance on AI, cybersecurity and other IT challenges as per 700+ senior executives
You are now subscribed
Your newsletter sign-up was successful
We carry our phones with us all the time, and the pictures we take with our iPhone cameras capture the most important, funny, and spontaneous moments of our lives. Losing your iPhone photos can be devastating but—luckily—deleted photos can usually be recovered. Read on for our guide on how to recover deleted photos from an iPhone.
Here we will outline a range of steps you can take to recover your lost photos, everything from simply checking a special folder on your phone to employing some of the best data recovery software.
How to recover deleted photos from iPhone: Preparation
Throughout this guide, you will see references to recovering from backups. To recover your photos from a backup, you will need to create that backup in the first place. Ideally, you should set up automatic backups when you first buy your phone, but you can start backing up your iPhone at any time.
iCloud is the best cloud storage solution for your iPhone because it is already part of the Apple product ecosystem. You can set it up easily from your settings app without downloading anything extra, and it will work with all of your iOS devices, not just your iPhone.
Setting up iCloud backups on your iPhone is easy, and takes only five minutes of your time. Once you have set up iCloud backups on your phone, iCloud will automatically back up all of your data—including photos—every time your iPhone is connected to power and WiFi, and your screen is off.
You can now take and delete photos to your heart’s content, knowing that you can always revert to a backup from the cloud if you lose something important.
Step 1: Check your Recently Deleted folder

If you accidentally deleted a photo, it doesn’t disappear right away. Instead, it moves to an album of Recently Deleted photos, where it remains for 30 days before being permanently deleted.
Sign up today and you will receive a free copy of our Future Focus 2025 report - the leading guidance on AI, cybersecurity and other IT challenges as per 700+ senior executives
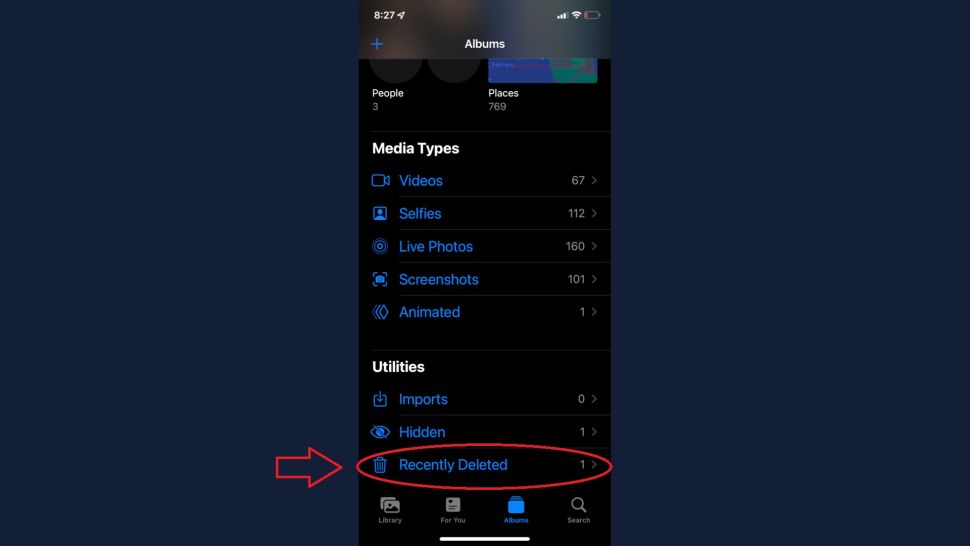
If the photo was lost less than a month ago, navigate to your Photos app and scroll to the very bottom, where you will find the Recently Deleted album under Utilities.
If the photo in question is in this album, simply tap it, then tap Recover in the bottom right corner of the screen. Hit Recover Photo again in the pop-up dialog to confirm recovery. The photo will now be restored to its original photo album from before deletion.
Step 2: Recover your photos from an iCloud backup
If it's been more than 30 days, or if your photo was lost due to a technical error, you may not see it in the Recently Deleted folder. In that case, you might be able to recover your lost photos by reverting your phone to an iCloud backup.
Once you complete the steps in the guide, you will have reverted your iPhone to a backup from the past. Make sure you choose a backup date from before your photos were lost, and they should reappear in your photo library.
Step 3: Download AnyRecover’s iMyFone D-Back
If you did not set up iCloud backup, or if you would like to recover your photos without doing a full factory reset of your iPhone, your only shot at recovering your photos will be to use data recovery software.
We tested many data recovery programs and found that AnyRecover is the best data recovery software for most users, because it offers the highest chance of successfully recovering your data. AnyRecover offers a special product for iPhone users called iMyFone D-Back, which you can use to attempt to recover deleted photos on your iPhone.
Use the link above to navigate to the iMyFone D-Back download page, and click Free Download to begin.
Step 4: Install iMyFone D-Back
Your computer will now download the iMyFone D-back installer. Once it has downloaded, double click it and hit install in the pop-up window. Make sure you check the box in the bottom left that indicates you have read and agreed to iMyFone D-back’s license agreement.
Wait a few minutes while iMyFone D-back installs. Once the installation process is complete, you can run the program immediately.
Step 5: Begin data recovery

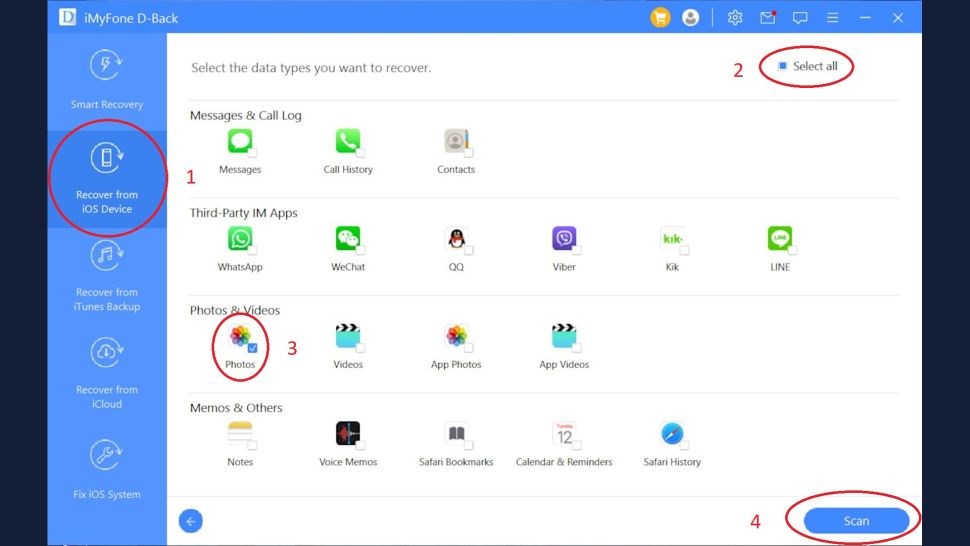
To begin, connect your iPhone to your computer using your USB charging cable. Now open iMyFone D-back and click the Recover from iOS Device tab on the left. The name of your iPhone should be displayed in the center of the screen if you did everything correctly. Hit Next to proceed.
On the next screen, you will be asked what kind of data you would like to recover. By default, iMyFone D-back will try to recover everything, including old contacts, photos, notes, and voice memos.
Since you are only trying to recover photos, uncheck Select All in the top right and then select Photos. This will make the next step go much faster. Click Scan in the bottom right corner to proceed.
Step 6: Scan your iPhone
RELATED RESOURCE

The future of work is already here. Now’s the time to secure it.
Robust security to protect and enable your business
iMyFone D-back will now scan your phone and attempt to recover deleted photos. This works because when you delete a photo on your phone, it does not actually disappear immediately—instead your phone will simply make that photo invisible and inaccessible to you.
The photo still exists on your hard drive in some form for a while, until it is randomly overwritten by another piece of data. If you deleted your photos recently, there is a good chance that they are still present on your phone, and iMyFone D-back will be able to recover them.
Be patient with this process. Scanning takes some time, and the more storage space you have on your phone the longer it will take since your entire hard drive gets scanned.
Step 7: Preview the list of recovered photos
Once the scanning process is complete, iMyFone D-back will present you with a preview list of recovered photos. Scroll through until you find what you are looking for. Since iMyFone D-back is paid software, you will need to purchase it to recover your photos. That said, you can see if the photos are still recoverable at this point before you pay.
Unfortunately, if you get to this step and the photos are still not there, it means they were likely permanently deleted. The older the deleted content was, the more likely it is that it was overwritten by something else, permanently erasing it from your phone.
If you do not see your photo on iMyFone D-back’s preview screen, then regrettably that particular photo is unrecoverable.
Optional: Purchase iMyFone D-back
If you saw your photos on the list in the previous step, that means they are still present on your phone and it is possible to recover them. However, you will see that the recover button in the bottom right corner of the screen is greyed out. This is because iMyFone D-back is paid software, and you will have to purchase it to recover your photos.
You can buy iMyFone D-back on a monthly subscription for £40.48 a month, on an annual subscription for £48.60, or on a lifetime subscription for £56.70. It is worth noting that although the monthly plan is significantly more expensive, iMyFone D-back has a 30-day money-back guarantee.
If you only need to use it once, you can purchase a monthly plan and cancel within the first month to get your money back after recovering your photos.
Summary
Now that you have read our guide, you know how to recover deleted photos from your iPhone. Never lose your precious memories again by regularly backing up your phone to iCloud, and remember to check that Recently Deleted folder before you do anything else.
If you are really stuck, using data recovery software like iMyFone D-back is a great way to recover your deleted iPhone photos.
To learn more about programs that complement your iPhone, check out our guide to the best iPhone antivirus, and our iCloud mail review.
Serguei Solokhine is an experienced freelance writer specializing in a range of topics, including finance, marketing, and travel.
He holds degrees in both finance and marketing, and boasts five years of experience working in the financial services industry across a range of roles.
Serguei enjoys writing about personal finance and investments, and has published works in several publications, including MoneyVisual, ITPro, Top.10, and TechRadar. He has covered topics such as software as a service (SaaS), CRM, and VPNs for TechRadar in addition to in-depth articles exploring web design, B2B remote desktop technology, and cloud computing for ITPro.
