How to remote desktop into Ubuntu
Learn how to set up and use remote desktop access on Ubuntu, with easy-to-follow steps for both VNC and RDP solutions

Rene Millman
Ubuntu stands as a cornerstone in the Linux world, renowned for its accessibility, extensive software ecosystem, and robust hardware compatibility. For IT professionals managing mixed environments or relying solely on Linux, establishing remote desktop access to Ubuntu is often a critical requirement. Whether you need to manage servers, provide remote support, or access your development environment, connecting remotely streamlines workflows and ensures productivity.
Fortunately, Ubuntu incorporates native tools for remote connections and integrates well with industry-standard protocols and leading remote desktop software. This guide provides a comprehensive walkthrough of setting up and utilizing various methods for Ubuntu remote desktop access, focusing on the built-in VNC capabilities, the popular RDP protocol via xRDP, and mentioning key third-party alternatives. Master these techniques to gain secure and efficient remote access to your Ubuntu systems from virtually anywhere.
Remote Desktop Options for Ubuntu
Ubuntu's primary built-in remote desktop solution leverages Virtual Network Computing (VNC). This native capability allows users to share and control their desktop environment remotely without installing additional server software on the Ubuntu host. VNC's strength lies in its cross-platform nature, enabling connections from clients on Linux, Windows, and macOS, making it a highly versatile option for diverse IT environments.
To initiate a remote desktop connection to Ubuntu using VNC, you will require a VNC client application installed on the connecting machine. Numerous free and reliable clients are available, such as TightVNC or TigerVNC for Windows, and RealVNC Viewer, which offers clients for Windows, macOS, Linux, Android, and iOS.
Alternatively, many IT professionals, particularly those accustomed to Windows environments, prefer the Remote Desktop Protocol (RDP). While not enabled by default, Ubuntu readily supports RDP connections through the installation of the xRDP server package. We will detail both the native VNC setup and the steps to enable RDP access.
For scenarios where you need to connect from your Ubuntu machine to other systems (Windows, macOS, or other Linux instances), Ubuntu includes the versatile Remmina Remote Desktop Client. Remmina supports multiple protocols, including VNC, RDP, SSH, and more, providing a centralized tool for managing various remote connections without needing separate applications.
Step 1: How to Enable Screen Sharing on Ubuntu 24.04.1
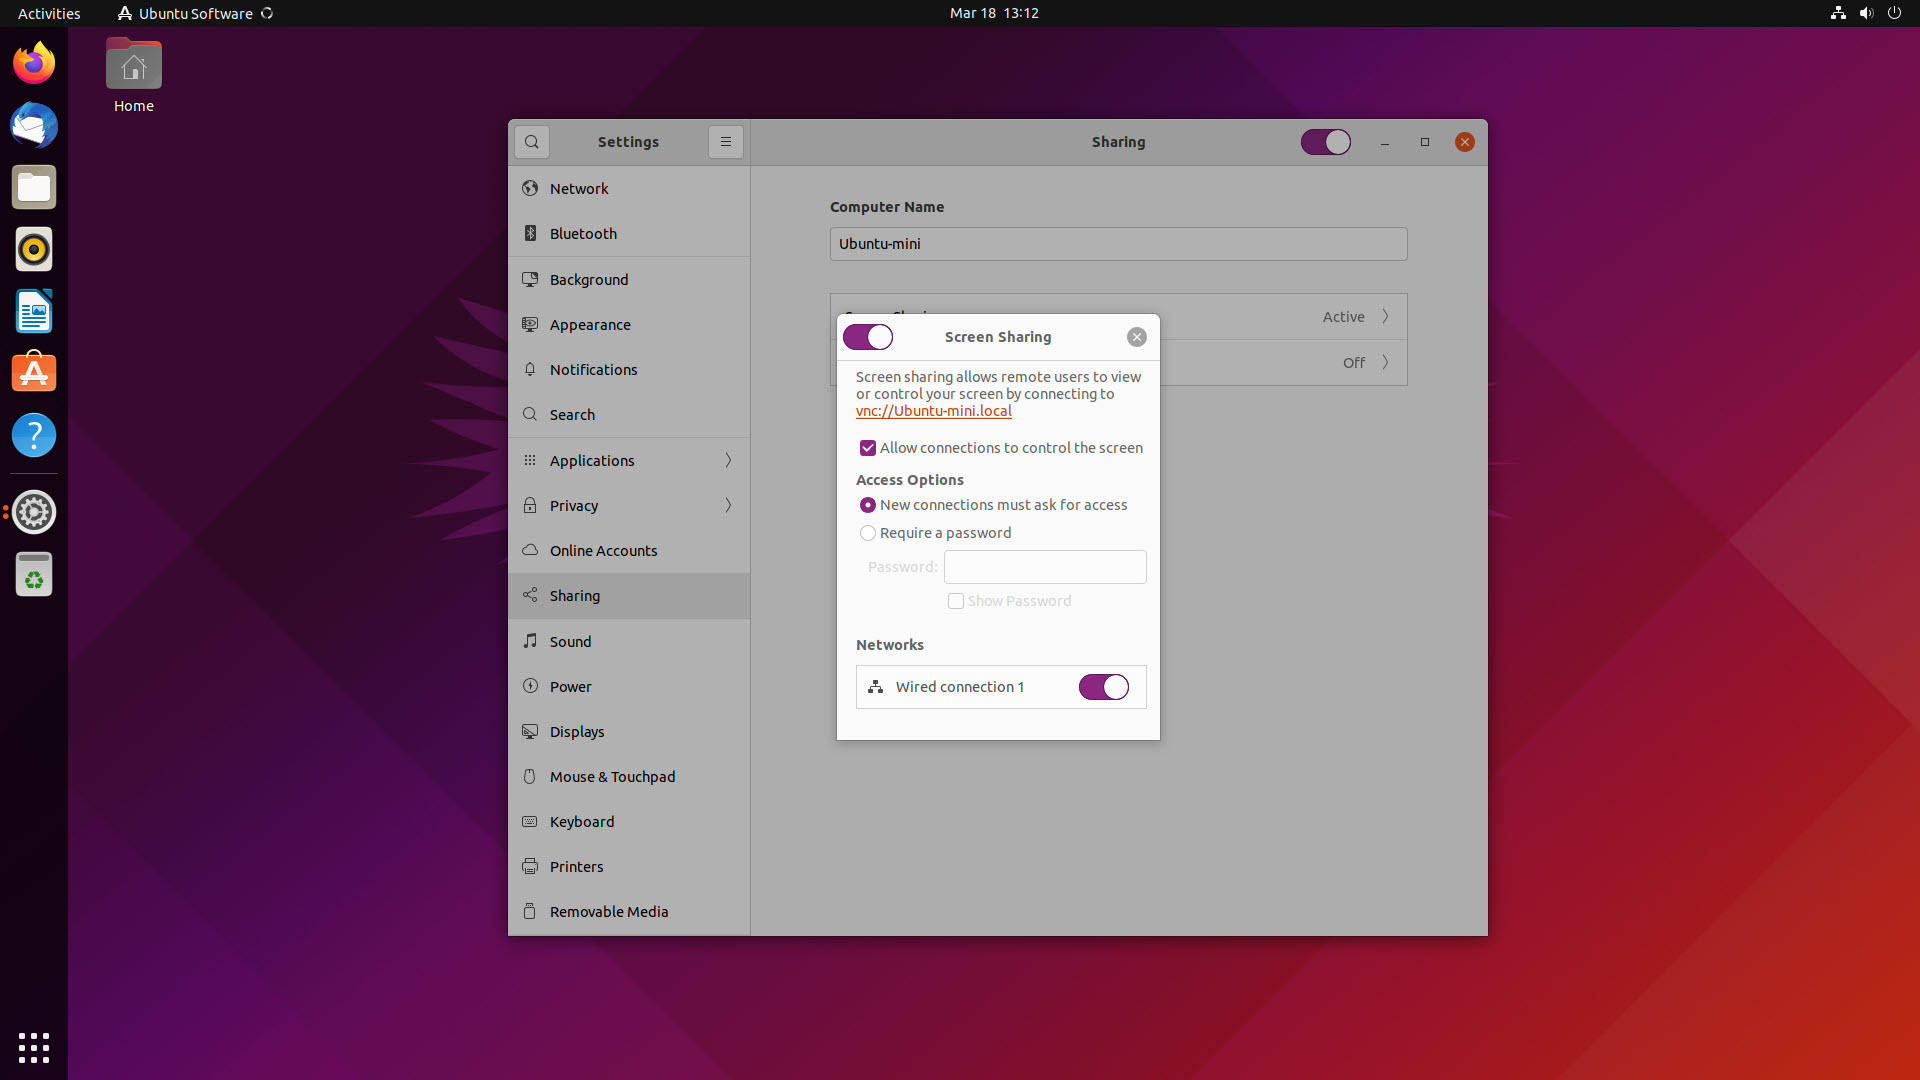
Configuring Ubuntu's built-in VNC server is straightforward using the desktop's settings panel:
- Access System Settings: Click the applications grid icon (usually bottom-left) and search for "Settings," or find it in your favorites. Click to open the System Settings application.
- Open Remote Desktop Settings: Within the Settings window, navigate to the "Sharing" or "System" section (depending on your specific Ubuntu flavor/desktop environment) and select "Remote Desktop".
- Enable Desktop Sharing: Locate the "Remote Desktop" toggle switch (previously might be labeled "Desktop Sharing" in older versions) at the top and enable it. This allows remote viewing of your desktop.
- Enable Remote Control (Optional but Recommended): To interact with the remote desktop (not just view it), ensure the "Remote Control" toggle switch is also enabled.
- Note Connection Credentials: Below the toggles, you'll find crucial connection details: your Ubuntu machine's Device Name (hostname), the VNC Port (usually 5900), and the Authentication credentials (Username and Password). Securely record the password required for remote connections.
With these steps completed, your Ubuntu system is configured to accept incoming VNC connections.
Sign up today and you will receive a free copy of our Future Focus 2025 report - the leading guidance on AI, cybersecurity and other IT challenges as per 700+ senior executives
Step 2: How to find the IP address of your Ubuntu computer
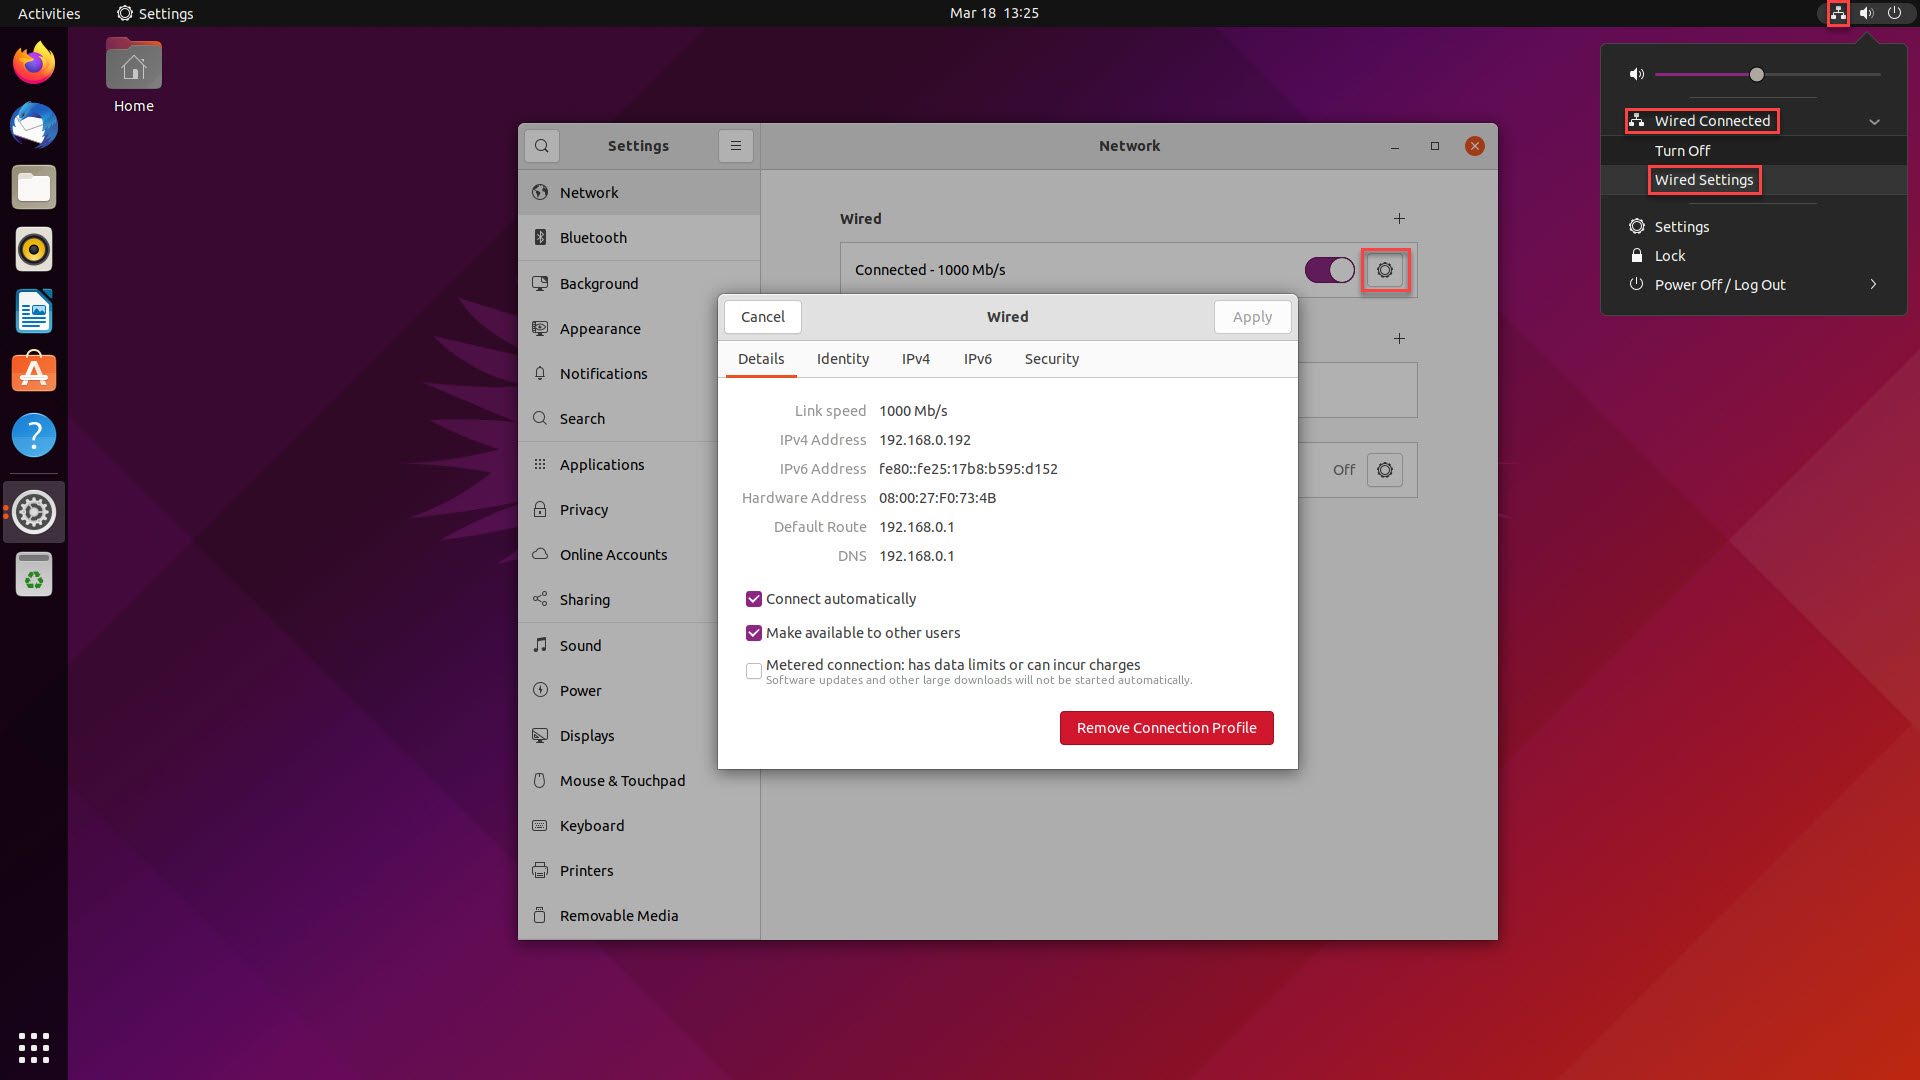
To establish a remote desktop connection, the client software needs the network address of the target Ubuntu machine. You'll typically use the internal IP address if connecting within the same local network.
- Access Network Settings: Click the network icon (Wi-Fi or Ethernet symbol) in the top-right system tray area. Select your active connection (e.g., "Wired Settings" or "Wi-Fi Settings").
- View Connection Details: In the Network Settings window that appears, click the cogwheel icon next to your active network connection.
- Locate the IP Address: Scroll through the details panel to find the IPv4 Address. This sequence of numbers (e.g., 192.168.1.105) is the IP address you need to enter into your VNC client. Note it down accurately. Pro Tip: For reliable long-term access, consider configuring a static IP address or using hostname resolution within your network.
With the IP address identified, you're ready to configure your VNC client on the remote machine.
Step 3: How to install a VNC client
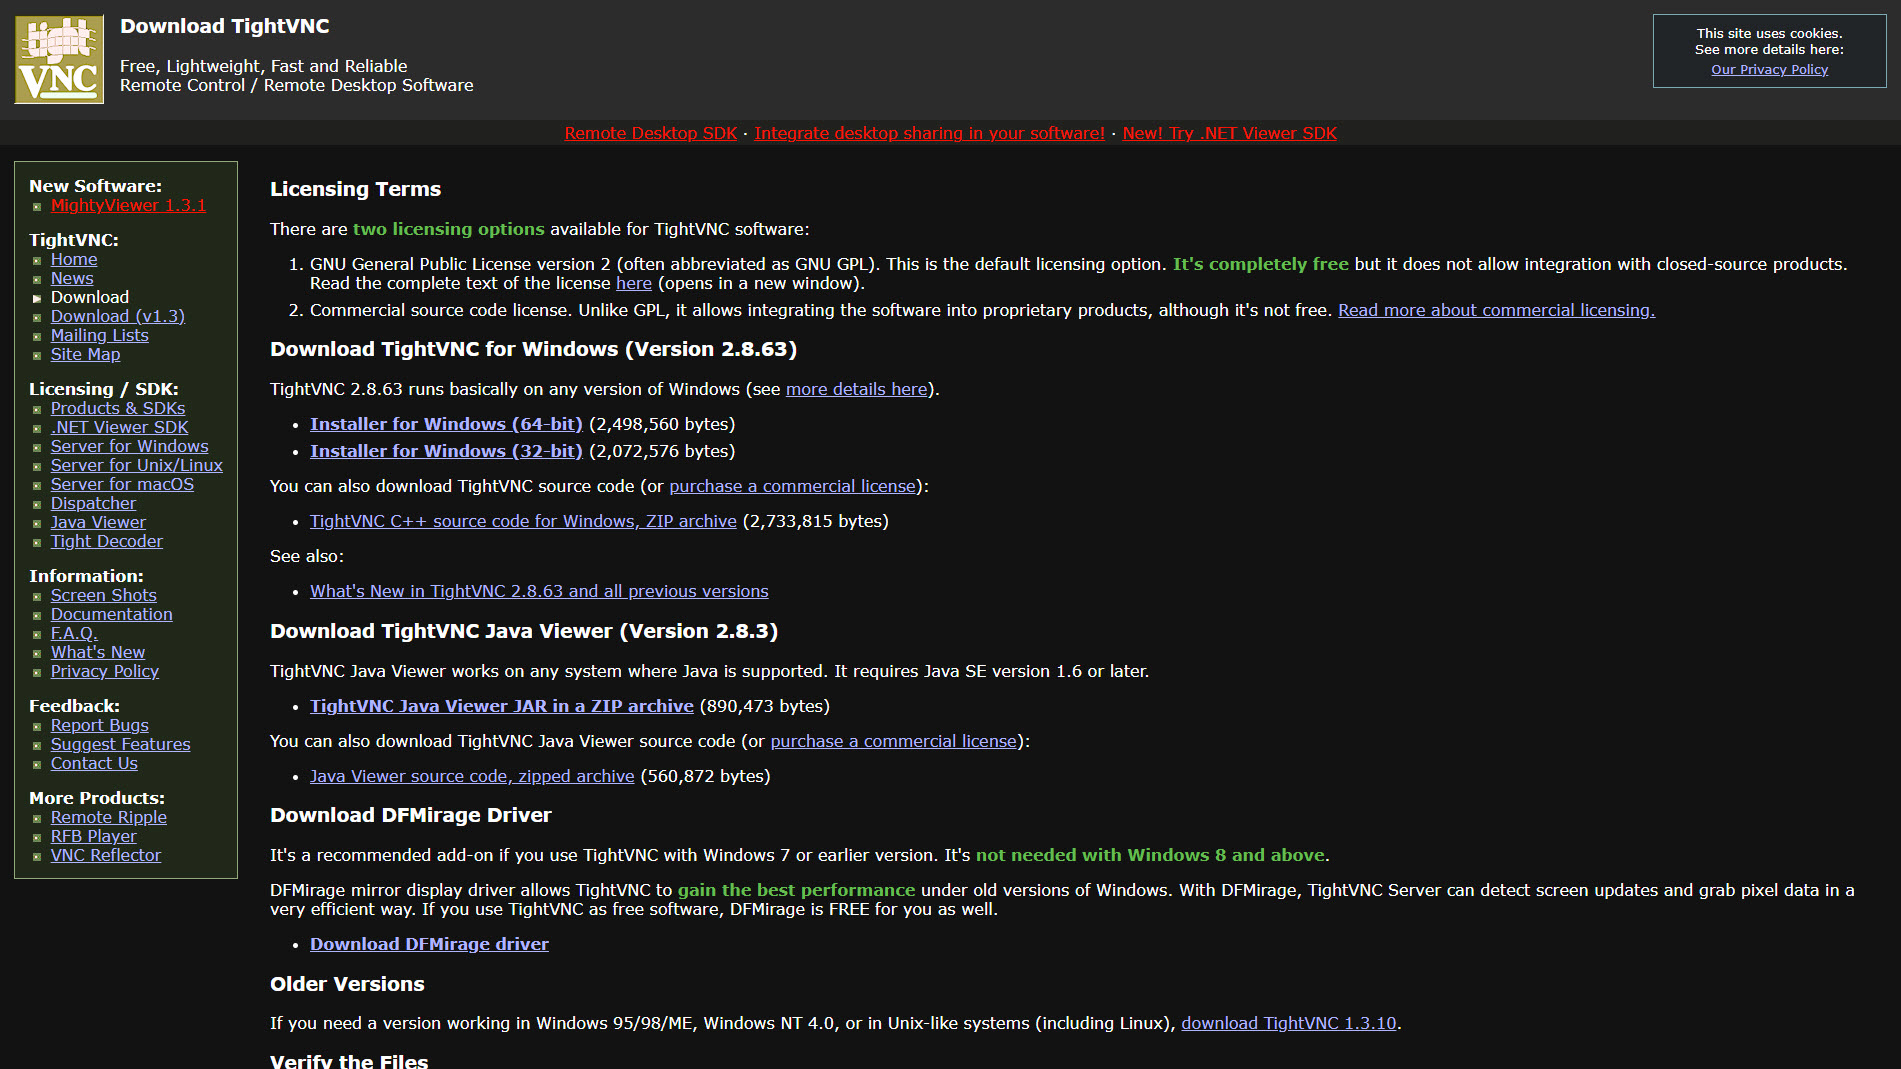
On the computer from which you want to connect to your Ubuntu machine, you must install a VNC client (also known as a VNC viewer). As mentioned, excellent free and open-source options exist:
- TightVNC: A popular choice for Windows users.
- TigerVNC: A high-performance client available for multiple platforms.
- RealVNC Viewer: Offers broad platform support, including mobile devices.
- UltraVNC: Another feature-rich option for Windows.
Download your preferred VNC client from its official website and follow the standard installation procedure for your operating system. These clients are generally lightweight and require minimal configuration post-installation.
For this guide's example using TightVNC on Windows: download the installer, run it accepting the defaults, and the TightVNC Viewer application will be ready to use.
Step 4: How to remote desktop into Ubuntu
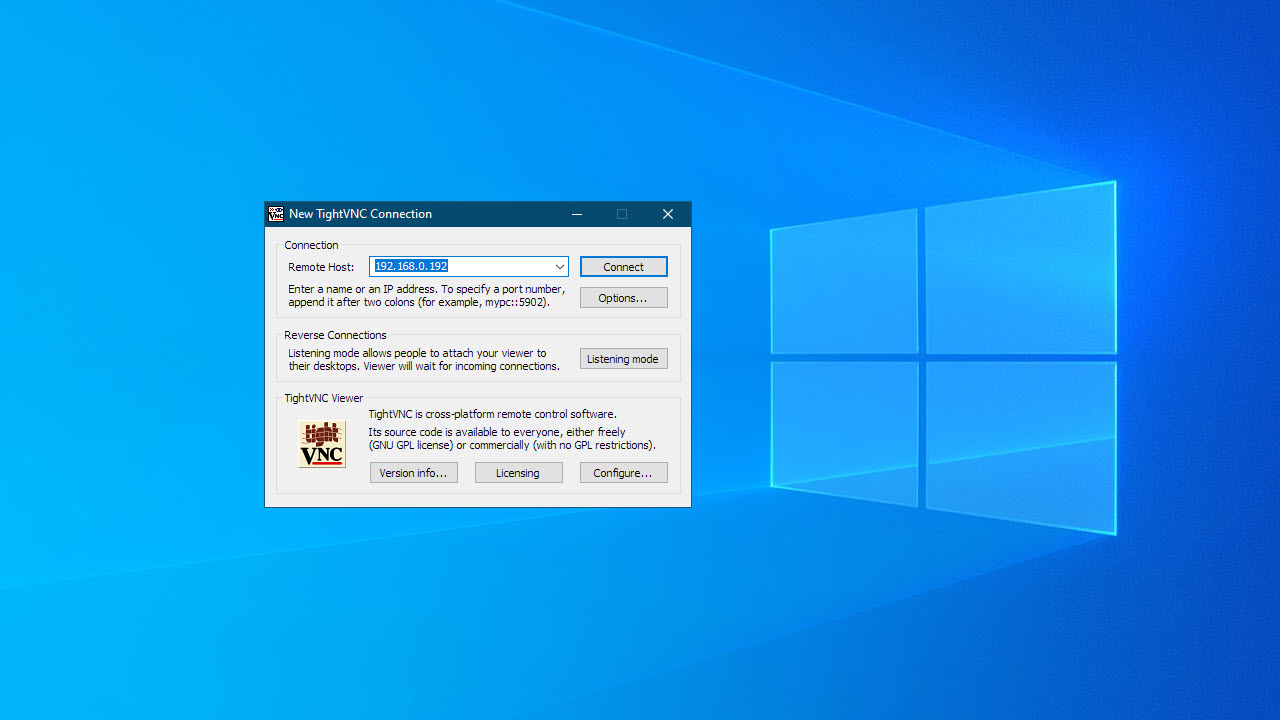
Connecting via your installed VNC client is typically straightforward:
- Launch the VNC Client: Open the VNC client application (e.g., TightVNC Viewer).
- Enter Target Address: In the connection dialog box, enter the IP address of your Ubuntu machine (noted in Step 2) into the "Remote Host" or equivalent field.
- Initiate Connection: Click the 'Connect' button.
- Authenticate: You will likely be prompted for the password you configured in Ubuntu's Remote Desktop settings (Step 1). Enter it carefully.
- Access Granted: Upon successful authentication, you should see your Ubuntu desktop appear within the VNC client window, allowing full remote control.
Optional step 5 for Windows users: How to use RDP
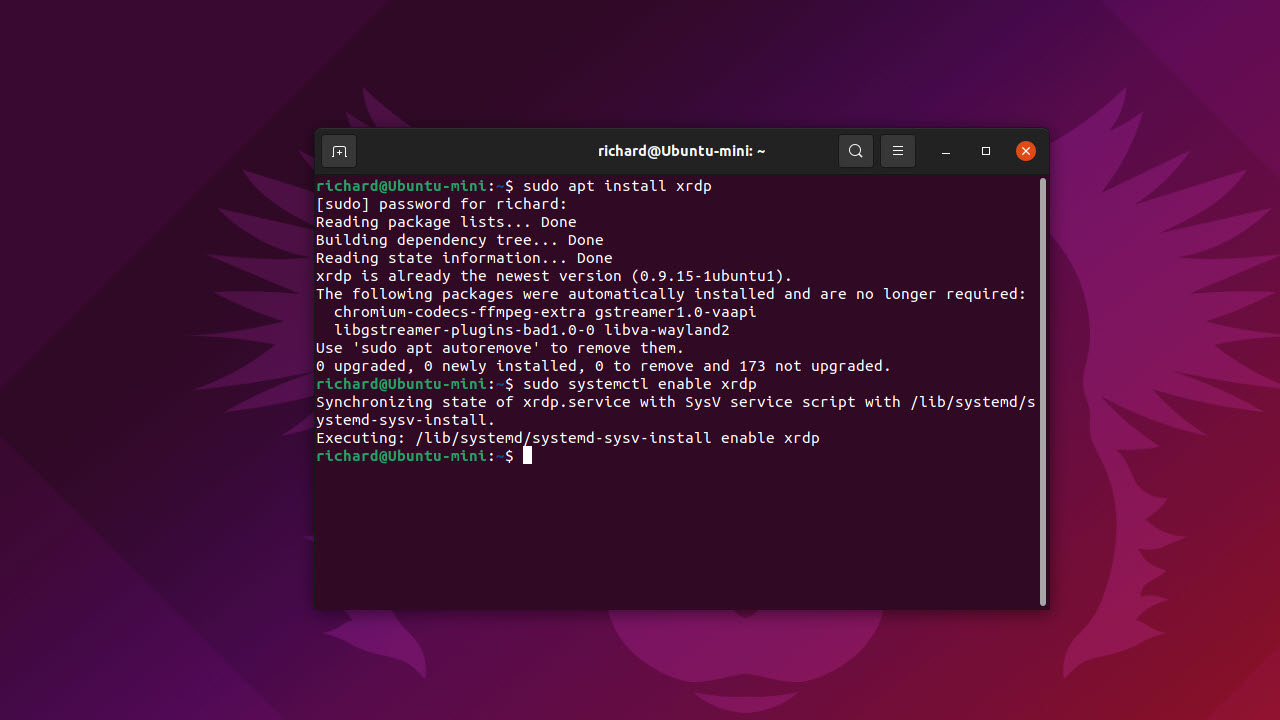
If you predominantly work with Microsoft Windows, you may be more comfortable using RDP to connect to your Ubuntu computer than VNC.
RDP is the protocol used by Microsoft Remote Desktop. It isn’t enabled by default on Ubuntu, but it’s easy to get it up and running by installing xRDP on your Ubuntu computer.
- To start, bring up the terminal (command line) on your Ubuntu computer by pressing Ctrl + Shift + T
- Enter the command ‘sudo apt install xrdp’, without the quotes, and press enter: you’ll need to enter your administrator password, and this command will download and install xRDP
- Now, enter the command ‘sudo systemctl enable xrdp’, without the quotes, and press enter: this will enable the xRDP listening service
Your Ubuntu machine can now accept incoming RDP connections. You can connect using the "Remote Desktop Connection" tool built into Windows (search for mstsc.exe) or download official Microsoft Remote Desktop clients for macOS, Android, and iOS from their respective app stores. Use your Ubuntu username and password when prompted by the RDP client.
Refer to our detailed guide on how to use Microsoft Remote Desktop Connection for client-side specifics.
Things to consider when using Ubuntu remote desktop
While VNC and RDP cover most graphical remote desktop needs, consider these alternatives and factors:
- Secure Shell (SSH): For command-line access only, SSH is the industry standard. It's incredibly lightweight, secure, and efficient for server administration, running scripts, or managing files without the overhead of a graphical interface. Install the OpenSSH server (sudo apt install openssh-server) on Ubuntu if not already present.
- Third-party tools: Solutions like TeamViewer and AnyDesk offer user-friendly remote access, often simplifying connections through firewalls and NAT without manual configuration. They provide cross-platform clients and are popular for remote support scenarios, though commercial use may require licensing.
- Chrome remote desktop: Google's solution allows access via the Chrome browser. While functional, setting it up for access to Ubuntu from external networks can sometimes be more complex than dedicated VNC/RDP setups.
- Security: Always prioritize security. Use strong, unique passwords for remote access. Ensure connections are encrypted (RDP typically is; VNC encryption varies by implementation – consider tunneling VNC over SSH for added security). Keep your system and remote desktop software updated. Restrict access using firewall rules (allow only necessary ports like 5900 for VNC or 3389 for RDP, ideally only from trusted IP addresses). For highly sensitive environments, consider using a VPN or SSH tunneling.
- Performance: Remote desktop performance depends heavily on network bandwidth and latency. Wired connections generally outperform Wi-Fi. Adjusting display settings like color depth or disabling visual effects can improve responsiveness over slower links.
- Wayland vs. Xorg: Newer Ubuntu versions default to the Wayland display server. Some remote desktop solutions (especially older VNC implementations) work better with the traditional Xorg display server. If you encounter issues like black screens, try logging out and selecting the "Ubuntu on Xorg" session from the login screen before enabling sharing or connecting.
RELATED RESOURCE

Discover why development and security teams need to adopt a responsible approach to AI
Further reading on remote desktops
If you’d like to dive deeper into remote desktop technologies, we offer a range of articles to help you explore different protocols and platforms. Learn more about key options like RDP, XRDP or VNC, and discover what TeamViewer has to offer. Additionally, if you're using Microsoft products, you might find our guide on Microsoft Remote Desktop particularly useful.
For those working with macOS, we also provide step-by-step instructions on setting up a remote desktop on a Mac, configuring Chrome Remote Desktop, and how to remote desktop from Mac to Windows.
Troubleshooting common remote desktop issues on Ubuntu
Even with a robust setup, users may occasionally run into issues when trying to remote desktop into Ubuntu. Here are a few common problems and how to resolve them:
- Connection timeout: Ensure that both machines are on the same network (if applicable) and that the IP address you’re using is correct. Double-check your firewall settings to ensure remote desktop ports (like 5900 for VNC or 3389 for RDP) are open.
- Authentication failures: If you’re unable to authenticate, revisit your password setup in the screen sharing or xRDP configuration. Also, verify that your username is correctly entered.
- Screen resolution issues: Some users experience screen resolution problems when connecting via VNC. Adjust the resolution settings on both your client and server to find an optimal display size.
- Lag or slow performance: Network latency can cause lag in remote desktop sessions. Try connecting over a wired Ethernet connection or ensure your Wi-Fi is stable with minimal interference.
- Security concerns: Remote desktop access can expose your system to potential threats. Ensure that your connection is secure by using encrypted protocols and strong passwords, and consider using VPN or SSH tunnels for an added layer of security.
Choosing the right remote desktop protocol: VNC vs. RDP on Ubuntu
Before diving into the setup steps, understanding the fundamental differences between VNC (Ubuntu's built-in option) and RDP (enabled via xRDP) is crucial for selecting the best protocol for your specific needs. Both enable graphical remote access, but they excel in different areas:
Virtual Network Computing (VNC):
Remote Desktop Protocol (RDP) via xRDP:
Which should I choose?
Understanding these distinctions will help you follow the most relevant steps in this guide for establishing effective remote desktop access to your Ubuntu system.
Richard brings more than 20 years of computer science, full-stack development and business operations experience to ITPro. A graduate in Computer Science and former IT support manager at Samsung, Richard has taught courses in Java, PHP and Perl, and developed software for both private businesses and state organisations. A prolific author in B2B and B2C tech, Richard has written material for Samsung, TechRadar Pro, and now ITPro.
