How to use remote desktop on Windows 10
We break down how to use remote desktop on Windows 10, across options for attended and unattended access


Sign up today and you will receive a free copy of our Future Focus 2025 report - the leading guidance on AI, cybersecurity and other IT challenges as per 700+ senior executives
You are now subscribed
Your newsletter sign-up was successful
For business owners looking to enable employees to connect to their work computers remotely, the best remote desktop software capable of reliably maintaining tens or hundreds of connections is necessary.
Fortunately, there are many ways you can connect to a remote desktop on Windows 10. We compiled this guide on how to make an effective remote desktop connection on Windows 10 with these types of programs in mind.
How to use remote desktop on Windows 10: Preparation
Before establishing a remote desktop connection with your Windows 10 PC, you must enable and configure your remote desktop settings. Navigate to the Start menu on your PC, and type Control Panel in the search bar. Click "Control Panel", then click "System and Security".
Under the "System" heading in "System and Security", click "Allow remote access". A pop-up window will open with several tabs. Click over to the "Remote" tab. Under the "Remote Desktop" heading, click the radio button that says "Allow remote connections to this computer".
Finally, tick the box that says "Allow remote connections only from computers running remote desktop with Network Level Authentication (NLA)" if you want to. NLA is a second layer of security that reduces the chances of a malicious actor taking control of your PC via remote desktop. You should leave this feature on unless you have a specific reason not to.
At this point, your PC is ready for remote connectivity. You can also add specific users from a drop-down list using the "Select Users" button. This will limit remote desktop access to only specific users. Otherwise, leave things as is—users with administrator access will receive remote desktop connectivity by default.
Initial setup
Step 1: Select a remote desktop software solution
There are a lot of different remote desktop software solutions available, including free software like Microsoft Remote Desktop and paid solutions such as TeamViewer, which is one of the best remote desktop software solutions available for business users.
Sign up today and you will receive a free copy of our Future Focus 2025 report - the leading guidance on AI, cybersecurity and other IT challenges as per 700+ senior executives
TeamViewer has outstanding security features and built-in communication tools. It also has tools for rapid mass deployment across your organisation, which are vital for effective business use, but aren’t available with most free remote desktop solutions.
The rest of this guide assumes you chose to use TeamViewer for remote desktop access. That said, remote desktop programs are broadly similar, and you can follow along regardless of what program you choose. Just remember that specific menu buttons and locations will vary.
- You can download and install TeamViewer without buying it, but you will need to log in to use it, which is only possible after purchasing a plan.
- To purchase TeamViewer, navigate to its Buy Now page and select a plan that makes sense for you. Once you have made a selection, hit the "Buy" button under your plan of choice, review your order details, and click "Continue to Payment".
- Once you have purchased a plan, navigate to TeamViewer’s home page and click the "Download" button at the top of the screen. Choose an appropriate version of TeamViewer based on your device. You can download TeamViewer onto a Windows PC, Mac, Linux machine, Chromebook, Raspberry Pi, Android, or iOS device. You can then use these devices to access your Windows 10 PC remotely.
- Once TeamViewer finishes downloading and installing, you will need to choose your access type to proceed.
There are two types of remote access sessions: attended and unattended access. With attended access, someone is using the PC while you access it from a remote location.
This type of access usually comes with a text-based chat enabling the remote and regular user to communicate. This is good for remote tech support, presentations, and other tasks that require shared screen control and collaboration. Unattended access means that nobody else is using the PC at the time of remote access.
Most remote desktop programs enable both access types, but you should decide which one meets your current needs, since the process to implement them is quite different.
This guide has instructions for running both types of sessions. To proceed, follow the instructions below for unattended access or skip ahead to the instructions for attended access.
Unattended access
Step 1: Initiate setup

Download the TeamViewer installer to your Windows PC. Make sure that you install the correct version, either 32-bit or 64-bit, depending on your version of Windows. You can see what version of Windows you have by navigating to Settings > System > About and checking the "System Type" field. It should say either 32-bit or 64-bit operating system.
When you download TeamViewer to your PC, you will see two options: one to install it as normal, and another to install remote desktop on the current PC. Choose the latter, and wait for TeamViewer to finish installing.
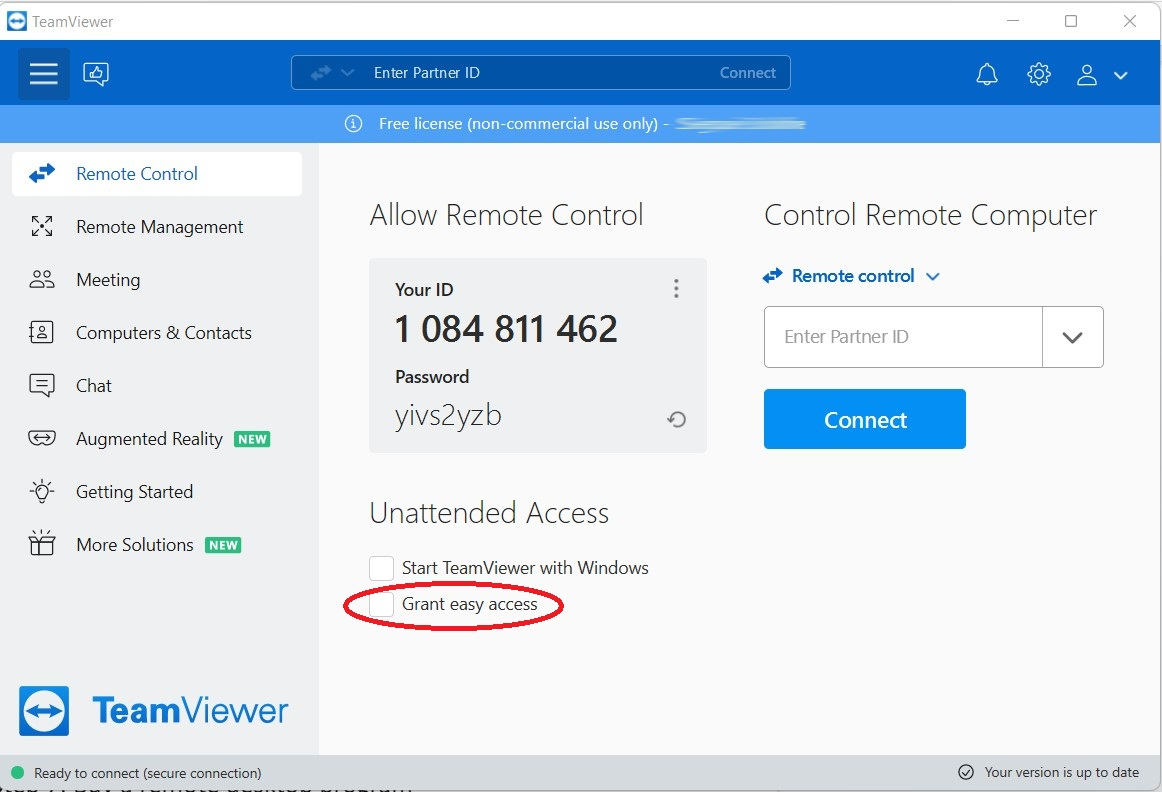
Log on to TeamViewer on the Windows PC and tick the box labeled "Grant easy access" under the "Unattended Access" heading.
Enter your login credentials to connect the Windows PC to a TeamViewer account in the pop-up window. Click "Assign".
Finally, log into TeamViewer on the device you will be using to initiate remote access. You should see your Windows PC on your list of computers and contacts. Click on it to start a remote desktop session at any time. Note that the Windows PC needs to be on and connected to the internet in order for you to access it remotely.
Attended access
Step 1a: Connect with QuickSupport

QuickSupport is user-friendly and walks users through requesting support step by step, making it a better option for large organisations.
Setting up attended access with QuickSupport in TeamViewer is quick and easy. First, install TeamViewer’s QuickSupport utility onto your Windows PC. Next, click "Send Your ID" to quickly share your support ID with a support person via SMS, email, or a messenger program of your choice.
The support person will then receive an email with a link for them to connect. Once the support person clicks the link, they should receive complete remote control of the Windows PC from their chosen device. They can also communicate with the PC user via video, voice, or text-based chat.
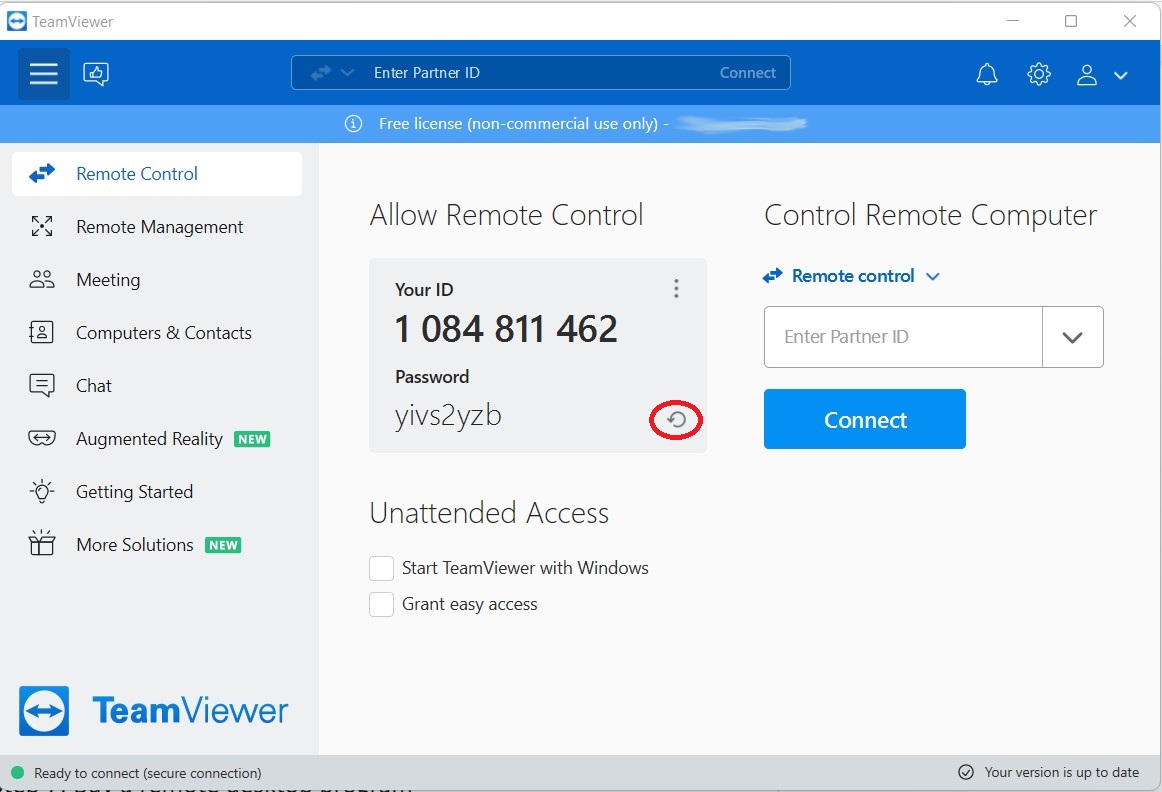
If you have a small team, you can set up a connection in just two steps without QuickSupport. First, the PC user should email their ID and password to the support person. Next, the support person should enter the ID and password into TeamViewer on their end and press "Connect".
That’s it! You now have an active remote desktop connection to your Windows PC. Note that this method can quickly get out of hand with a large organisation, with many email requests coming in at once. Hence, it is only suitable for a business with relatively infrequent support sessions.
It’s also important to reset your password after each session.
Remote desktop on Windows 10: Summary
Now you know how to use TeamViewer or a similar remote desktop program to connect to your Windows 10 PC from any device. You can set up an unattended access session to control your PC from another location, or assist an existing PC user through an attended access session.
Further reading on remote desktops
If you're interested in finding out more about remote desktop technology and platforms, we've got a wide range of content available for your reference. Learn more about protocols such as RDP, XRDP or VNC and what TeamViewer offers; find out how to use Microsoft Remote Desktop and how to use remote desktop on Windows 10.
If you need walkthroughs for setting up remote access via Microsoft or Apple OSs, see how to use remote desktop on Mac, how to set up Chrome Remote Desktop; and how to remote desktop from Mac to Windows.
Finally, if you're a Linux user, find out how to remote desktop into Ubuntu via the best remote desktop for Linux.
Serguei Solokhine is an experienced freelance writer specializing in a range of topics, including finance, marketing, and travel.
He holds degrees in both finance and marketing, and boasts five years of experience working in the financial services industry across a range of roles.
Serguei enjoys writing about personal finance and investments, and has published works in several publications, including MoneyVisual, ITPro, Top.10, and TechRadar. He has covered topics such as software as a service (SaaS), CRM, and VPNs for TechRadar in addition to in-depth articles exploring web design, B2B remote desktop technology, and cloud computing for ITPro.
