How to speed up a laptop: 16 handy tips
Learn how to speed up a laptop using software tweaks or hardware upgrades, extending its shelf life in the process


Sign up today and you will receive a free copy of our Future Focus 2025 report - the leading guidance on AI, cybersecurity and other IT challenges as per 700+ senior executives
You are now subscribed
Your newsletter sign-up was successful
Knowing how to speed up a laptop is undeniably important for today's workers. Particularly as more and more of us are working remotely, the ability to boost your own device's performance can be a game changer.

The key is being able to diagnose what is causing your machine's sluggish performance. This can be attributed to a number of factors, from background programs you don't need to low disk space. There are also more technical issues, such as insufficient memory, and more concerning troubles like the presence of malware.
Many of these issues can of course be solved by purchasing new hardware, although this option is not always available. For those with constricted budgets, the good news is that most of the tips we've outlined below should breathe at least some live into slowing systems.
How to speed up a laptop: 16 handy tips
There are some simple places to start with performance enhancements; much of the following is based on Windows 10, though there are a number of similarities with operating systems, so they should also work across Windows 11 laptops.
Please note, that some of these steps also involve the replacement of hardware, which might not be feasible if you don't personally own your machine or even have the necessary tools to gain access to the insides of your laptop.
All the software-based suggestions, however, should address most of the usual issues that slow laptops down.
This article will cover the following steps in more detail:
Sign up today and you will receive a free copy of our Future Focus 2025 report - the leading guidance on AI, cybersecurity and other IT challenges as per 700+ senior executives
- Deleting unused programs
- Limiting startup programs
- Cutting down on ‘bloatware’
- Removing malware
- Deleting unnecessary system resources
- Swapping out your hard drive for an SSD
- Defragging your hard disk
- Using ReadyBoost to increase memory
- Switching off unnecessary animations
- Disabling automatic updates
- Removing web results from Windows search
- Optimizing Windows search
- Improving your cooling
- Adding more RAM
- Switching to Linux
- Biting the bullet and buying a new laptop
1. Delete unused programs
Over the course of your device’s life, you are likely to install a range of programs on it. Although software and web extensions might be individually useful when installed, over time these programs can build up and result in serious performance issues.
If it’s been a while since you stopped to check which applications you need, and which can be uninstalled, it’s a good idea to start here.
Some small programs can actually hog system resources, particularly desktop customization programs, virus scanners, and file optimization tools. Utility software like this can hang around in the system tray, subtly chipping away at the effectiveness of your device.
The process for taking stock of installed programs is largely the same on both Windows 10 and 11. You simply need to:
- Open the Settings app
- Select Apps’ then ‘Apps & Features’ - or search for 'uninstall' and select 'Add or Remove programs'
- From here you can see the list of installed apps
As a good practice, it’s advised to do this every once in a while. Even if you don’t end up uninstalling any applications, it is good to keep a mental checklist of what you have installed. If you want to free up large amounts of space quickly, you can sort this list by the size of the app, which will reveal the worst offenders.
2. Limit startup programs
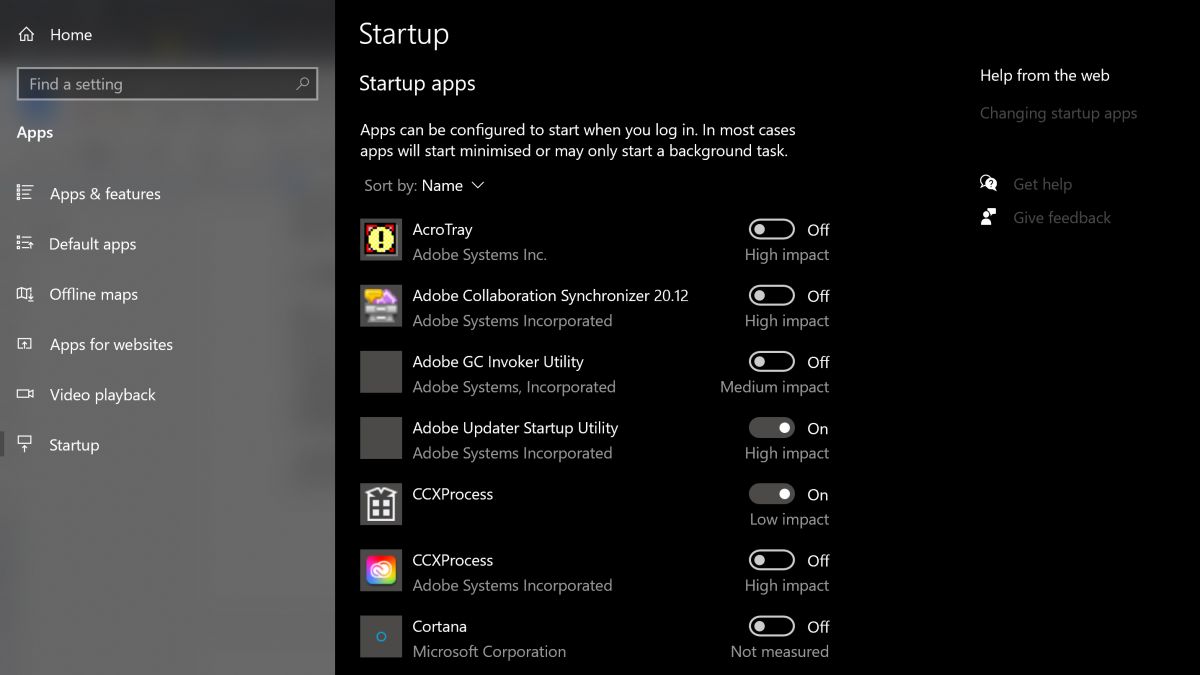
Many programs are designed to open automatically after you boot up your device. Although this can be helpful for productivity apps like Slack or Teams, enabling too many programs to do this can overwhelm your laptop’s memory on launch and impact performance.
Luckily, controlling which applications open on Windows 10 or 11 startup is very easy.
All you have to do is:
- Navigate to the settings menu
- Click ‘Apps’ then ‘Startup’ to see a comprehensive breakdown of apps that can open on startup.
- From here, you are able to choose which apps are disabled or enabled upon launch.
This section also gives you advice on how each individual app impacts your system performance.
This section also gives you advice on how each individual app impacts your system performance.
3. Cut down on 'bloatware'
It’s not just old devices that can slow down. Factory-fresh laptops often come equipped with pre-installed programs that have been included as part of a software bundle, for example.
Although this can sometimes be helpful, more often than not this merely burdens the user with a slew of unnecessary utility tools. In the worst cases, manufacturers do deals with software vendors and include trials of paid software that the user may have never intended on buying or even trying out.
‘Bloatware’, as it’s called, can have a detrimental effect on system performance, taking up valuable memory and disk space. Following the same steps taken to delete unwanted programs, it’s worth assessing what programs have always been on your laptop, but don’t add anything to your user experience.
4. Remove malware
Users are advised to always be vigilant of the potential risks of malware, and to limit your exposure in this regard you can draw on a range of antivirus software to greatly reduce risk.
However, if you discover that malware is already present on your device, there are also a number of free malware removal tools that will do an effective job of detecting and eliminating whatever’s on your system.
Cryptomining malware is one of the most common types of malicious software that affects users today, and can have a detrimental effect on performance. This type of malware covertly utilizes system resources to run calculations needed to mine cryptocurrency.
The impact of this on a less powerful, older laptop model can be significant.
5. Delete unnecessary system resources
A simple but effective way of making things run a little smoother is to delete any unused resources.
You can do this fairly easily using a file scanner tool, which will tell you whether there are any old folders or files you haven’t accessed in some time. This might come in the form of older documents, or maybe even data stored on your laptop, including temporary files and cookies that could be affecting your PC’s performance.
A number of tools exist to help you with this. One of the most widely used is CCleaner, developed by Avast, which can clean potentially unwanted files and invalid Windows Registry entries from a computer.
The tool will scan your PC’s hard drive and search for folders or files that haven’t been accessed in some time. It will then delete anything within a criteria that you set out, while also taking a look at any problems that may exist in the registry that could be slowing down your laptop.
The tool also has a tab that allows you to uninstall programs directly through the utility, instead of having to go through the Control Panel, as well as a function for turning off startup programs. It is also able to locate hidden files that may be using up too much storage.
To get started follow these steps:
- Download and install CCleaner.
- Once installed, start the application.
- It will start on the ‘Health Check’ tab, which runs an overall system scan for a variety of problems, but a custom clean to get a little more granularity.
- In the ‘Custom Clean’ tab, click on ‘Analyze’ to scan the selected components, followed by ‘Run Cleaner’ to perform the actual operation.
- This will scan the drive looking for items such as temporary internet files, memory dumps, and more advanced stuff like cleaning out cache data.
You can choose what items you want to scan for, such as specific applications or system components. The Registry tab can also help you clean up any unnecessary registry entries that could slow down your laptop.
You can also use the Tools tab to explore various other features offered by CCleaner, including disk analysis and application removal. You may also want to head into CCleaner’s settings menu and disable the update notifications, as these may become irritating if you’re only planning on using the application every couple of months.
6. Swap out your hard drive for an SSD
If your laptop has a mechanical hard drive, then swapping it for a solid-state drive (SSD) could unlock significant improvements in read and write speeds and deliver improved overall performance.
This is possible because SSDs contain no moving parts, which also means they are more reliable, and can revitalize an ailing system. If your laptop already uses an SSD, it might also be worth considering an upgrade to a faster SSD.
Over the past few years, SSD prices have gone down and capacities up, so putting one in your laptop shouldn’t mean breaking the bank. However, as with RAM, many laptop hard drives won’t be replaceable or will use specialized form factors which bar the use of third-party drives.
Assuming your laptop is capable of being upgraded, you can use a cloning tool to copy Windows from your old disk to an SSD rather than reinstalling Windows from scratch.
7. Defrag your hard disk
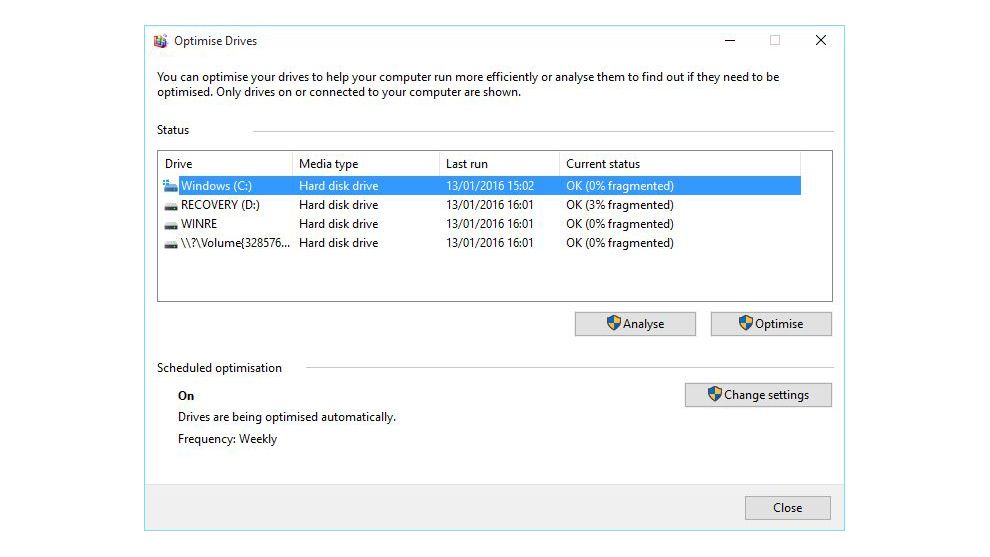
Old mechanical hard drives can often suffer from fragmentation. This happens when the various bits that make up a complete file are scattered across the physical surface of the drive platter. Because the drive head has to travel further across the surface of the disk to read all the separate portions, this has the effect of slowing down the machine.
Defragmentation, which is often referred to as defragging, restructures the disk to ensure that bits are grouped in the same physical area, with the intention of increasing the speed of hard drive access.
Note, however, because solid-state drives (SSDs) do not use spinning-platter disks, they do not experience fragmentation. On the one hand, that’s a bonus for businesses using SSDs, as it is one less step to take to speed up laptops; on the other, if your laptop with an SSD is experiencing slowdown, this is not a step that will help.
It’s simple to check whether a physical disk needs defragging by:
- Heading to the storage tab in Windows 10’s system settings menu
- Select the option labeled ‘Optimize drives’
- This opens the optimization wizard, which allows you to analyze all of your machine’s drives individually
- This then presents you with a percentage value for how fragmented each one is
- From there, you can defrag the drive of choice, which should result in more stability and faster performance.
8. Use ReadyBoost to increase your memory
ReadyBoost is a clever feature that was introduced by Microsoft as part of Windows Vista. In short, it allows you to boost your system memory by using a flash drive as additional capacity.
Although it’s not as effective as swapping a hard drive for an SSD, ReadyBoost can provide a little uptick to the performance of your system, particularly if you’re using a low-powered laptop with limited random access memory (RAM).
It puts aside a part of the flash drive memory for things such as caching, helping regularly-used apps to open quicker, and increasing random read access speeds of the hard disk.
Here's how to use ReadyBoost:
- Insert a USB memory stick into an empty USB slot on your chosen laptop
- A dialogue box will open, asking you what you want to do with the flash drive Select ‘Speed up my system using Windows ReadyBoost'
- Another window will open, and here you can select how much of the drive you wish to give over for boosting.
- Once that’s done, accept the settings listed and the window will close
The drive will be automatically detected and used whenever it’s plugged in.
It's worth noting, however, that if your machine is fast enough already, Windows will prevent you from using ReadyBoost so as not to waste time on a process that won’t measurably improve performance.
RELATED RESOURCE

Leverage automated APM to accelerate CI/CD and boost application performance
Constant change to meet fast-evolving application functionality
9. Switch off unnecessary animations
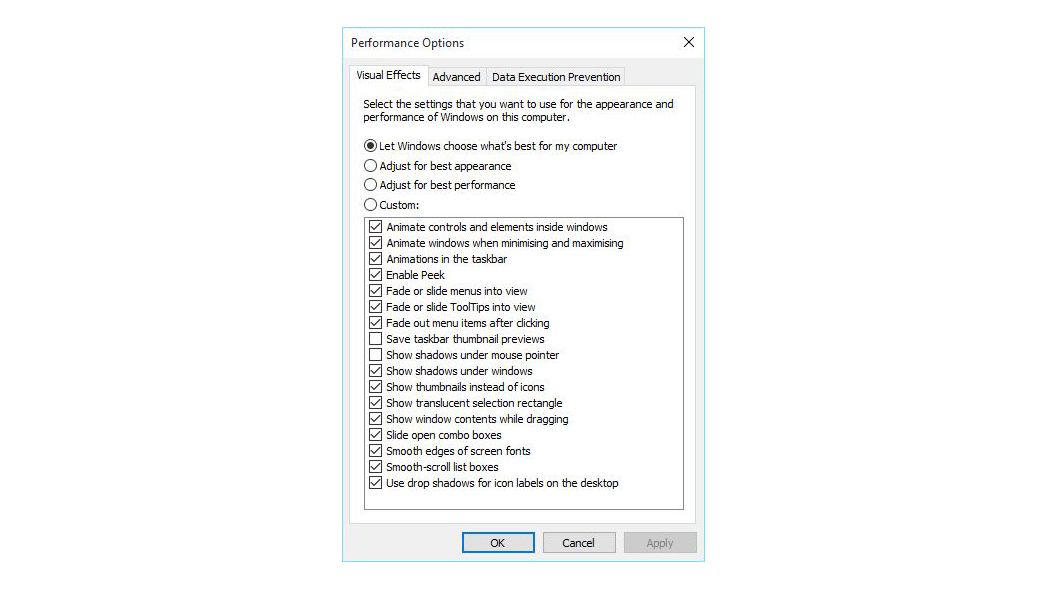
Ever since Windows Vista (and some would argue Windows XP), each new iteration of Microsoft’s operating system has become more animated with artistic graphics, crafted effects, and even icon drop shadows. Perhaps the most egregious era for this was that of Windows 7, with its cheery glow effects that did nothing for productivity.
For more recent iterations of Windows, such as Windows 11, animation effects are still used frequently. These can be simple animations for a range of actions, including opening and closing applications, or minimizing and maximizing apps.
These animations do provide the user with a smooth experience that’s easy on the eye. However, they can impact battery life, create unnecessary distractions and harm system performance.
Luckily, removing these visual effects is fairly simple and can be achieved in a few straightforward steps.
To turn off animation effects:
- Open the Settings menu
- Click on ‘Accessibility’
- Click ‘Visual’ effects tab
- Toggle the ‘Animation effects’ option to disable the feature
10. Disable automatic updates
Normally, we wouldn’t advise you to disable automatic software updates, as they’re the simplest way to keep your machine safe and secure from an array of cyber attacks and compatibility issues. After all, turning off the automatic updates has the potential to cause your device to become plagued with serious security holes.
Despite this, if you know the risks, this practice can be excused in the pursuit of improved performance.
For example, if your work laptop doubles as a gaming device, there’s a high possibility that game-distribution platforms such as Steam and the Epic Games Store are often installing multiple large updates and patches in the background.
Adobe Creative Cloud is also prone to significant background updates that can impact network performance in addition to system speeds. By disabling this option and updating only when you actually want to use the software, you can ensure that these updates aren’t getting in the way when you would rather be doing something else.
We would still advise that any critical software or frequently-used services - such as Windows or antivirus updates - are left on automatic, but if you’re really pushed for processing headroom, you can set these to download and install at a specific time when you’re unlikely to be using the device, such as late at night or at the weekend.
11. Remove web results from Windows search
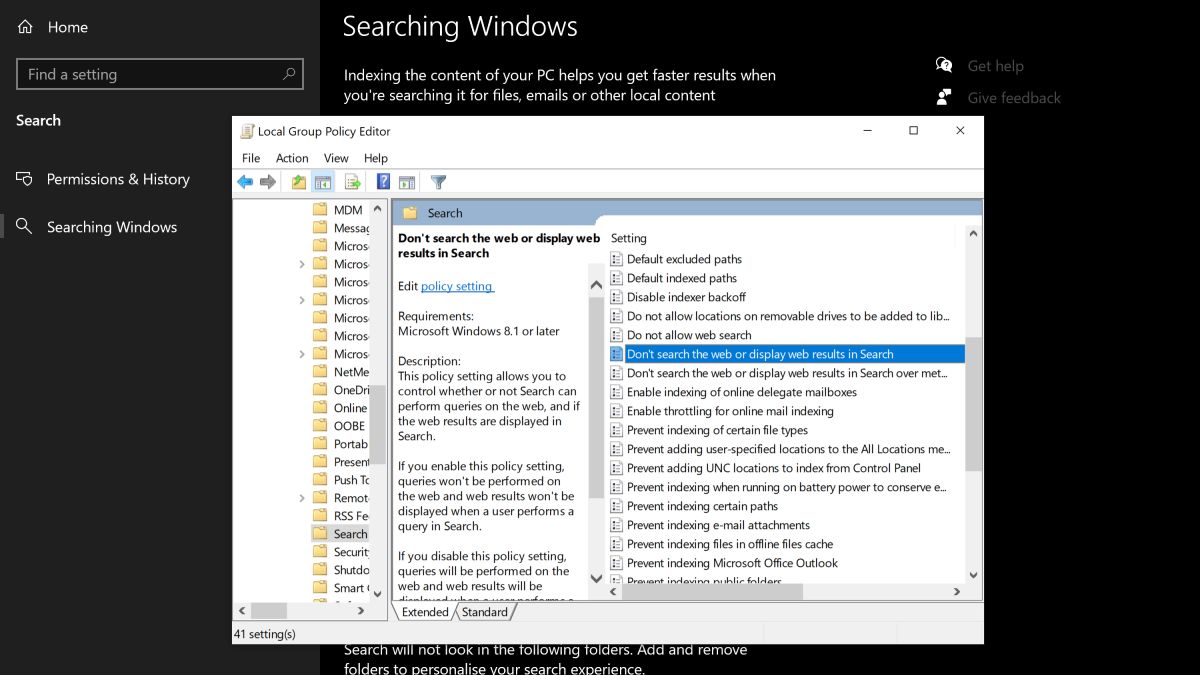
Note: The following will not work if your are using Windows 10 Home, which does not support the Group Policy Editor
Search indexing in Windows 10 and 11 has evolved much since its beginnings in older versions of Windows.
This feature creates an index of files and folders across your system, combined with their metadata, to find them more efficiently when you try and look them up using the operating system’s built-in search function.
In recent years, the way Windows handles search indexing has improved much, but optimizing it can still add to making your system more efficient.
First of all, you can disable the web results that appear in Windows 10’s search menu because, let’s be honest, it is unlikely that you’re using Windows search for web searches instead of a web browser.
To do this, simply:
- Press Windows key
- Type Run and open the app
- Type ‘gpedit.msc’ and hit enter to bring up the Group Policy Editor.
- Click on Local Computer Policy
- Click Computer Configuration
- Click Administrative Templates
- Click Windows Components
- Finally, click Search.
Find the policies labelled 'Do not allow web search', 'Don't search the web or display web results in Search' and 'Don't search the web or display web results in Search over metered connections', then double-click to edit them and set preference for each one to ‘enabled’.
At this point, it will be necessary to restart your computer for the changes to take effect. Once they do, you should no longer see web results and suggestions appearing in your system search bar.
12. Optimize Windows search
If you want to further improve the speed of your machine’s search function, it is also possible to alter the locations that Windows Search indexes to exclude things you know you don't need to find. This can include locations such as the Appdata folder that contains web browser cache and cookies, or other such folders that it is unlikely you will need to access.
If you don't use Internet Explorer, support for which ended in June 2022, or Edge, you may not want these indexed either.
To manage this:
- Open the system’s Control Panel
- Next, click on 'All control panel items' in the location bar at the top
- Find and click on Indexing Options
On Windows 11 you can access this by going to:
- Settings
- Privacy and Security
- Searching Windows
This will open a window that shows all the locations that are included in Windows search indexer. From here, you are able to manually choose which locations to include, or exclude, to speed up this search function.
The most comprehensive Windows Search setting is fairly demanding and will reduce your battery life and drain system resources.
13. Improve your cooling
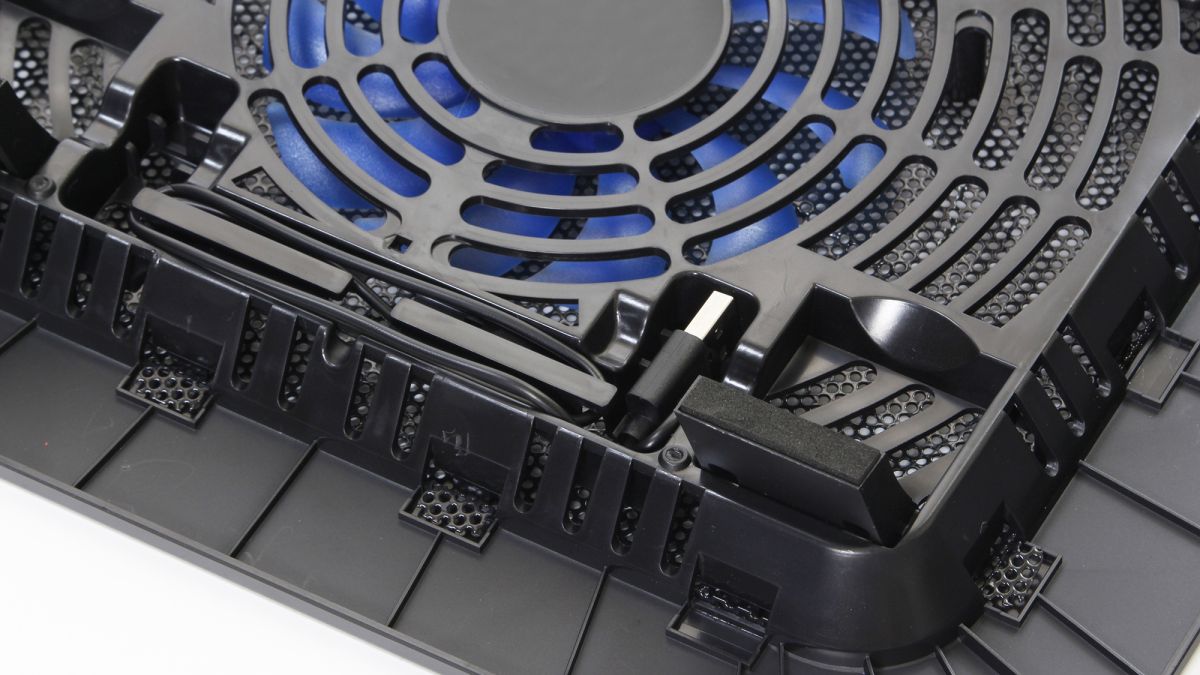
Have you ever experienced your laptop becoming unnervingly hot during the summer months, often accompanied by what sounds like a jet engine?
Unfortunately, this means that your laptop has reached its maximum safe operating temperature, and is trying to cool down by ramping up the fan speed and reducing the heat output of its processors through suppressed performance.
A lot of laptops come with built-in cooling systems, such as fans or heatsinks that aim to regulate temperature and prevent internal components from hitting their maximum temperatures.
However, even on some of the best laptops, the cooling systems may not be powerful enough for you to experience the full potential of your processor’s capabilities.
Fortunately, the market offers a number of solutions for this in which it is worth spending a little more, such as an external cooling pad. This piece of kit is placed underneath your laptop, blowing cool air into its underside in an attempt to keep the internal components from overheating.
These are optimal when used with laptops that have airflow vents situated at the bottom of their chassis, and can be acquired for as little as £10.
14. Add more RAM
When it comes to performance boosts, memory is often one of the first places to look. Indeed, many of the tips listed thus far have involved ways to fee up additional system memory. However, adding extra memory capacity can also be a great way to boost performance, particularly if it is an older laptop model.
Laptops running 32-bit versions of Windows can only have a maximum of 3GB in a system; essentially that means you can have 2GB and add in another 2GB, but Windows will only use 3GB of RAM.
Unfortunately, this won't be an option for all laptops. Many have their RAM soldered directly onto the motherboard – partly due to the desire for smaller chassis – which makes upgrades a nigh-on impossible task. And, even if your machine has replaceable SODIMMS for its RAM, you still have to open the chassis up, which is a pain at best – not to mention a big risk.
15. Switch to Linux
If nothing seems to be working well, you might be tempted to switch to a Linux-based OS.
Of course, this is not the ideal choice for everyone, but it is definitely one worth considering - particularly for developers and programmers, who are more likely to be comfortable with the Linux environment.
Taking the leap to Linux can mean a significantly less resource-intensive operating system for your computer, with numerous versions designed with the sole purpose of being gentle on your old hardware. Gentler than Windows, at least.
However, one downside to this option is that trading in your Windows OS for Linux isn’t the most straightforward journey. In fact, it’s a task that will require you to come prepared with time, patience, a USB stick, as well as copious amounts of troubleshooting.
On the other hand, the challenging installation process might be worth it. Linux is, after all, a truly impressive and useful operating system and you’re likely to find it easier to use than it at first seems.
16. Bite the bullet and buy a new laptop
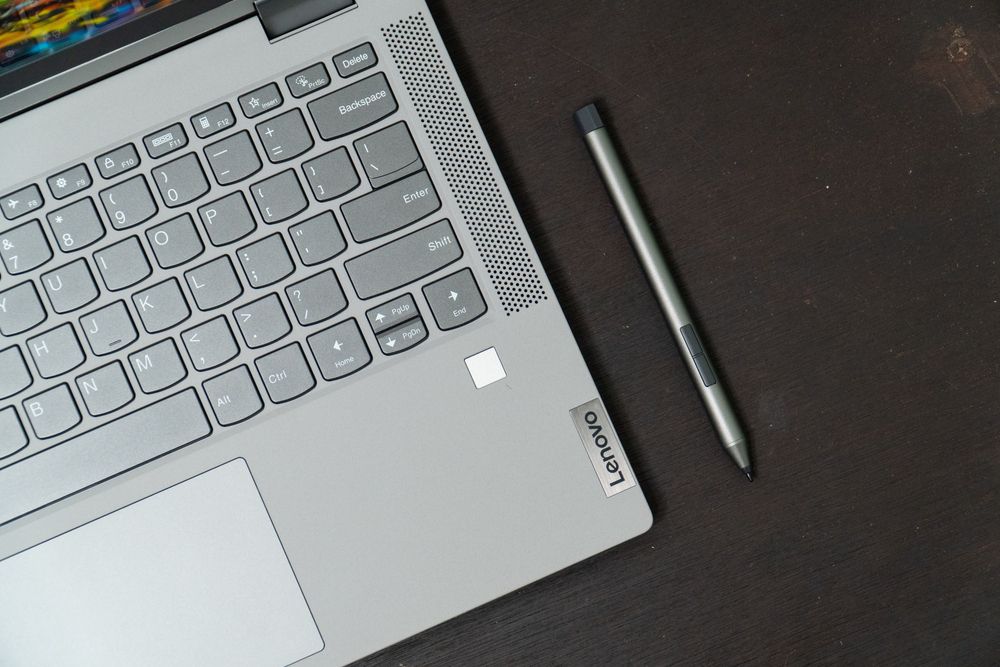
Even though buying a laptop is no small thing it is still worth considering as a last resort, especially if none of the other steps have produced the desired results. There are a number of high-performance, affordable laptops available for business use, which could prove instant fixes to the problems an old laptop is causing.
Researching new laptops is also a good time to assess your hardware needs, and plan out what exactly you want your laptop to achieve. For example, if you are a remote worker, or an employer seeking to provide remote employees with reliable hardware, you might want to consider the best laptops for working from home.
Adam Shepherd has been a technology journalist since 2015, covering everything from cloud storage and security, to smartphones and servers. Over the course of his career, he’s seen the spread of 5G, the growing ubiquity of wireless devices, and the start of the connected revolution. He’s also been to more trade shows and technology conferences than he cares to count.
Adam is an avid follower of the latest hardware innovations, and he is never happier than when tinkering with complex network configurations, or exploring a new Linux distro. He was also previously a co-host on the ITPro Podcast, where he was often found ranting about his love of strange gadgets, his disdain for Windows Mobile, and everything in between.
You can find Adam tweeting about enterprise technology (or more often bad jokes) @AdamShepherUK.
